MLC-3201 PC Monitor Read this booklet thoroughly before using and save it for future reference
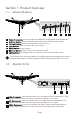
Section 1: Product Overview 1.1 – Monitor Buttons 2 1 1 2 3 4 5 6 7 3 4 5 6 7 Power Connector : Insert the power cable to supply power to the monitor. M Menu Button : Press to display the OSD menu or enter sub-menus. Down Button : Press to move down in the menus. Up Button : Press to move up in the menus. E Exit Button : Press to exit. Power Button : Press to turn the monitor on/off. LED Indicator : Changes colors to indicate status. Refer to Section 6.
Section 2: Stand Installation Keep the foam over the monitor before attaching the stand. Follow the steps below to finish the installation. 1. Open the package, take out the product with foam still attached, and gently place it on a desktop or table. Monitor Stand Base Stand Stem Foam 2. Take out the two parts of the stand, remove the foam covering the back of the monitor, and press the button to remove the stand plate. Stand Plate Button 3. Use the screwdriver and two 12mm NO.
Section 3: Mount Installation This monitor ONLY includes screws which may be used when attaching the monitor to a VESA 75x75mm type mount. No VESA mount or mounting accessory is included. 1. Open the package, take out the product with foam still attached, and gently place it on a desktop or table. If the monitor is attached to the stand, remove the stand. Stand Base Stand Stem Foam 2.
Section 4: Connectivity Options 4.1 – Removing the Port Cover Before connecting any cables, remove the port cover first. Port Cover Back of Monitor 4.2 – Connecting the Power Cable Connect the included power cable to the power connector, and then plug the other end into an wall outlet. Power Cable 4.3 – HDMI Connectivity In order for the monitor to receive HDMI signals from the computer, use the HDMI cable to connect the monitor to the computer.
Section 5: Basic Operation 1. Insert one end of the HDMI cable into your PC’s graphics card. For optimal refresh rate (or “performance”), it is recommended to use a HDMI cable with the monitor’s corresponding connector. 2. Connect the other end of the cable to the corresponding connector on your monitor. See the image below. VGA DVI HDMI AUDIO 3. Connect the power cable to your monitor then connect the other end to your power source.
Section 7: ECO Modes and Gameplus Switching 1.Press any one of the buttons (M, , ,E, ) to activate the navigation window. eco 2.Press button to switch Gameplus modes. According to the needs of your game, choose the corresponding game icon. These game icons are primarily designed to optimize your aim during shooting games, though they can be used for other scenarios. 3.Press button to switch ECO modes.
• ALL RIGHTS RESERVED, COPYRIGHT DENVER ELECTRONICS A/S www.denver-electronics.com Electric and electronic equipment contains materials, components and substances that can be hazardous to your health and the environment, if the waste material (discarded electric and electronic equipment) is not handled correctly. Electric and electronic equipment is marked with the crossed out trash can symbol, seen below.