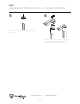
FIXIT Setbacks 12” L L WA WA L L 45” 60” 60” STR E ET T E RE ST PUMP An optional wheel catch is available to hold bikes with no kick stands 12” www.dero.
FIXIT Installation Instructions – Surface Mount TOOLS NEEDED RECOMMENDED BASE MATERIAL Hammer drill 3/8” masonry bit Hammer Socket Wrench 9/16” socket Tamper-proof socket (included)* Socket extension, 6” min. *Keep tool for future maintenance Solid concrete is the best base material for installation. To ensure the proper anchors are shipped with your rack, ask your Dero Rack representative which anchor is appropriate for your application.
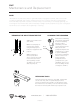
FIXIT Installation Instructions – Surface Mount 5 After installation is complete, please scan the QR code on the Fixit with a smartphone. This will allow us to add this Fixit station to our map available here: Nut Nut Tamper-proof nut http://www.dero.com/fixitmap/fixitmap.html Place the bike hanger in the desired position on top of the Fixit upright and attach with carriage bolts, washers and nuts. Pad recommendations for pouring along trail www.dero.
FIXIT Installation Instructions – In Ground Mount 1 2 13.5” Pour a 16” diameter by 36” deep concrete footing. Place the Fixit in the footing centered and plumb. The surface of the concrete to the hole on the side of the Fixit should be 13.25”. Support the Fixit and let the concrete set. 3 4 Decide which position the pump will be installed and hold it in place while marking where the anchor will go in the concrete. Drill a 3/8” x 3” hole in the concrete with a hammer drill and masonry bit.
FIXIT Installation Instructions – In Ground Mount 5 6 Insert the tool cables into the cable slot on the Fixit upright. Place the bike hanger in the desired position on top of the Fixit upright and attach with carriage bolts, washers and nuts. www.dero.
FIXIT Maintenance and Replacement NOTE: All threads for all parts of the pump are right-hand threads. They tighten clockwise, and loosen counterclockwise (“righty tighty, lefty loosey”). However, when you are looking top-town at a bolt that threads from underneath, if you move it counter-clockwise from your point of view, you are actually tightening, not loosening, the nut! This has led to some unnecessary breakage of pump parts.