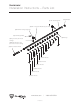
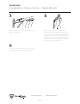
TRACK RACK Installation Instructions – Parts List (1) 96” Slotted Track (2)End Caps (2)3/8” x 2.5” Hex Head Cap Screws (2)Channel Trolley Supports (2)3/8” Flange Nuts (13)Trolleys (2)Lag Screws (for wood ceiling) (2)Wedge Anchors (for poured concrete ceiling) (1)Splice Slotted Track (2)5.5” Hooks (2)8.5” Hooks (2)11.5” Hooks (2)14.5” Hooks (2)17.5” Hooks (3)20.5” Hooks www.dero.
TRACK RACK Installation Instructions – Ceiling Mount TOOLS NEEDED RECOMMENDED BASE MATERIAL 9/16” Wrench/Socket 3/4” Wrench/Socket 1/4” Drill Bit or 3/8” Masonry Drill Bit (depending on anchor type) Tape Measure Drill (Hammer Drill Recommended) Hammer Level Saw for cutting track Note: if installing a ceiling mounted Track Rack, continue with the assembly by following the directions below. If installing a wall mounted or floor mounted model, assemble those units according to their instructions first.
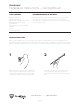
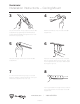
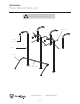
TRACK RACK Installation Instructions – Ceiling Mount 3 4 Secure the Channel Trolley Supports onto the 96” Slotted Track by tightening the Hex Head Cap Screws and Flange Nuts through the holes in the Channel Trolley Supports. Hammer an End Cap into one end of the 96” Slotted Track. 5 6 Insert the Trolleys into the open end of the 96” Slotted Track. Insert the hooks through the holes in the tabs that are hanging down from the Trolleys.
TRACK RACK Wall Mount Parts List (4) 24” Slotted Tracks (2) End Caps (2) Angle Brackets (2) Knee Braces (10) 1/2” Spring-loaded Nuts (10) 1/2” x 1” Hex Head Cap Screws (4)Lag Screws (for wood stud walls) (4)Sleeve Anchors(for concrete block walls) (4)Wedge Anchors (for poured concrete walls) www.dero.
TRACK RACK Installation Instructions – Wall Mount TOOLS NEEDED BEFORE INSTALLING 9/16” Wrench/Socket 3/4” Wrench/Socket 1/4” Drill Bit or 3/8” Masonry Drill Bit (depending on anchor type) Tape Measure Drill (Hammer Drill Recommended) Hammer Level Saw for cutting rack Solid concrete is the best base material. Brick, block, and wood stud walls may be acceptable. Metal stud walls are not an acceptable material for installation.
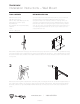
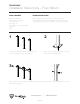
TRACK RACK Installation Instructions – Wall Mount 3 4 Make sure the horizontal Slotted Track is level. Adjust if necessary. Attach the Track Rack to the Wall Mount assemblies by securing the Channel Trolley Supports to the horizontal 24” Slotted Track with the remaining Spring-loaded Nut and Hex Head Cap Screw. The edge of the Slotted Track Mounting Bracket should be flush with the edge of the 24” Slotted Track.
TRACK RACK Floor Mount Parts List The floor mounted Track Rack MUST be anchored to the floor. This is NOT a freestanding unit Upright Brace Channel Support Upright Knee Brace (Optional wheel stop) www.dero.
TRACK RACK Installation Instructions – Floor Mount TOOLS NEEDED INSTALLATION STEPS 9/16” wrench/socket ¾” wrench/socket, qty. 2 3/8” masonry bit Tape measure Drill (hammer drill recommended) Hammer Level Before installing: Make sure the floor is strong enough to accommodate the rack fully loaded with bikes. Compare parts shipped with rack to parts list. Call Dero if any parts are missing. 1 2 Place the Uprights 48” apart from each other. See your rack layout for location and numbers.
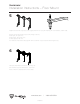
TRACK RACK Installation Instructions – Floor Mount 3b B) For double-sided units, fasten the Double-sided Uprights and Upright Braces to the Uprights with 3/8” x 3” bolts, 3/8” washers, 3/8” lock washers, and 3/8” nuts. 4 A) For single-sided units, attach Knee Braces to the first Upright and then every other Upright with 3/8” x 3” bolts, 3/8” washers, 3/8” lock washers, and 3/8” nuts. Anchor each Knee Brace by drilling a 3/8” hole and fastening with a wedge anchor.
TRACK RACK Installation Instructions – Floor Mount 5 Fasten the Channel Supports to the uprights with ½” x 3” bolts, ½” washers, ½” lock washers, and ½” nuts. Use the following Channel support mounting locations: 1st Upright, use right hole. 2nd Upright, use center hole. 3rd Upright, use left hole. For modular units each 3rd Upright will have a Channel Support at the left and right holes. 6 Insert the Track Rack or Bike File assembly into the Channel Supports and secure.