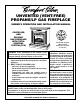
UNVENTED (VENT-FREE) PROPANE/LP GAS FIREPLACE OWNER’S OPERATION AND INSTALLATION MANUAL CGEFP33PR AND EFP33PR GAS FIREPLACE WITH TOTAL CONTROL SYSTEM (TCS) WARNING: If the information in this manual is not followed exactly, a fire or explosion may result causing property damage, personal injury, or loss of life. — Do not store or use gasoline or other flammable vapors and liquids in the vicinity of this or any other appliance. — WHAT TO DO IF YOU SMELL GAS • Do not try to light any appliance.
UNVENTED PROPANE/LP GAS FIREPLACE SAFETY INFORMATION WARNINGS IMPORTANT: Read this owner’s manual carefully and completely before trying to assemble, operate, or service this fireplace. Improper use of this fireplace can cause serious injury or death from burns, fire, explosion, electrical shock, and carbon monoxide poisoning. Due to high temperatures, the appliance should be located out of traffic and away from furniture and draperies. 4.
OWNER’S MANUAL LOCAL CODES SAFETY INFORMATION Install and use fireplace with care. Follow all local codes. In the absence of local codes, use the latest edition of The National Fuel Gas Code, ANS Z223.1, also known as NFPA 54*. Continued 16. Operating fireplace above elevations of 4,500 feet could cause pilot outage. 17. To prevent performance problems, do not use propane/LP fuel tanks of less than 100 lbs. capacity. *Available from: American National Standards Institute, Inc.
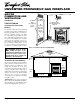
UNVENTED PROPANE/LP GAS FIREPLACE PRODUCT FEATURES OPERATION This vent-free fireplace is clean burning. It requires no outside venting. There is no heat loss out a vent or up a chimney. Heat is generated by realistic flames. When used without the blower in “manual ignition” mode, the fireplace requires no electricity to operate, making it ideal for emergency backup heat. SAFETY DEVICE This fireplace has a pilot with an Oxygen Depletion Sensing (ODS) safety shutoff system.
OWNER’S MANUAL AIR FOR COMBUSTION AND VENTILATION Continued DETERMINING FRESH-AIR FLOW FOR FIREPLACE LOCATION Determining if You Have a Confined or Unconfined Space Use this work sheet to determine if you have a confined or unconfined space. Space: Includes the room in which you will install fireplace plus any adjoining rooms with doorless passageways or ventilation grills between the rooms. 1. Determine the volume of the space (length x width x height). Length x Width x Height = _________________ cu. ft.
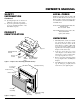
UNVENTED PROPANE/LP GAS FIREPLACE AIR FOR COMBUSTION AND VENTILATION Continued VENTILATION AIR Ventilation Air From Inside Building 12" Ventilation Grills Into Adjoining Room, Option 1 This fresh air would come from an adjoining unconfined space. When ventilating to an adjoining unconfined space, you must provide two permanent openings: one within 12" of the ceiling and one within 12" of the floor on the wall connecting the two spaces (see options 1 and 2, Figure 3).
OWNER’S MANUAL INSTALLATION NOTICE: This heater is intended for use as supplemental heat. Use this heater along with your primary heating system. Do not install this heater as your primary heat source. If you have a central heating system, you may run system’s circulating blower while using heater. This will help circulate the heat throughout the house. In the event of a power outage, you can use this heater as your primary heat source. WARNING: A qualified service person must install fireplace.
UNVENTED PROPANE/LP GAS FIREPLACE INSTALLATION Continued INSTALLATION SEQUENCE After unpacking fireplace (see UNPACKING, page 3), we suggest that you install your fireplace system in the following sequence: 1. Removal of fireplace floor assembly (required) 2. Electrical connections for power cord (required) 3. Relocating wall switch (optional) 4. Installing blower accessory (optional) 5. Connecting fireplace to gas supply (required) 6. Checking gas connections (required) 7.
OWNER’S MANUAL INSTALLATION Continued CAUTION: The wall switch must never be mounted directly above the fireplace where heat may damage it. If you relocate wall switch from lower fireplace cavity, it must be mounted either on side wall of mantel or on wall to side of fireplace. Burner Outlet Tube Wire Tie Gas Control Valve Switch with Wall Plate Figure 8 - Relocating Switch and Wall Plate 5.
UNVENTED PROPANE/LP GAS FIREPLACE INSTALLATION Continued 16. Position switch/plate assembly vertically over wall openings with decal lettering upright (see Figure 13). 17. Insert mounting screws, removed in step 2 of Relocating Wall Switch on page 9, through holes in wall plate and into wall anchors. 18. Tighten screws until wall plate is firmly attached to wall. Do not overtighten. Opening in Wall or Mantel Wall Wall Plate/ Switch Screws Figure 13 - Securing Wall Switch 10.
OWNER’S MANUAL INSTALLATION 9. Continued 8. Plug in blower power cord. a. If your fireplace system is installed as a freestanding unit with an accessory mantel, determine whether the power cord will exit the left side or the right side of the firebox. Install 1 plastic bushing provided into the 1.5" hole in the floor support bracket on the exit side (see Figure 16). Install the second plastic bushing provided into the 1.5" hole in the outer casing through which the power cord will exit.
UNVENTED PROPANE/LP GAS FIREPLACE INSTALLATION Continued INSTALLING THERMOSTATIC BLOWER ACCESSORY NOTICE: Shut-off gas supply and disconnect heater from gas supply if installing blower in previously installed fireplace. Contact a qualified service person to do this. 1. 2. 3. If fireplace screen and floor are still installed, see Removing Fireplace Screen and Floor Assembly, page 8. Using screw provided, attach green ground wire from speed control cord to blower housing.
OWNER’S MANUAL INSTALLATION Continued 13. Check to make sure that the power cord and all wires are completely clear of the blower wheel and that there are no other foreign objects in blower wheel. WARNING: Never touch the blower wheel while in operation. 14. Peel off backing paper and stick supplied wiring diagram decal near center of firebox bottom (see Figure 23).
UNVENTED PROPANE/LP GAS FIREPLACE INSTALLATION Continued INSTALLING GAS PIPING TO FIREPLACE LOCATION WARNING: A qualified service person must connect fireplace to gas supply. Follow all local codes. CAUTION: Never connect fireplace directly to the propane/LP supply. This fireplace requires an external regulator (not supplied). Install the external regulator between the fireplace and propane/ LP supply. Installation Items Needed Before installing fireplace, make sure you have the items listed below.
OWNER’S MANUAL Continued CONNECTING FIREPLACE TO GAS SUPPLY To Fireplace Gas Regulator Flexible Gas Line from Fireplace Gas Regulator ➞ INSTALLATION 4. 5. Attach the flexible gas line to gas supply (see Figure 26). Check tightness of flexible gas line attached to gas regulator of fireplace (see Figure 26). Check all gas connections for leaks. See Checking Gas Connections. Replace log base assembly back into fireplace. Feed flexible gas line into fireplace base area while replacing log base assembly.
UNVENTED PROPANE/LP GAS FIREPLACE INSTALLATION 5. Continued 6. Equipment Shutoff Valve 7. Propane/LP Supply Tank 8. 9. Route flexible gas line through access hole in hearth base. Center cabinet mantel on hearth base (see Figure 30). Make sure mantel is flush against wall. Break off nailing flanges (see Figure 31) with hammer or pliers. Place cardboard or other protective material on top of hearth base. Carefully set fireplace on protective material, with back of fireplace inside mantel opening.
OWNER’S MANUAL INSTALLATION Continued 10. Route electrical cord(s) through access holes in either side of fireplace with bushing. Plug electrical cord(s) into electrical outlet. 11. Carefully insert fireplace into cabinet mantel. Be careful not to scratch or damage hearth base, cabinet mantel, or any laminate trim on hearth base. Remove protective material from top of hearth base and from front of fireplace (if any). Note: You can secure fireplace to hearth or floor. Open lower louver.
UNVENTED PROPANE/LP GAS FIREPLACE INSTALLATION 6. Continued 7. 8. Mantel Clearances for Built-In Installation If placing mantel above built-in fireplace, you must meet minimum clearance between mantel shelf and top of fireplace opening. Wall board or facing material (above firebox) may be of combustible material, including decorative mantel ornaments or other similar projections off of the facing material.
OWNER’S MANUAL INSTALLATION 2. Continued INSTALLING LOGS (CGEFP33PR) WARNING: Failure to position the parts in accordance with these diagrams or failure to use only parts specifically approved with this heater may result in property damage or personal injury. CAUTION: After installation and periodically thereafter, check to ensure that no flame comes in contact with any log. With the heater set to HIGH, check to see if flames contact any log.
UNVENTED PROPANE/LP GAS FIREPLACE INSTALLATION 3. Continued 1. 2. Place the base of the middle log (#1) in the U-shaped slots of the grate base. The cutout on the right of the middle log should fit over the burner (see Figure 44). Make sure the front of the middle log is resting on the tabs of the grate base and the cutout area is centered over the burner “U” bend. Locate pegs on the bottom of back log (#2). Slide these pegs into the holes in the grate base behind the burner (see Figure 45). 4.
OWNER’S MANUAL NORMAL LIGHTING INSTRUCTIONS OPERATING FIREPLACE FOR YOUR SAFETY READ BEFORE LIGHTING WARNING: You must operate this heater with the fireplace screen in place. Make sure fireplace screen is in place before running heater. WARNING: If you do not follow these instructions exactly, a fire or explosion may result causing property damage, personal injury or loss of life. NOTICE: During initial operation of new heater, burning logs will give off a paper-burning smell.
UNVENTED PROPANE/LP GAS FIREPLACE OPERATING FIREPLACE Continued 4. 5. When pilot flame is lit, the thermocouple is heated by the flame. When thermocouple becomes hot (5 to 15 seconds), main burner will automatically light on high flame. To lower flame, point remote control toward lower front of fireplace and push HI/LO button once. Note: This fireplace does not have a pilot-only mode. TO TURN OFF GAS TO APPLIANCE Shutting Off Heater - Wall Switch Push ON/OFF button on wall switch once.
OWNER’S MANUAL INSPECTING BURNERS Check pilot flame pattern and burner flame patterns often. PILOT FLAME PATTERN Figure 53 shows a correct pilot flame pattern. Figure 54 shows an incorrect pilot flame pattern. The incorrect pilot flame is not properly heating the thermocouple. When the thermocouple cools, the heater will shut down.
UNVENTED PROPANE/LP GAS FIREPLACE TROUBLESHOOTING Note: For additional help, visit DESA International’s technical service web site at www.desatech.com. WARNING: Turn off heater and let cool before servicing. Only a qualified service person should service and repair heater. CAUTION: Never use a wire, needle, or similar object to clean ODS/pilot. This can damage ODS/ pilot unit. Note: All troubleshooting items are listed in order of operation.
OWNER’S MANUAL TROUBLESHOOTING Continued OBSERVED PROBLEM POSSIBLE CAUSE REMEDY Heater produces a whistling noise when burner is lit 1. Turning control knob to HI position when burner is cold 2. Air in gas line 1. Turn control knob to LO position and let warm up for a minute 2. Operate burner until air is removed from line. Have gas line checked by local propane/LP gas company 3. Observe minimum installation clearances (see pages 8 through 10) 4.
UNVENTED PROPANE/LP GAS FIREPLACE TROUBLESHOOTING Continued WARNING: If you smell gas • Shut off gas supply. • Do not try to light any appliance. • Do not touch any electrical switch; do not use any phone in your building. • Immediately call your gas supplier from a neighbor’s phone. Follow the gas supplier’s instructions. • If you cannot reach your gas supplier, call the fire department. IMPORTANT: Operating fireplace where impurities in air exist may create odors.
OWNER’S MANUAL WIRING DIAGRAM Note: For proper operation, the wires must be connected exactly as shown in wiring diagram. See page 31 for number key. 20 40 31 39 27 5 18 30 37 43 17 35 36 107570 27 For more information, visit www.desatech.
UNVENTED PROPANE/LP GAS FIREPLACE SPECIFICATIONS Btu (Variable) Type Gas Ignition Pressure Manifold Inlet Gas Pressure (in. of water) Shipping Weight * For input adjustment 20,000/33,000 Propane/LP Gas Only Electronic (Automatic)/Piezo (Manual) 3.5" W.C. Maximum Minimum* 122 lbs. 10.5" 5" REPLACEMENT PARTS Note: Use only original replacement parts. This will protect your warranty coverage for parts replaced under warranty. PARTS UNDER WARRANTY Contact authorized dealers of this product.
OWNER’S MANUAL PARTS DEALERS These Parts Dealers are privately owned businesses. They have agreed to support our customer’s needs by providing original replacement parts and accessories. Baltimore Electric Washer Equipment Co. LA Porte’s Parts & Service 1348 Dixwell Avenue Hamden, CT 06514-0322 1-800-397-7553 203-248-7553 Parts Department 1715 Main Street Kansas City, MO 64108-2195 KS, MO, AR 816-842-3911 www.washerparts.com 2444 N.
UNVENTED PROPANE/LP GAS FIREPLACE ILLUSTRATED PARTS BREAKDOWN 2 REMOTE CONTROL FIREPLACE EFP33PR AND CGEFP33PR (LOGS FOR CGEFP33PR SHOWN) 4 1 5 7 6 10 38 26 27 11 9 12 13 3 14 15 32 36 42 35 19 37 21 18 20 22 16 41 23 33 44 30 31 40 28 25 17 43 24 8 34 13 39 29 For more information, visit www.desatech.
OWNER’S MANUAL PARTS LIST REMOTE CONTROL FIREPLACE EFP33PR AND CGEFP33PR This list contains replaceable parts used in your fireplace. When ordering parts, follow the instructions listed under Replacement Parts on page 28 of this manual. KEY NO.
UNVENTED PROPANE/LP GAS FIREPLACE ILLUSTRATED PARTS BREAKDOWN 6 1 FIREBOX 7 2 10 14 9 9 14 12 5 14 14 19 13 5 4 3 14 15 16 8 14 11 For more information, visit www.desatech.
OWNER’S MANUAL PARTS LIST This list contains replaceable parts used in your fireplace. When ordering parts, follow the instructions listed under Replacement Parts on page 28 of this manual. FIREBOX KEY NO.
UNVENTED PROPANE/LP GAS FIREPLACE CORNER MANTEL ACCESSORY WITH FIREPLACE PERIMETER BRASS TRIM (Not Shown) ACCESSORIES Purchase these fireplace accessories from your local dealer or Parts Dealers list on page 29. If they can not supply these accessories, call DESA International’s Sales Department at 1-800-458-2472 for referral information. You can also write to the address listed on the back page of this manual.
OWNER’S MANUAL 3/8" Diameter 2 Holes 1/8" Diameter 2 Holes 3/4" 3/4" CUT HERE 4 3 /4 " 4 3 /4 " 3 3 /4 " 3 3 /4 " 3/8" 3/8" 3/16" Template 1 - Relocating Wall Switch to Hollow Room Wall 107570 35 Template 2 - Relocating Wall Switch to Side Wall of Mantel For more information, visit www.desatech.
UNVENTED PROPANE/LP GAS FIREPLACE THIS PAGE INTENTIONALLY LEFT BLANK For more information, visit www.desatech.
OWNER’S MANUAL NOTES _______________________________________________________________________________________________ _______________________________________________________________________________________________ _______________________________________________________________________________________________ _______________________________________________________________________________________________ _______________________________________________________________________________________________ ___________
WARRANTY INFORMATION KEEP THIS WARRANTY Model Serial No. Date Purchased Always specify model and serial numbers when communicating with the factory. We reserve the right to amend these specifications at any time without notice. The only warranty applicable is our standard written warranty. We make no other warranty, expressed or implied.