PORTABLE FORCED AIR HEATERS OWNER’S MANUAL RM115 - 115,000 Btu/Hr and RM155 - 155,000 Btu/Hr H.S.I. Series IMPORTANT: Read and understand this manual before assembling, starting, or servicing heater. Improper use of heater can cause serious injury. Keep this manual for future reference.
115,000 and 155,000 Btu/Hr H.S.I. Series PORTABLE FORCED AIR HEATERS SAFETY INFORMATION WARNINGS IMPORTANT: Read this Owner’s Manual carefully and completely before trying to assemble, operate, or service this heater. Improper use of this heater can cause serious injury or death from burns, fire, explosion, electrical shock, and carbon monoxide poisoning.
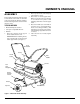
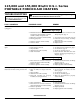
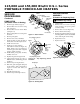
OWNER’S MANUAL ASSEMBLY 2. These models are furnished with wheels and a front handle. Some models are furnished with a rear handle also. Wheels, handle(s), and the mounting hardware are found in the shipping carton. 3. 4. TOOLS NEEDED • Medium Phillips Screwdriver • 3/8" Open or Adjustable Wrench • Hammer 1. Slide axle through wheel support frame. Install wheels on axle. IMPORTANT: When installing wheels, point extended hub of wheels toward wheel support frame (see Figure 1). 5.
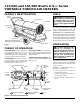
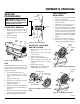
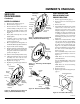
115,000 and 155,000 Btu/Hr H.S.I. Series PORTABLE FORCED AIR HEATERS PRODUCT IDENTIFICATION FUELS Hot Air Outlet Upper Shell Fan Guard Lower Shell Fuel Cap Fuel Tank Ignition Control Assembly (assembly on inside of side cover) Power Cord Figure 2 THEORY OF OPERATION The Fuel System: The air pump forces air through the air line. The air is then pushed through the nozzle. This air causes fuel to lift from the tank. A fine mist of fuel is sprayed into the combustion chamber.
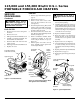
OWNER’S MANUAL OPERATION 5. WARNING: Review and understand the warnings in the Safety Information section, page 2. They are needed to safely operate this heater. Follow all local codes when using this heater. 1. 2. 3. 4. TO STOP HEATER Unplug extension cord from outlet. TO RESET HEATER 1. TO START HEATER Follow all ventilation and safety information. Fill fuel tank with kerosene or No. 1 fuel oil. Attach fuel cap. Plug power cord of heater into three-prong, grounded extension cord.
115,000 and 155,000 Btu/Hr H.S.I. Series PORTABLE FORCED AIR HEATERS TROUBLESHOOTING WARNING: Never service heater while it is plugged in, operating, or hot. Severe burns and electrical shock can occur. Note: For additional help, visit DESA International’s Technical Service web site at www.desatech.com. FAULT CONDITION POSSIBLE CAUSE REMEDY Motor does not start five seconds after heater is plugged in 1. No power to heater 1. Check circuit breaker in electrical panel WARNING: High voltage! 2.
OWNER’S MANUAL PUMP PRESSURE ADJUSTMENT SERVICE PROCEDURES Fan WARNING: Never service heater while it is plugged in, operating, or hot. Severe burns and electrical shock can occur. 1. Motor 2. 3. Flush UPPER SHELL REMOVAL 1. 2. 3. Remove screws along each side of heater using 5/16" nut-driver. These screws attach upper and lower shells together. Lift upper shell off. Remove fan guard. Upper Shell Fan Guard Motor Shaft Setscrew 5. 6.
115,000 and 155,000 Btu/Hr H.S.I. Series PORTABLE FORCED AIR HEATERS SERVICE PROCEDURES Continued WARNING: Never service heater while it is plugged in, operating, or hot. Severe burns and electrical shock can occur. IGNITOR 1. 2. 3. 4. FUEL FILTER 1. 2. 3. 4. 5. 6. 7. Remove side cover screws using 5/16" nut-driver. Remove side cover. Pull upper fuel line off fuel filter neck. Carefully pry bushing, fuel filter, and lower fuel line out of fuel tank. Wash fuel filter with clean fuel and replace in tank.
OWNER’S MANUAL SERVICE PROCEDURES Continued NOZZLE ASSEMBLY 1. 2. 3. 4. 5. 6. 7. 8. 9. 10. 11. 12. 13. Remove upper shell (see page 7). Remove fan (see page 7). Remove fuel and air line hoses from nozzle assembly (see Figure 12 or 13). Turn nozzle assembly 1/4 turn to left and pull toward motor to remove (see Figure 14). Place plastic hex-body into vise and lightly tighten. Carefully remove nozzle from the nozzle adapter using 5/8" socket wrench (see Figure 15).
115,000 and 155,000 Btu/Hr H.S.I. Series PORTABLE FORCED AIR HEATERS SERVICE PROCEDURES Blade Pump Plate Air Intake Filter Filter End Cover Continued IGNITION CONTROL ASSEMBLY (Procedure for Replacing Fuse) WARNING: High Voltage PUMP ROTOR (Procedure if Rotor is Binding) 1. 2. 3. 4. 5. 6. 7. 8. 9. 10. 11. 12. 13. 14. 15. 16. Remove upper shell (see page 7). Remove filter end cover screws using 5/16" nut-driver. Remove filter end cover and air filters (see Figure 17).
OWNER’S MANUAL WIRING DIAGRAM Ignitor Yellow Yellow Ignitor Red Motor Main Black Power Plug 120V/60Hz 120V (L1) AC Neutral (L2) Motor Green Green Ignition Control White White Motor Return Ignitor Blue Photocell Photocell Photocell Blue Figure 21 - Wiring Diagram SPECIFICATIONS Output Rating (Btu/Hr) 115,000 155,000 Fuel Use Only Kerosene or No. 1 Fuel Oil Fuel Tank Capacity (U.S. Gal.) 9.0 13.5 Fuel Consumption (Gal. Per Hr.) .85 1.
115,000 and 155,000 Btu/Hr H.S.I.
OWNER’S MANUAL PARTS LIST This list contains replaceable parts used in your heater. When ordering parts, be sure to provide the correct model and serial numbers (from the model plate), then the part number and description of the desired part. RM115 RM155 KEY NO.
115,000 and 155,000 Btu/Hr H.S.I. Series PORTABLE FORCED AIR HEATERS PARTS LIST PARTS AVAILABLE - NOT SHOWN PART NUMBER DESCRIPTION 098493-01 General Information Decal QTY. 1 WHEELS AND HANDLE PARTS LIST KEY PART NO.
OWNER’S MANUAL REPLACEMENT PARTS Note: Use only original replacement parts. This will protect your warranty coverage for parts replaced under warranty. PARTS UNDER WARRANTY Contact authorized dealers of this product. If they can’t supply original replacement part(s), call DESA International’s Technical Service Dept. at 1-800-323-5190.
WARRANTY AND REPAIR SERVICE WARRANTY SERVICE LIMITED WARRANTY DESA International warrants this product and any parts thereof, to be free from defects in materials and workmanship for one (1) year from the date of first purchase when operated and maintained in accordance with instructions. This warranty is extended only to the original retail purchaser, when proof of purchase is provided. This warranty covers only the cost of parts and labor required to restore the product to proper operating condition.