
Owner's Manual

www.desatech.com
111244-01G 5
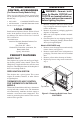
OPTIONAL REMOTE
CONTROL ACCESSORIES
There are four optional remote controls that
can be purchased separately for Remote-Ready
Models only:
• wall switch •
hand-held ON/OFF remote
• wall thermostat
• hand-held thermostat remote
See Accessories, page 44.
LOCAL CODES
Install and use replace with care. Follow all local
codes. In the absence of local codes, use the lat-
est edition of The National Fuel Gas Code ANSI
Z223.1/NFPA 54*.
*Available from:
American National Standards Institute, Inc.
1430 Broadway
New York, NY 10018
National Fire Protection Association, Inc.
Batterymarch Park
Quincy, MA 02269
PRODUCT FEATURES
This replace has a pilot with an Oxygen Deple-
tion Sensing (ODS) safety shutoff system. The
ODS/pilot is a required feature for vent-free room
replaces. The ODS/pilot shuts off the replace if
there is not enough fresh air.
This replace has a piezo ignitor. This system
requires no matches, batteries, or other sources
to light replace.
THERMOSTATIC HEAT CONTROL
FOR THERMOSTAT-CONTROLLED
MODELS
Thermostat-Controlled models have a thermostat
sensing bulb and a control valve. The thermostat
will automatically modulate the heat output to
maintain a consistent room temperature. This
results in greater replace comfort. This can also
result in lower gas bills.
UNPACKING
WARNING: Ceramic brick
liners for Models CDCFNR and
-
per louver and must be removed
1. Remove fireplace and hood from carton.
Log is wrapped and inside replace. Do not
remove at this time.
2. Remove all protective packaging applied to
replace for shipment.
3. Make sure your replace includes one hard-
ware packet.
4. Check replace for any shipping damage. If
replace is damaged, promptly inform dealer
where you bought replace.
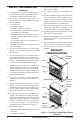
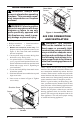
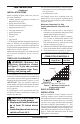
1. Remove screws from top louver and carefully
remove louver (see Figure 2).
2. Remove ceramic brick liners with protective
packaging. The brick liners will be installed
later.
3. Remove yellow sticker from top of rebox.
4. Replace top louver using screws removed in
step 1.
Figure 2 - Removing Brick Liners From
CDCFNR/PR
Top Louver
Screws
Wrapped
Brick Liners