
Installation Guide

ASSEMBLY INSTRUCTION
SKU#516732
NOTE: Please consult a qualified electrician if you are not certain of the installation.
CAUTION: Before starting the installation or service, disconnect the power by turning off the circuit
breaker or removing the fuse at the fuse box. Use silicon caulking to seal between wall plate and wall.
Leave bottom unsealed so moisture can drain out.
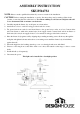
1. Carefully unpack the fixture, lay out all parts on a clean surface.
2. Attach the cross bar to outlet box using provided outlet box screws.
3. Tie ground wire from outlet box and from fixture to the ground screw on the cross bar. Connect white
wire from fixture to white wire (neutral wire) from supply circuit. Connect black wire from fixture to
black wire (live wire) from supply circuit. Cover connections using provided wire connectors.
4. Place the fixture body against wall by aligning the protruding mounting screws all the way through the
wall plate and tighten lock nuts and washers to mounting screws until the fixture body is held firmly
against the wall.
5. Fasten the nipple into the bushing. Attach top cover over the nipple and screw with finial.
6. Unscrew socket ring from socket. Place shade over socket, and reattach socket ring to socket to secure
shade.
7. Install the bulb (sold separately).
8. Reconnect the power.
This light can be installed in a downlight position.