
Installation Guide

INSTALLATION PROCEDURE
ALWAYS protect your eyes with safety glasses.
SAFETY TIPS
When installing your new faucet, hand tighten the connector nuts, then use one wrench to
anchor the fitting and a second wrench to tighten the nut one additional turn. Connections that
are too tight will reduce the integrity of the system.
IMPORTANT POINTS
Helpful tools to install this faucet:
Your new Design House faucet will give you years of trouble free performance. Thank you for
choosing our product for your home. Please read all of these instructions carefully before
installing your new faucet.
(2) crescent wrenches
Teflon tape
basin wrench
faucet supply tubes
flashlight
silicon sealer
Models 522946, 522953, 522961, 522979
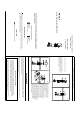
AIR GAP
Design House is a registered
brand of DHI Corp.
Mequon, WI 53092
1-800-558-8700
MAINTENANCE
Brass finishes are polished, then protected with a lacquer coating to help prevent tarnishing. Clean these
surfaces only with a damp, soft cloth.
Your new Design House faucet is designed to give you years of trouble free performance. Keep it looking
new by cleaning it periodically with a soft cloth. Avoid abrasive cleaners, steel wool and harsh chemicals
that will dull the finish and void your warranty
To reduce the amount of lead in your drinking water, allow the water to run for a moment before
filling your glass and remember to always use cold water for drinking purposes.
Under the Safe Drinking Water Act, the U.S. Environmental Protection Agency restricts the
amount of lead used in brass and solder. Your new faucet is made in strict compliance with
all government standards. The materials used in the manufacture of this faucet are of industry
standard quality and are similar to other plumbing products having brass fittings.
CONSUMER PROTECTION WARNING
1
2
2.Insert air gap (2A) through sink deck hole,
leaving approximately 1/2 '' of the body
threads showing above sink deck. (Back the
nut (2B) down if necessary).
4.Connect dishwasher outlet hose (5/8 ''
I.D.) (4A) to air gap inlet (smaller diameter
leg) (4B) and to dishwasher outlet (4C) using
hose clamps (4D). Connect drain hose (7/8 ''
I.D.) (4E) to air gap outlet (larger dimension
leg) (4F) and to "Y" fitting (4G) or disposer
(4H) using hose clamps. (4A, 4C, 4D, 4E,
4G, 4H are not included).
4
3
3.Thread ribbed nut (3A) fully onto body.
Tighten nut (3B) firmly. Snap cap (3C)
onto ribbed nut, with the slotted vents
(3D) facing the wall.
Note: Air gap to be installed that the flood
level mark (F/L) shall be at or above the
flood level of the sink or other receptacle
which may be connected to the sanitary
drain into which the air gap discharges.
1.Remove cap (1A) and ribbed nut (1B).
OR
(F/L)
1A
1B
2A
2B
3C
3A
3D
3B
4B
4D
4F
4D
4E
4D
4A
4C
4G
4D
4D
4H