
Installation Sheet


Your new Design House faucet will give you years of trouble free performance. Thank you for
choosing our product for your home. Please read all of these instructions carefully before
installing your new faucet.
When installing your new faucet, hand tighten the connector nuts, then use one wrench to
anchor the fitting and a second wrench to tighten the nut one additional turn. Connections that
are too tight will reduce the integrity of the system.
Wrap threaded
connections (except aerator thread in spout or where o-ring or rubber sealant
are present) with Teflon tape available from your local hardware or plumbing supply store.
Always wrap in a clockwise direction.
IMPORTANT POINTS
SAFETY TIPS
ALWAYS protect your eyes with safety glasses.
Helpful tools to install this faucet:
Teflon tape
(2) crescent wrenches
basin wrench
flashlight
faucet supply tubes
silicon sealer
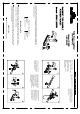
1.Shut off water supplies.
Remove old faucet. Place gasket
(1)on
bottom of new faucet. If your
model has a spray, proceed to
step 2.
If your model does not have a
spray skip to step 4.
2.Mount spray support in far right
hole in sink.
3.Insert spray hose down through
support and sink. Attach spray hose
to spray hose nipple underneath
center of faucet.
4.Place faucet in position on
sink. From under sink, thread
mounting nuts onto faucet.
Tighten mounting nuts.
5.Make connections to water lines.
Use 1/2" IPS faucet connections
(5A, not included) o
r use the
supplied coupling nuts (5C, not
included) with 3/8"O.D.ball-nose
risers (5B, not included). Use
wrenches to tighten connections.
Do not overtighten.
6.Important: After installation
is completed, Remove
aerator(1). Turn on hot and
cold water supplies. Turn
handles to full open position
for one minute. Check for
leaks. Replace aerator.
OR
5C
5B
5A
6A