
Installation Guide


o 547380 - Polished Chrome
Problem: Faucet leaks from under handle.
Cause: Bonnet is loose or o-ring on cartridge is
dirty or twisted.
Action:
1. Move handle to OFF position. Remove the index
and unscrew the screw on handle, then remove the
handle.
2.Tighten the bonnet by turning it clockwise. Move
the cartridge stem to the ON position. The leak
should stop around the cartridge stem.
3. If the leak does not stop, shut off the water supply.
Remove the bonnet by turning it counter-clockwise.
Lift cartridge off body and remove cartridge seal.
Clean cartridge ports and cartridge seal. Place
cartridge seal into cartridge ports or replace if
necessary.
4. Replace the cartridge making sure the wings fit
well into the cuts in the faucet body. Tightly screw
the bonnet onto the faucet body.
5. Reinstall the handle.
Problem: Faucet leaks around aerator or an improper
flow pattern.
Cause: Aerator is incorrectly fitted or is dirty.
Action:
1. Unscrew the aerator. Make sure all internal parts
are laying flat.
2. If there is debris, gently flush all parts inside.
3. Reinstall the aerator.
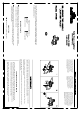
Many of these parts come preassembled.
This exploded diagram is to assist in trouble
shooting.
Index
Screw
Handle
Washer
Cartridge
Bonnet
Coupling nut
Mounting nut
Aerator
Disc
Disc spring
Lift rod &
Lift rod knob
4. Place one end of the spring clip (1)
onto the end of the horizontal rod (2).
Insert the horizontal rod (2) through a
hole on the strap (3). Connect the other
end of the spring clip (1) to the
horizontal rod (2). Insert the lift rod (4)
into the strap and tighten the screw (5).
2. Apply the silicone to the underside of the flange
(2). Insert the pop-up body (1) into the drain hole
from below sink. Screw the flange (2) into the pop-up
body (1). With the pivot hole (3) facing toward faucet,
use groove joint pliers to tighten the nut (4), do not
over tighten. Do not turn the pop-up while tightening
the nut, or sealant may not seal drain. Clean excess
putty. Apply thread sealant tape to the top threads of
the tailpiece (5) in a clockwise direction, as shown
and hand tighten.
3. Install the horizontal rod (2) and
the stopper (3) as shown (4). Hand
tighten the pivot nut (1).
1. Remove the stopper (1) and the flange (2). Screw
the brass nut (3) all the way down. Push the plastic
washer (4) and the gasket (5) down. Unscrew the
pivot nut (6) from the pop-up body (7) and remove
the seal washers (8). Take off the spring clip (9)
from the horizontal rod (10). Remove the tailpiece
(11) from the pop-up body (7).
1
3
2
4
5
10
9
6
8
7
11
3
4
2
5
1
3
1
2
4
3
4
2
5
1
Screw
Strap
Clip
Washer
Pivot nut
Pivot Rod
& Ball
Body
Washer
Nut
Gasket
Washer
Flange
Stopper