ASSEMBLY INSTRUCTIONS Three Drawer Base Cabinet 562033, 562041, 562058, 561449, 561456, 561464 -1-
Unpacking Precautions If using a sharp object to unpack the cabinet components and the packing materials, be careful to avoid scratching or damaging the cabinet components. The various packing materials may be used to protect the cabinet components during assembly. During the unpacking process, place the various components away from and to the side of the work area so that they will not be inadvertently knocked over or otherwise damaged.
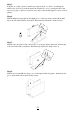
Step 3 Using the wood glue, squeeze a small bead of glue in all grooves before assembling the cabinet sides, bottom, top and back panels. Be careful not to use too much glue, this could cause access glue to squeeze out and onto the panels, if this should happen, be sure to remove quickly. Step 4 Slide the Right side panel (R) into the Right groove of the face frame, and mount the male clip to the face frame with the screwdriver. Each male clip will need 2 small screws (l).
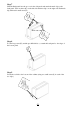
Step 7 Slide the Back panel into the grooves in the side panels and attach the male clips to the back panel. There’re three clips on the left side and three clips on the right side. Each male clip will need 2 small screws(I). Step 8 Use the long screws(K), and the pre-drilled holes , to attach the back panel to the edges of the bottom panel. Step 9 Secure the toe kick to the bottom of the cabinet (using two small screws(I) in each of the two clips).
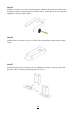
Step 10 Remove the drawer glides from the carton, and separate them into sets: exterior and bottom parts. Exterior Bottom Step 11 Using one small screw attach the glide brackets to the interior back panel using the predrilled holes. Optional Holes: Exterior two sets are optional for soft-closing drawer glide Optional Holes Step 12 Using one small flat head screws to attach both left and right exterior drawer glides to the interior edge of the face frame left & right for each drawer.
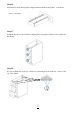
Step 13 Align the dovetails of one of the side drawer panels with the teeth on the back drawer panel and gently seat the side drawer panel into the back drawer panel. This can be done by gently tapping the side with a rubber mallet. Step 14 Slide the drawer bottom into the grooves in the sides and back drawer panel until it is fully seated. Step 15 Attach the drawer fronts to the drawer box by aligning the dovetails of drawer panels with the teeth on the front drawer panel and gently seat as above.
Step 16 Attached the bottom drawer glides using the flat head small screws(I) three on each side. Turn over the drawer Step 17 Install the drawers into the cabinet by aligning the bottom glides with the exterior glides in the cabinet. Step 18 Use two medium size screws(J) to attach 4 wooden triangle blocks in all four corners of the top of the cabinet.