GLASSBLOCK assembly instructions Mortar Glass Block Installation System www.sevesglassblock.
Seves Glass Block Mortar Glass Block Installation System Assembly Instructions Introduction: The Mortar I System utilizes Seves Glass Block perimeter channels on all four sides. You will also use Universal Mortar Spacers and glass block mortar to produce clean, consistent 1/4" joints and a traditional grid look. The Mortar II System does not use the Seves Glass Block perimeter channels but instead utilizes expansion strips, panel reinforcing and panel anchors.
Note: All glass block panels are non-load bearing, so adequate provisions must be made for support of construction around the panel. The joints of the Mortar I and Mortar II Systems utilize D WUDGLWLRQDO LQVWDOODWLRQ PHWKRG XVLQJ D PRUWDU ÀQLVK for the classic “grid” look. Glass block sealant should be used to seal the perimeter on both sides of the panel. Before you begin installing your glass blocks, decide which installation method is right for your project.
Mortar I System The tools required for the Mortar I glass block installation system are a margin trowel, mortar pan, polyfoam brush, sponge, tin snips, screwdriver or power GULOO ÀQH WRRWK VDZ RU PLWHU VDZ FDXONLQJ JXQ XWLOLW\ NQLIH PHWDO ÀOH WDSH PHDVXUH " to 1/2" striking tool and 2' level. 1. Prepare The Rough Opening A. Make sure the opening is the correct size. To determine the correct size of the rough opening, add 1/4" to the sum of the nominal block sizes for both the height and width.
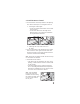
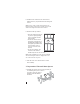
2. Install Perimeter Channel $ &XW WKH FKDQQHO WR ÀW WKH SHULPHWHU RI WKH RSHQLQJ The channel ends may be cut straight or mitered. a. If cutting the ends straight: • Cut the top and bottom channels to the width of the opening. • Cut the side channels to the height of the RSHQLQJ PLQXV VR WKH\ ZLOO ÀW EHWZHHQ the top and bottom channels. 45° b. If mitering the ends, make all cuts at a 45° angle. B. Cut the top channel in half lengthwise with a utility knife.
D. Install the side channels in the same manner making sure they are plumb before attaching with screws. Note: You may want to slide a glass block into the bottom channel at both corners to make sure the side channels are aligned with the bottom channel. E. Install the half top channel: • Place the half channel in the top of the opening making sure it is aligned with the side channels.
B. Modify the spacers using tin snips based on their location: • Where four block come together, spacers are used as assembled. These are called “REGULAR”. “REGULAR” Spacer • Where block meet the side perimeter channel, clip off both sets of smooth legs. Twist-off tabs remain in place. File off any burrs so the spacer ZLOO OD\ ÁDW 7KHVH DUH called “FLAT”. “REGULAR” Spacer 0RGLÀHG &DOOHG “FLAT” • For the top row of block, clip off one upper toothed leg and cut the twist off tab in half.
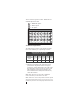
This is a reference guide for where “REGULAR” and PRGLÀHG VSDFHUV DUH XVHG = “REGULAR” Spacer = “FLAT” Spacer = “H” Spacer 4. Mortar Preparation The following gives an idea of the number of blocks that can be installed per 50 pound bag of mortar. White Premixed Glass Block Mortar Number of blocks per 50 lb. bag of mortar Block Sizes (Nominal) 4" x 8" 6" x 6" 6" x 8" 8" x 8" 12" x 12" No. of 4-in Series (4"thick) 34 34 30 26 18 No.
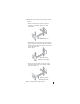
5. Install The First Row A. Place two glass blocks in the sill channel, sliding one block into the right jamb and one block into the left jamb. Make sure the blocks are seated in the channels. Note: No mortar is applied to the edges of the blocks that meet the channel. DO NOT apply mortar to the channels. 5A B. Install the next block: • Apply 3/8" to 1/2" of mortar to the edge of the next block. • Place the block in the channel with the mortar facing a previously installed block.
& ,QVWDOO WKH UHPDLQLQJ EORFNV LQ WKH ÀUVW URZ LQ WKH same manner. • Apply 3/8" to 1/2" of mortar to both edges of the last block installed in the row. • Be sure to insert “REGULAR” spacers with the cross arm down, where two blocks meet. 3XVK WKH EORFNV ÀUPO\ in place, forming 1/4" mortar joints. Make sure 5C the joints are FRPSOHWHO\ ÀOOHG with mortar. 5D D. Remove excess mortar with a polyfoam brush, DQG ÀOO DQ\ YRLGV RQ ERWK VLGHV RI WKH SDQHO 6.
& 6HW WKH ÀUVW EORFN DQG ODVW EORFN RI WKH QH[W URZ into the side channels on top of the “FLAT” spacers. 6C D. Install the remaining blocks in the row in the same PDQQHU DV WKH ÀUVW URZ • Apply 3/8" to 1/2" of mortar to the edge of each block that meets a previous block. Apply mortar to both edges of the last block installed in the row. • Be sure to insert “REGULAR” spacers with the cross arm down, where two blocks meet. 3XVK WKH EORFNV ÀUPO\ LQ SODFH IRUPLQJ mortar joints.
F. Install the next to last row of block using “H” spacers in place of “REGULAR” spacers. Insert “H” spacers and “FLAT” spacers as shown. 6F G. Lay a bed of mortar on top of the next to last row, installing “FLAT” spacers at each corner. Note: For ease of block placement, you may want to snap off the tab of the “FLAT” spacer before placing both corner blocks. H. Install the last row of block starting with a block in each top corner, then work toward the middle.
I. Press any mortar that has been forced out back into the joints using a polyfoam brush. J. Remove all mortar from the glass block faces. 7. Finishing Note: Allow the mortar to set up for about one hour before proceeding. Note: To prevent scratching of the glass DO NOT use abrasive materials for this cleanup. A. Twist off the spacer tabs on both sides of the panel. 7B 7A B. With moderate pressure, run the striking tool over all the joints.
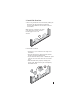
' 8VH D VRIW GU\ FORWK WR UHPRYH WKH H[FHVV ÀOP $ common household plastic scouring pad can also be used. E. Cut the expansion strip to a 1-1/2" width and insert it between the top of the blocks and the frame. 7F 7E 7G F. Apply sealant to the back of the half-section of channel and install it between the expansion strip and frame. G. Apply glass block sealant around the perimeter to seal the glass block and channel. Also seal the top channel to the frame at the head.
Mortar II System The tools required for the Mortar II glass block installation system are a margin trowel, mortar pan, 2 polyfoam brushes, sponge, tin snips, screwdriver RU SRZHU GULOO FDXONLQJ JXQ XWLOLW\ NQLIH PHWDO ÀOH tape measure, 3/8" to 1/2" striking tool, 2' level and rubber mallet. 1. Prepare The Rough Opening Note: For those glass block applications that begin at ÁRRU OHYHO ZH UHFRPPHQG WKDW \RX PDNH D FXUE EDVH as wide as the glass block being used.
B. Use a level to make sure the opening is level and plumb. C. Measure the opening diagonally from corner to corner in both directions, and compare the dimensions to check for squareness. These dimensions should be equal within 1/8". 1C 1B D. If there are any problems with the opening, make adjustments before proceeding. E. Use a polyfoam brush to treat the sill with latex paint, Weldbond® adhesive or asphalt emulsion DV VSHFLÀHG EHORZ • For wood interior, non-shower applications use latex paint.
2. Preparation of Universal Mortar Spacers, Panel Anchors, and Expansion Strips A. Assemble the spacers for the series of block you are installing. The spacers come in two halves, snap the spacers together to ÀW WKH ZLGWK RI WKH EORFN 2A B. Modify the spacers using tin snips based on their location: • Where four block come together spacers are used as assembled. These are called “REGULAR”.
• Where glass block meet the jambs and curb, (except for the four corners) orient the spacer with the cross arm down and clip off the upper set of toothed legs, and the upper half of the twist-off tab. These are called “T”. “REGULAR” Spacer 0RGLÀHG &DOOHG “T” Note: Prepare a supply of “T” spacers before you start, so that your panel construction can continue without interruption. Note: ,W LV LPSRUWDQW WR ÀOH RII DQ\ EXUUV C.
D. Bend each panel anchor 90° to produce a short arm (approximately 4"). ° 4 2D E X P A N S I O N 2E E. With scissors or utility knife, trim the expansion strip for length based on the distance between anchors. Trim the expansion strip width to 2-1/8" for 3-in Series block. S T R I P 3. Mortar Preparation This chart will give you an idea of the number of blocks that can be installed per 50 pound bag of mortar. White Premixed Glass Block Mortar Number of blocks per 50 lb.
4. Install The First Row Note: If your project is framed on 3 or 4 sides, complete Steps A thru K. If your project is framed on 2 sides, skip to Step L. 4B A. Using a trowel apply approximately a 1/2" mortar bed to the treated 4C curb or ÁRRU 4A % :LWKRXW DSSO\LQJ DQ\ PRUWDU WR WKH ÀUVW EORFN SODFH an “L” spacer at the lower outside corner of the block so that the spacer cross arm will be at the bottom, between the glass block and the curb. C.
F. Apply 3/8" to 1/2" of mortar to the vertical edge of the second block that will contact the 4G preceding block. 4F G. Place the second block using a “T” spacer on the bottom and “REGULAR” spacer at the top with the spacer cross arm between the two blocks. Push the two blocks together. H.
Projects frames on 2 sides: L. Using a trowel apply approximately a 1/2" mortar bed to the treated curb or 4M ÁRRU WKH OHQJWK of 2 blocks. 4N M. Without applying PRUWDU WR WKH ÀUVW block, place an “L” spacer at the lower 4L outside corner of the block so that the cross arm is at the bottom, between the glass block and curb. N. Place a “T” spacer at the other lower corner of the block with the cross arm up. O.
S. Install a vertical panel anchor after the second block and screw the short leg of the anchor to the curb. All panel 4S anchors should be attached using #12 x 1" zinc-plated head screws or equivalent. Use two screws per anchor. Note: If attaching the panel anchors to tile or masonry, plastic screw anchors should be used. T. Apply mortar so that the long leg of the anchor is embedded in the vertical joint. 4T U.
5. Installing The Remaining Rows 5A A. Apply a 3/8" to 1/2" mortar bed on WRS RI WKH ÀUVW URZ Note: Be careful to keep the smooth legs of the spacers free of mortar to ensure that the next row of block will VLW ÁDW RQ WKH spacers. B. Place a block (without mortar) against the jamb using spacers that are already in place from the previous row, for alignment. 5C 5B C. Place a “T” spacer at the upper corner of this block against the jamb. D.
E. Remove the previously installed “T” spacers at both jambs at the top of the second row and apply a 3/8" to 1/2" mortar bed on top of this row. 5E F. Install panel anchors at both jambs by completely embedding them in the mortar and fastening them to the jamb. 5F G. Reinsert the “T” spacers you previously removed. Note: Additional mortar may need to be applied to cover the anchor.
H. Lightly press panel reinforcing into the mortar bed along the entire length of the panel so that it is completely embedded in the mortar. Where more than one reinforcing strip is needed, overlap them six inches. Note: Panel reinforcing is always installed in the same horizontal joints as the panel anchors. 5H Note: If using 12" x 12" nominal size glass block, panel anchors and panel reinforcement should be installed on top of every row, except the top row. I.
J. Twist off the spacer tabs along the top of the next to last row on one side 5K of the panel. 5J K. Install two blocks, buttering both vertical sides of the second block before installing. Note: Spacers are not required at the top of the panel. L. Install the vertical panel anchor with the long leg facing down. Completely embed the long leg of the anchor into the vertical mortar joint.
M. Screw the short leg of the anchor to the top of the opening. 5M 1 &RQWLQXH WKLV WZR EORFN SURFHGXUH DFURVV WKH ÀQDO URZ $IWHU LQVWDOOLQJ WKH ÀQDO EORFN EH VXUH WR SUHVV EDFN into the joints any mortar that has been forced out. O. Install the expansion strip across the head. Note: Because the top course meets the expansion strip at the head, no mortar is placed at the top edge of these blocks. 5O 6. Finishing Note: Allow the mortar to set up for about one hour before proceeding.
B. With moderate pressure, run the striking tool over all the joints. It is best to strike all the horizontal MRLQWV ÀUVW WKHQ WKH YHUWLFDO MRLQWV VR WKDW WKH pattern is uniform. Fill any voids with mortar. Note: Striking removes excess mortar and compacts it to create a smooth, concave, moisture-proof seal. 6B C. After striking, use a damp sponge to remove the excess mortar from the block face, rinsing the sponge frequently.
Maintenance An important part of the functional beauty of Seves Glass Block products is that they are virtually maintenance free! There’s nothing to rot, rust, peel or paint.
The information contained herein is accurate and reliable to the best of our knowledge.
GLASSBLOCK Seves Glass Block Inc. Cleveland, OH 44147 www.sevesglassblock.com Weldbond® is a registered trademark of F. T. Ross Ltd. All other trademarks and registered trademarks in this brochure are owned and protected by Seves Glass Block Inc., Cleveland, OH 44147. © 2016 Seves Glass Block Inc. Printed in U.S.A. SGB-002 Rev.