
Installation Guide


INSTALLATION
INSTRUCTIONS
❺ ❻
❷
❸
❹
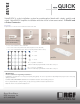
Prepare the cross
connectors
By sliding one leg into
another, prepare an “L”
cross for each of the
bottom corners of your
project. Prepare “T”
crosses, one for each
glass block in your first
course.
Preparing an “L” cross
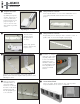
Add profiles to crosses
Insert a profile into the “L” cross. This combination of a “L”
cross and profile will start the bottom corner of your
project.
An “L” cross connected to a profile
Then insert the
opposite end of
the profile into a
“T” cross.
At this step, profiles
may be “slid” into the
leg of a cross.
Add profiles to crosses
Repeat this process until you have created a series of
profiles and “T” crosses the length of your project.
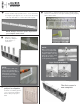
Using the “L” cross connector, connect this strip of
profiles and T connectors together with a profile to create
a 90 degree corner.
Screw this “L” shaped
strip to the curb & wall
(or jamb). Make sure
to use a screw that is
appropriate for the
material to which you
are attaching the strip.
This strip will act as
your floor and wall
anchors.
Next, insert profiles
vertically into the “T”
connectors which
have been secured to
the floor or curb. Each
profile may be slid
into the upright leg of
a “T” connector.
❼ ❽
Insert Glass Block
Place the glass blocks between the vertical profiles.
Repeat until first row or course is completed.
❶