
Installation Instructions

2
LEVEL RAIL INSTRUCTIONS
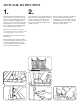
1.
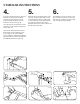
Determine the desired rail placement
and snap a line on the deck to ensure
all posts are aligned properly (Fig. 1).
Ensure sufcient mounting structure
exists in areas to receive posts. Install
blocking where necessary. Plumb the
posts, using the shims provided, and
secure all posts in place (Fig. 2).
Note: Post kits include leveling shims
and rail panel attachment hardware, post
mounting hardware sold separately.
Tip: Shims can be easily cut using a
wood chisel.
Tip: Post anges are manufactured to
accept 3/8" diameter fasteners, be sure
to use the appropriate fasteners for
your installation. Check local building
codes for load requirements.
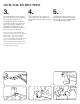
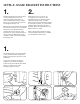
2.
Place rail panel across the opening and
adjust to ensure equal baluster spacing
at each end (Figs. 3 & 4). Mark each
end of the rail panel 1/4" from post
face to allow for bracket and/or weld
clearance (Fig. 5).
Before cutting the panel to size, protect
the rail surface from marring while
cutting (do not cut rail on deck surface
as metal lings may rust deck surface).
Cut at your mark. Repeat for the
remaining 3 ends (Fig. 6).
(Fig. 1)
(Fig. 2)
(Fig. 3)
(Fig. 5)
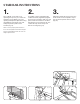
1
2 3
4
5
(Fig. 4)
(Fig. 6)