
Installation Instructions

4
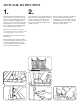
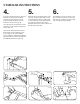
1.
Place a plank on the stair noses
spanning from post to post. Place the
stair panel on the plank across the
opening and adjust for plumb ensuring
equal baluster spacing at each end.
Clamp the panel in place at this
location (Fig. 12).
Note: Use the proper plank thickness
to ensure the proper nished rail height.
Check local building codes for stair rail
height requirements.
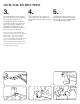
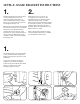
2.
Assemble a stair mounting bracket.
Hold the bracket (angled end) against
the post face and in line with your stair
panel, mark the rail at these locations.
Repeat this for all 4 rail ends. Be sure
to label the top end of the top rail
before removing it (Fig. 13).
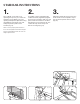
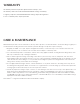
3.
Add 7/8" (toward rail end or post) to the
marks made on the rail panel in step 2
(Fig. 14) and cut panel at these marks
(Fig. 15).
PLANK
(Fig. 12)
TOP
(Fig. 13)
2
3
4
7/8"
(Fig. 14)
(Fig. 15)
STAIR RAIL INSTRUCTIONS