v 1.0 AutoCommand ® Remote Control Car Starter Models 28636 - 28638 With Full Keyless Entry & Security Alarm Features Installation Manual For use on automatic vehicles only. For gasoline or diesel vehicles. x Delu el mod ’ t e h uper ge ‘S n a g-R Lon 7955 Cameron Brown Court Springfield, Virginia USA Tel: (703) 866-2000; Fax: (703) 866-2001 www.designtech-intl.
Congratulations on your purchase of the AutoCommand® Remote Car Starter. This Remote Car Starter system allows you to start the car by remote control from the comfort of your home or office in order to cool it down in the summer or heat it up in the winter. This Remote Car Starter system is for automatic transmission cars only. It is an extremely sophisticated system with multiple built-in safety and security features.
!! WARNING !! AutoCommand Wire Harness If you are working on a newer car, you may notice bright yellow tubes or harnesses underneath the steering column area. These are the “SRS” or AIR BAG wires. DO NOT tamper with these wires in any way, since this could result in personal injury and/or damage to the air bag system.
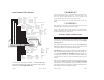
All dipswitches should be OFF (up position) during the installation. Ignition Key Diagram for Steps 4-7 Lock/Off POWER & IGNITION WIRES RUN The AutoCommand® module (large black box) will be installed under the dash, once all wiring has been completed. Do not mount the module at this time because you will need to check the diagnostic lights as the installation progresses.
7 Thick Yellow Wire Starter Attach the YELLOW 14 gauge wire to the starter wire coming off of the key switch in the steering column area. This wire is hot (+12V with a meter) in the start position only. It is off in all other positions. CONTROL HARNESS 11 Orange Wire 8 On/Off Plug-in Control Switch This switch must be installed for the remote starter to operate. Mount the switch then plug this switch harness into the AutoCommand module at the 2 pin white connector. (See diagram on page 4).
to the on position confirming that the unit has been ‘initialized’. The ignition wires will also not come on when the brake is depressed if the unit is initialized. IF THE UNIT DOES NOT INITIALIZE AT THIS TIME, see the purple Trouble Shooting Sheet. 13 Green Wire Tach Input Control Harness The Remote Starter has two ways of monitoring the car during the starting process. Either way will ensure a clean, accurate start. Read about both methods before deciding which one to use.
16 Brown Wire Accessory Pulse/Dome LampControl Harness The BROWN wire is the acessory pulse which gives you a quick pulse just before the car starts or stops. This is a 500 mA transistor ground output which MUST drive a relay (not included) which in turn will supply either ground or positive signal. This is important in some vehicles to control the defroster or to control the GM R.A.P. system, or to re-lock power door locks if the vehicle automatically unlocks them whenever the vehicle stops running.
21 Green/White Wire Trunk / Carb Accessory Harness The GREEN/WHITE wire can be used for one of 2 functions. See the dip switch setting option #21 (described in Step 29) to choose the setting you want (factory setting is trunk). This output is a 500 mA negative transistor output. You MUST have this output power a relay to either the trunk or the carburetor solenoid. NOTE: If the remote starter is in the armed mode -- popping the trunk with the transmitter will disarm the alarm.
REQUIRED FINAL STEPS 25 The Antenna 27 TRANSMITTER LEARNING The black coax antenna wire with the clear plastic tube at the end receives the remote signal from the transmitter. Plug the coax antenna into the remote starter module. Snake the coax antenna around under the dash and up the inside of the right or left windshield post and over the top of the windshield.
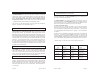
Why the remote starter shut off the last time: 1 flash 2 flashes 3 flashes 10/15 minute time out -- i.e. nothing unusual happened. Brake pushed/Hood opened/Auxiliary kill input received No Tach or Stalled. May be missing an ignition wire which powers up the alternator. Or in tach mode -- you may be missing the correct tach wire. 4 flashes Received another remote input from the transmitter 5 flashes Transmission was shifted into gear. 6 flashes Low battery voltage, or alternator not coming up.
Option # FACTORY SETTING (2 Flashes) OPTION SETTING (1 Flash) Option # FACTORY SETTING (2 Flashes) OPTION SETTING (1 Flash) Option 7 Enable Required No Enable Required The AutoCommand has a safety feature which requires the user to ‘set’ the control switch by turning it off and on once each time the user leaves the vehicle. This is called ‘enabling the unit’. You can disable this feature by choosing the option “no enable required”.
* Press the MIDDLE button on the transmitter. The green LED on the remote starter module or the external plug-in LED will flash ONCE to indicate that the remote starter has changed the selected feature from the factory setting to the option setting. Pushing the middle button again will give you 2 flashes of the LED and will change the setting back from the option setting to the factory setting. You can go back and forth as often as needed.
HOW TO USE A RELAY List of vehicles and the types of security systems: Acura 3.
Diesel Vehicles USER INFORMATION You must also set Option 6 to run in diesel mode. This may be all that is required in many installations. However if possible, hook up the RED/BLACK wire from Step 9 to ensure the best possible starting. The Wait-To-Start option 9 combined with Deisel option 6 is the best way to connect to a diesel vehicle.
LIMITED LIFETIME WARRANTY DesignTech International, Inc. Warrants to the original consumer/purchaser that this product shall be free of defects in material and workmanship under normal use and circumstances for the period of time that the original owner of this product owns the vehicle in which it is installed. When the original consumer/purchaser returns the product pre-paid to DesignTech International Inc.