
User's Manual


28636 - 28638 Page 19Page 18 28636 - 28638
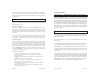
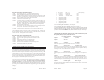
# ON - Down OFF - Up Factory Setting
1 Learn TX Normal use OFF
2 Learn tach Normal use OFF
3 Tach mode “No-Tach” mode OFF
4 (Programing switch) OFF
5 (Programing switch) OFF
6 (Programing switch) OFF
7 (Programing switch) OFF
8 (Programing switch) OFF
#1 is for teaching the transmitter(s). See step 27.
#2 is for teaching the AutoCommand’s tach rate. See step 13.
#3 sets the starting method. The normal setting is up. In this position, the the
remote starter uses “No-Tach” starting. If you wish to use the tach to start, and
you have connected the GREEN wire, set this switch down (On). See Step 13.
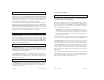
The following list explains the settings as they come from the factory and
the options you may set, if you choose to do so:
FACTORY SETTING OPTION SETTING
Option # (2 Flashes) (1 Flash)
Option 1 Not used
Option 2 10 minutes 15 minutes
Select this option to increase the standard run time to 15 minutes.
Option 3 Normal crank Extended Crank
This option will increase the amount of time the AutoCommand engages the starter.
This is useful for older vehicles or vehicles with throttle body fuel injection that may
take longer to start. This adds 50% more crank time.
Option 4 Normal Crank Super Crank
Same as option 2, but 100% more crank time. This option applies even if Option 2 is
set.
Option 5 Normal Voltage Ignore Voltage Metering
Selecting this option for
Diesel vehicles tells the AutoCommand to ignore up to a .5
volt dip below the voltage reading it takes when in the NO-TACH mode. This is
useful when using the NO-TACH starting on a diesel with many electrical accessories.
Option 6 Gasoline engine Diesel engine
This option allows the AutoCommand to be installed in a diesel vehicle. In this mode
the run times are doubled.
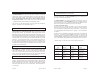
Why the remote starter shut off the last time:
1 flash 10/15 minute time out -- i.e. nothing unusual happened.
2 flashes Brake pushed/Hood opened/Auxiliary kill input received
3 flashes No Tach or Stalled. May be missing an ignition wire which powers up the
alternator. Or in tach mode -- you may be missing the correct tach wire.
4 flashes Received another remote input from the transmitter
5 flashes Transmission was shifted into gear.
6 flashes Low battery voltage, or alternator not coming up. Either low battery volt-
age or you are missing one of the necessary ignition wires needed to run
the vehicle. When you locate it -- simply connect it to the AutoCommand’s
IGN2 wire. If low battery, start vehicle with key and recharge battery.
7 flashes An alarm input was activated.
8 flashes Overcurrent. One of the transistor outputs is driving an output with too
heavy a load. You must have this output drive a relay.
12 flashes Control Switch was turned off or a wire to the switch has been cut.
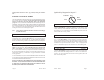
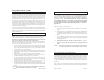
This self diagnostic mode can also tell you
why it started the last time. To know why
the unit started the last time, simply hold your foot on the brake while you turn the
control switch off. The diagnostic code is as follows:
Why the remote starter started the last time:
1 flash The unit has not started yet since it was last powered up.
2 flashes Received a radio signal input from the transmitter to start.
3 flashes N/A.
4 flashes Temperature reached 0’F in Cold Start mode.
5 flashes Voltage reached 11 volts in Cold Start mode.
6 flashes Received a start command from the optional Pager unit.
7 flashes Started from 24 hour daily start feature.
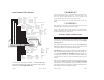
29 DIP SWITCH SPECIAL SETTINGS
The remote starter unit has 8 dip switches on the side of the case which allow for
programming of special options and features. The first 3 dip switches have already
been used in earlier steps for transmitter learning, and tach rate learning. DIP
switch numbers 4 - 8 are used for selecting up to 31 options other than those that
have been set at the factory. Some options may alter the way the remote starter
operates, some options turn on special features for your particular installation. (See
the next page for a detailed description of each option.)
You will not need to use these special switches in most situations. The factory
settings will operate most vehicles. You must turn the Control Switch OFF to
program any features. (Note that when turning off this control switch the LED
will flash a few times giving the diagnostic code described in Step 28. Ignore this
by waiting a few seconds for it to finish before programming your new Dip Switch
settings.)