
User's Manual


28636 - 28638 Page 11Page 10 28636 - 28638
OPTIONAL STEPS
14 Yellow Wire Headlights/Parking Lights Control Harness
The optional YELLOW 18 gauge wire activates the low beam headlights or
the parking lights with a built-in 15 amp 12 volt relay. This feature provides
visual indication that the car has started. After the
remote starter has success-
fully started the car, the lights will come on and stay on until the system shuts
off, or until the key is inserted into the ignition and the car is driven. Hook
the YELLOW wire to the low beam headlights or the parking lights if you
desire this feature. (Note: There is a 15 Amp fuse in the case for the head-
light circuit. This is the one furthest from the power wires. Check this fuse if
you have no output).
15 Blue Wire Horn/Siren (or Trunk) Control Harness
This wire puts out a pulse once each time the remote starter starts the car. It
also is used to confirm Lock and Unlock and in the various CarFinder® and
Panic/Alarm modes.
The AutoCommands have a +12 volt relay output which can directly drive a
horn or siren.
If connecting up to a
horn, this BLUE wire goes to the positive wire for the
horn. The ground side of the horn is probably arleady going to ground.
If connecting up to a
siren, this BLUE wire goes to the positive wire for the
siren and the black ground wire of the siren goes to ground. Note: See Step
29 Option 11 for changing from the factory setting of ‘horn’ mode to the
‘siren ‘ mode.
This output can also be used to supply a +12 volt relay output to power an
electric trunk by setting option 22 (Described in Step 29). If set, the BLUE
wire now acts like a 12 volt positive trunk output and the GREEN/WHITE
wire refered to in Option 22 now acts as a negative (-) horn/siren output. This
GREEN/WHITE wire is a negative transistor output which can be used to
directly drive the negative going horn wire at the steering column.
to the on position confirming that the unit has been ‘initialized’. The ignition
wires will also
not come on when the brake is depressed if the unit is initialized.
IF THE UNIT DOES NOT INITIALIZE AT THIS TIME, see the purple Trouble
Shooting Sheet.
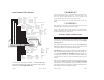
13 Green Wire Tach Input Control Harness
The Remote Starter has two ways of monitoring the car during the starting process.
Either way will ensure a clean, accurate start. Read about both methods before
deciding which one to use.
“No Tach
TM
” Starting
This starting method
does not require hooking up the GREEN tach wire. This
method will start the car by reading the car’s voltage before attempting to start, and
then looking for a voltage increase when the alternator kicks in. This feature auto-
matically takes into account voltage, temperature and the time since the vehicle
was last run.
The “No-Tach
TM
” starting method is preset at the factory (dip switch 3 OFF), and
you can skip the rest of this step and proceed to Step 14 should you choose it. Note
that some hard to start vehicles may require option 3 to be set for “extended crank”.
Tachometer sensing
If the vehicle is generally hard starting (requiring a cranking time of more than 2
seconds) you will get more accurate starting with the tachometer sensing starting
method. If you are installing the remote starter on a carbureted vehicle, you must
use the tachometer sensing. This method starts the car by reading the engine speed
(tach) information from a wire under the hood. If you choose tachometer sensing,
connect the GREEN wire to the car’s tach wire under the hood. After you have
connected the GREEN wire, you need to teach the remote starter the vehicle’s tach
rate. Set the Tach rate as follows:
TACH RATE LEARNING
A. Connect the GREEN wire to the car’s tach wire under the hood.
B. Turn the Control Switch OFF. Wait 5 seconds for the flashing of the
GREEN LED to stop.
C. On the
remote starter module, make sure dip switch 3 is in the ON (down)
position
D. Start the car and let it get to a normal idle.
E. Keep your foot clear of the gas pedal to prevent varying engine speed
F. Flip dip switch #2 to the ON (down) position.
G. Watch the RED LED. It will come on after 3 or 4 seconds, indicating the
idle rate has been learned.
H. RETURN DIP SWITCH #2 TO THE OFF (UP) POSITION (LEAVE DIP
SWITCH #3 DOWN -- ON)