
User's Manual


28636 - 28638 Page 15Page 14 28636 - 28638
The YELLOW/GREEN wire is the NC (normally closed) contact of the on-
board door unlock relay. The YELLOW/RED wire is the C (common) con-
tact of the on-board door unlock relay.
The WHITE/GREEN wire is the NC (normally closed) contact of the on-
board door lock relay. The WHITE/RED wire is the C (common) contact of
the on-board door lock relay. Check the separate GREEN SHEET to deter-
mine which wire the correct lock/unlock wires in your vehicle.
To select lock polarity output:
The
remote starter has a 15 amp fuse inside it’s case to select lock polarity.
This fuse is factory set at positive. (This fuse is the one closest to the power
wires and connects the normally open contact of the relay to +12V or ground).
The position furthest from the power wires is ‘positive’. The closest position
is ‘negative’.
If your door locks are positive, keep the fuse set for positive as it comes from
the factory.
If your door locks are negative, open the unit and reverse the
position of the fuse (as described in the above paragraph).
If your door locks
are reverse polarity, keep the fuse set for positive and cut the lock and unlock
wires of the vehicle in half and follow the Green Sheet Keyless Entry Notes.
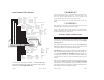
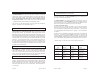
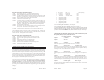
Check this chart for connecting to the 3 most popular locking styles:
AutoCommand Positive Negative Reverse
Wire Polarity Polarity Polarity
Yellow/Red Connect to car ‘s Connect to car’s Connect to car side,
Unlock wire unlock wire car unlock wire
Yellow/Green NOT NOT Connect to door side,
USED USED car unlock wire
White/Red Connect to car’s Connect to car’s Connect to car side,
lock wire lock wire car lock wire
White/Green NOT NOT Connect to door side,
USED USED car lock wire
24 Yel/Red & Yel/Green Door Unlock Accessory Harness
Wht/Red & Wht/Green Door Lock
21 Green/White Wire Trunk / Carb Accessory Harness
The GREEN/WHITE wire can be used for one of 2 functions. See the dip
switch setting option #21 (described in Step 29) to choose the setting you
want (factory setting is trunk). This output is a 500 mA negative transistor
output. You
MUST have this output power a relay to either the trunk or
the carburetor solenoid. NOTE: If the
remote starter is in the armed mode
-- popping the trunk with the transmitter will disarm the alarm.
You can also swap the trunk and horn wires using option 22 (described in
Step 29). This option is also described in Step 15.
22A Extra Yellow Starter Kill
These models have a built-in Starter Kill relay to immobilize the vehicle
when the alarm is armed. You will need to cut the vehicle’s Starter wire in
half between the key cylinder and the starter solenoid of the vehicle. If you
have already hooked up the Thick Yellow Wire in Step 7, cut the wire between
where the Yellow wire is and the key. Now connect the solenoid (engine) side
wire to the yellow starter wire that goes to the module where there are 6 spade
connectors -- if not already done in Step 7. Now attach the extra Thick Yel-
low wire onto the tab connector of the
remote starter that is protruding out of
the opposite side of the module as the main power wires. Connect the other
end of this wire to the remaining cut end of the keyside of the vehicle’s starter
wire that was cut in half earlier.
22B White Ground out while armed Accessory Harness
This WHITE wire is 400mA continuous negative transistor output which
follows the Starter Kill output. This wire is active whenever the alarm of the
remote starter is armed or the vehicle is running remotely under remote starter
control. You can use the WHITE wire for any other special applications that
are only active while the alarm is armed or running remotely.
23 Dash-mount LED Plug-In LED
This external LED gets pluged into the connector just to the left of the dip
switches. This external LED can be dash mounted as desired. This LED will
disable the GREEN LED on the unit. This becomes useful for checking diag-
nostics even if the unit is not visible. This LED will also blink on and off
continuously when the
remote starter is locked/armed. The LED mounts in a
5/16 inch hole.