
User's Manual


28636 - 28638 Page 17Page 16 28636 - 28638
27 TRANSMITTER LEARNING
Your transmitter is factory coded to one of over 16,000,000 different codes.
The
remote starter module can learn the codes of up to 4 different transmitters.
Once power and the Control switch have been hooked up to the module, the
codes can be learned. The transmitter should have already come from the
factory taught to the
remote starter module. If your unit does not respond
to the transmitter in any way -- then you must teach the AutoCommand®
the code of the transmitter with the following procedure -- otherwise --
skip this step:
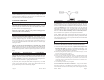
With the Valet Switch in the ON position:
1. On the
remote starter module, put the dip switch marked “1” to the on (down)
position.
2. Watch the green or external dash-mount red LED as you press and hold the left
LOCK button on the transmitter down. When the LED & dash lights come on,
the module has learned the transmitter code. Stop pressing on the transmitter
button
3. To learn additional transmitters (up to 3 more), simply push the left LOCK
button on another transmitter for a few seconds until the green feedback light
& dash lights comes on.
4. RETURN DIP SWITCH #1 TO THE UP OFF POSITION!!! A few sec-
onds later the LED and dash lights flash 4 times signifying exiting this
mode.
NOTE: Teaching new transmitters erases all previously learned transmit-
ters. Thus you must learn all current transmitters at the same time.
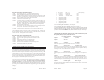
28 Trouble Shooting with the Self Diagnostics
The remote starter unit comes with a complete built in diagnostic routine. It tells you
why the remote starter wouldn’t start the car or why the unit shut the car off the last
time. To activate the diagnostic mode, simply turn the control switch OFF. In a few
seconds, the GREEN LED on the
remote starter module will flash 1 to 12 times to tell
you what the problem was. See the chart on the following page for an explanation of
the flashes.
Note: If the hood is open when the control switch is turned off, the light output will
flash the diagnostic code. This will allow you to see the code from outside the vehicle.
REQUIRED FINAL STEPS
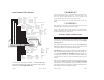
25 The Antenna
The black coax antenna wire with the clear plastic tube at the end receives the remote
signal from the transmitter. Plug the coax antenna into the remote starter module.
Snake the coax antenna around under the dash and up the inside of the right or left
windshield post and over the top of the windshield. Use the 2 enclosed black clips to
mount the last eight inches of the antenna to the windshield
behind the rear view
mirror and at least 2 inches down from the metal top of the vehicle. Clean the wind-
shield with the alcohol pad provided for maximum adhesion of the black clips. Use
the 2 double stick foam tape pieces to mount the plastic clips. The better exposed the
last (clear tube) section is, the better the range performance. In many vehicles, you
can get better range performance by mounting the antenna vertically hanging down-
ward from the top of the windshield.
The wiring section of the installation is now complete. Be sure to tape off all unused
wires so as to prevent short circuits, and mount the module securely under the dash.
When tying up and mounting, be sure to avoid any moving parts (steering column,
pedals) and sharp edges.
26 Trying the Unit Out
NOTE: Failure to properly install the hood pin switch and the Control Switch could
result in serious personal injury. All safety features provided must be installed.
WARNING: Be prepared to apply the brake during this testing. Close the hood,
fully apply the emergency brake, and place the vehicle in Park.
Note: Some installers hook up a battery charger to the battery during installation.
This is fine, but the
remote starter will not function properly until the charger is re-
moved. Remove the charger before final testing.
1. Once all the wiring is checked and is correct, turn the control switch from Off to
On once. (The green LED on the module or external dash mount red feedback
LED if plugged in should flash once then go off.) Note that these LED will
actually glow dim when in the off position.
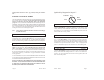
2. Now put the car in park, then press and hold the middle button on the transmitter.
3. When the remote control radio signal is received, the HORN, if hooked up, will
honk quickly.
4. After this, power will be applied to IGN1, IGN2, and then START.
5. When the car’s rpm go above 500, the START wire will lose power and the AC-
CESSORY and LIGHTS will be turned on a few seconds later.
6. The car will continue to run for ten minutes, or until the car is taken out of park,
the hood is opened, the brake is depressed, or the transmitter is pushed again.
Please check out each of these safety features.
7. The
remote starter will also turn off if the car stalls, but in this case it will try
starting the car up to 2 more times, waiting a little longer between tries.
8. The tan USER TIPS & NOTES and Wallet Cardgives you further details regard-
ing the daily use of this product. Refer to this sheet for further functions and
features.
NOTE: If you unit does not respond at all to the transmitter, you may need to
follow the Transmitter Learning on the next page.