User Manual Destinator 6
1. Limited Product Warranty Destinator Technologies, warrants to the Client that the Products shall substantially conform to Destinator Technologies’ specification for a period of one (1) year from the date of the original purchase by the end user (the "Warranty Period").
Contents 1- Introduction 3 Destinator Features .......................................................................................................................................3 Destinator Guided Tour ................................................................................................................................3 Technical Support .........................................................................................................................................
Introduction 6- Maps 40 Map Screen Interface ..................................................................................................................................40 Installing a Map ..........................................................................................................................................40 Map Cutter Screen Interface .......................................................................................................................40 Focus the Map.........
1 - Introduction Welcome to the world of mobile navigation! With Destinator 6, you can steer into a new era of mobile navigation. Simple operation, clear maps in 2D or 3D mode as well as numerous innovative features and functions have made Destinator 6 the essential guide for every traveler – whether in the car, on foot or by bike.
Introduction Technical Support If you have other questions about the Destinator software, please contact your supplier or Technical Support: Telephone: +49 (0)1805-123012 Email: support-eu@destinatortechnologies.com Web Address: www.destinatortechnologies.
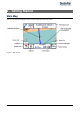
2 - Getting Started Main Map You can use the icons displayed on this screen to plan and view your route.
Getting Started Current location in Vehicle Mode. Current location in Pedestrian Mode. Last known location when GPS signal is unreliable. Generated route Travel direction The red GPS receiver means that a reliable GPS signal is not yet located. The green GPS receiver means that a reliable GPS signal is located and that you are ready to navigate. These icons display your power source, electricity or battery.
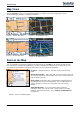
Getting Started Map Views From the Options menu, you can determine whether you want to see a two-dimensional or threedimensional map in daylight or nighttime conditions. Figure 2 - 2D Day Map View Figure 3 - 2D Night Map View Figure 4 - 3D Day Map View Figure 5- 3D Night Map View Point on the Map You can navigate to any point by tapping its location directly on the Map screen in both 2D and 3D map view.
Getting Started Menus You can press the Menu shown below. button from the Main Map screen to display the Destinations menu, as Destinations Menu The Address button lets you navigate to an address, as described in "Enter Address" (see "Enter Address" on page 12). The Points of Interest button lets you navigate to thousands of interesting places. For more information, see "POI (Points of Interest) (on page 18)".
Getting Started Options Menu Traffic information from FM radio transmissions is received by the TMC-enabled GPS receiver and monitored by your navigation software. For more information, see "Traffic Information (on page 21)". The Day/Night Mode toggle button lets you display the map view for either day or night driving. For a display of day and night maps, see "Map Views (on page 7)".
Getting Started Map Manager Menu The Select Map button lets you choose among different maps on your memory card. For more information, see "Select Map (on page 27)". The Pedestrian Mode/Driving Mode button lets you toggle between traveling as a pedestrian or in a vehicle. When in Pedestrian Mode, you are not limited by vehicle constraints, such as one way streets. Note that you can only generate a route up to ten kilometers and Voice prompts are not available.
Getting Started Settings Menu The Settings settings options. button, at the bottom of the Options menu, lets you configure your The Prompts button lets you specify the types of voice or visual prompts that you want to use. For more information, see " Prompts (on page 33)". The GPS button lets you configure the GPS settings. For more information, see "GPS Settings (on page 34)". The Language button lets you select the language for announcing travel prompts, street names, and driving directions.
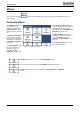
3 - Search for a Location Enter Address When you click the Address button, the Address screen appears as shown below. Figure 13 - Display the Address Screen You can use the keyboard to enter the characters of the address name. The characters appear in the Address field. Destinator automatically searches the Address list for the first occurrence of the entered characters. After you have selected a city, Destinator displays the next address field, such as street and address number.
Search for a Location Address Modes You can define the information used to locate an address by tapping the Mode Destinator provides a variety of options for entering an address. Town-Street button. This sequence provides the following address screens: Town, Street, Address Number For every city, you also have the option of selecting the City Center. If you don't know address number, you can select the Street Midpoint. Town-Street is the default format.
Search for a Location Add to My Favorites Lets you add an address to your list of favorite locations, as shown in the figure below. For more information, see "My Favorites". Figure 14 - Add Address to My Favorites If you are using a phone-enabled navigation device, you can send your current location in an SMS message. For more information, see "Sending an SMS Address (on page 31)". Go to your Destination After you have specified the address, tap the Next button.
Search for a Location Recent Locations The Recent Locations screen lets you select an existing destination from a list of destinations that you have previously traveled to. Destinator automatically stores the last 64 destinations in memory. As each new route is added to the top of the list, the older destinations at the bottom are erased. To navigate to a recent destination, tap the Recent Locations button. From the Recent Locations screen, select a location and tap the Show or Next button.
Search for a Location My Favorites A Favorite is a destination that you have stored for easy retrieval. To access a favorite destination, open the Destinations menu and tap the My Favorites button. The My Favorites screen displays your favorites groups. When you tap on a selected group, Destinator automatically displays its stored locations. Tap the selected location to show your destination on a map. Tap the GO button to calculate your route.
Search for a Location Delete Group When you tap this button, the selected group and its associated entries are removed. The My Favorites group cannot be deleted. Favorite Alerts Alerts let you know that you are within a certain distance of a favorite location. You can tap the Alerts button to set the distances for the 1st and 2nd Alerts. When you travel closer than the designated distance, the alert will sound, as shown below.
Search for a Location Favorites Actions From this screen, you can tap the Actions button to display the following commands. Set as Origin Lets you designate the selected location as the route origin. You would use this command when calculating a route from a point other than your current location. Show Map Lets you see the selected address on the map. Edit Favorite Location Lets you change the name, comment, or group location for the selected location.
Search for a Location Note: From the Item Entries Actions screen, click the Sort by ABC button to display the category entries in alphabetical order. Subcategories Many categories have subcategories to provide for an even greater list of choices. For example, gas station, may have many subcategories each representing a particular brand name. The same is also true for Hotels. Restaurants have subcategories that represent different types of food, such as Indian, Italian, and French, as shown below.
Search for a Location Show on Map Lets you see the selected address on the map. Add to My Favorites Lets you add an address to your list of favorite locations, as shown in the figure below. For more information, see "My Favorites". Sort By ABC or Distance Lets you sort the entries of the selected category alphabetically or by distance from your current location. Note: Destinator initially displays the entries by distance.
Search for a Location Send as SMS If you are using a phone-enabled navigation device, you can send your current location in an SMS message. For more information, see "Sending an SMS Address (on page 31)". Traffic Information Traffic (TMC) messages are national and regional FM radio broadcasts that are used to inform drivers of traffic, weather, and other driving conditions, as shown below. The Traffic Alert icon appears each time a traffic condition is encountered.
Search for a Location The Radio Frequency bar, at the top of the TMC screen, displays the radio station frequency. You can tap the Actions button to disable the TMC Auto-Search button, so that your TMC messages are from only one station. If the TMC Auto-Search is disabled, you can click the same button to enable the TMC Auto-Search, so that your messages appear from many stations.
Search for a Location Traffic Alert Categories TMC Distance You can select from the following traffic message types: Accidents Weather Information Traffic Jams Construction Enter the radius size for the area to monitor for traffic messages. For example, if you specify 5 km, Destinator only monitors traffic messages that affect a five kilometer radius.
Search for a Location The following options are available: The Route Summary button displays your entire route on the Map screen, plus the travel distance and the Estimated Travel Time Remaining (ETR). The Show Turn button displays the next turn on the Map screen, including the street name, the distance to it, and the turn direction. The Avoid button lets you avoid the selected turn in the directions list. Destinator recalculates the route automatically.
Search for a Location Edit Group Select a group and tap this button to change the group name. When you tap the Edit Group button, the Avoid Roads Group screen appears displaying the group name. Change the group name and tap Save. The new name is displayed on the Avoid Roads screen. Delete Group Select a group and tap this button to remove the group from the Avoid Roads screen. The road entries in this group are also removed.
Search for a Location Route Playback This feature lets you record your route as you’re driving and then to play it back on the Map screen. From the Route Manager menu, tap the Route Playback button. To record a route, tap the Record button in the Route Playback screen. Destinator shows the Map screen and navigates you to your selected destination. To stop recording, return to the Route Playback screen and tap the Stop button. To playback your recording, select the data file, and tap the Play button.
Search for a Location Select Map This feature lets you change the currently selected map to another map saved on your SD memory card. If you want to store additional maps on your memory card, see “Maps” on page 1. You can tap the Select Map button to display the maps saved on your SD memory card. The Select Map screen displays map details and version numbers. The map currently used appears at the top of the list.
Search for a Location Units of Measure You can tap the Units of Measure button to specify the measurement system you would like to use. You can select: Miles/Hour Kilometers/Hour Map Settings You can tap the Map Settings button to customize your map display, as shown in the figure below. The following map settings are: Map Orientation Forward is up – This option orients the map so that your forward direction is always at the top.
Search for a Location Figure 37 - Travel to Multiple Routes The Show on Map screen provides you with the following route types: Faster and Shorter. You can select Shorter (the default value) to calculate a route with the shorter physical distance between your current location and the selected designation. When you tap the GO button, Destinator automatically calculates the faster route. Defining Route Groups A Route Group represents a group of stops.
Search for a Location When in the Stops screen, you can use the following commands: Use the Up or Down buttons to change the order of your itinerary. Shows the stop destination on the map and lets you select a route type, Faster or Shorter. Tap GO to calculate the stop destination. Select the Show button to view the selected stop destination on the map.
Search for a Location Navigating to an SMS Address You can navigate to an address received from an SMS message. This feature is available only when both the sender and receiver have phone-enabled navigation devices that run Destinator. When an SMS message is sent to a phone-enabled navigation device, an icon appears on the map screen. Tap this icon to open the SMS Alert inbox and select the SMS message. Tap Next to display the location on the Show on Map screen.
Search for a Location 2. Select the contact and press Send. The SMS Contents screen appears. 3. The mobile number of your contact is automatically entered into the Mobile # field. You can add a message of up to 20 characters in the Comment box. The Address field displays the location of the destination you have selected. 4. Press Send. A confirmation message confirms that the SMS message was sent.
4 - Settings Prompts You can select the types of voice and visual notifications that you would like to use while navigating. From the Settings menu, tap the Prompts button. The Prompts screen appears. Voice Prompts Speed Warning Warns you when your car exceeds the speed limit. This prompt is not active by default. Route Recalculation Activated when Destinator recalculates a new route. This prompt is not active by default.
Settings GPS Settings Destinator uses the GPS receiver to pinpoint your location. GPS signals are automatically acquired and your vehicle's location and position are constantly updated unless you are working in the Free Browse Map mode or you tap the GPS Off button. The GPS receiver may take a few minutes to find its initial location. For best results, ensure that the GPS receiver has a clear view of the sky.
5 - Installation Requirements PC Requirements To install and use the Console, your PC must meet the following requirements. Microsoft Windows 98, ME, NT, 2000, or XP Microsoft ActiveSync A minimum of 300 MB free space for temporary files An Internet connection for online registration Installing the Console To install the Destinator Console: 1. Insert the Destinator Disk into the PC's CD-ROM drive.
Installation Requirements Console Toolbar The following options are available from the Console Toolbar: Figure 47 – Console Toolbar Install Software Lets you install the Navigation System to your device. Install/Remove Maps lets you install or remove a map. For more information, see "Installing a Map (on page 40)". Cut Map Lets you customize an installed map. For more information, see “Map Cutter Screen Interface (on page 40)”.
Installation Requirements Maps After you have installed the Destinator Console to your proprietary device, you must select at least one map. For information about installing maps, see "Installing a Map (on page 40)". Import Favorite Location You can download a list of favorite locations from your PC to your device. The list must be contained in Comma-Separated Values (.csv) files. As part of the download procedure, you convert the .csv files to .
Installation Requirements Text-to-Speech (TTS) The Text to Speech feature lets you hear street names as part of the voice prompts. To install TTS: 1. Click the TTS button on the Destinator Console toolbar. 2. Select your language preference for the voice prompts and click OK. 3. Destinator prompts you to specify a directory for the TTS installation. Click Yes to select the default application installation directory. Click No, if you want to specify another directory.
Installation Requirements Quick Activation Note: This section is not relevant for maps of Western Europe and North America. Recommended Registration for Support You can activate Destinator automatically by using Quick Activation. To activate Destinator: 1. Check that your PC has an Internet connection. 2. Check that the navigation device is communicating with your PC through Microsoft ActiveSync. 3. Open the Destinator Console. 4. Click the Quick Activation button from the Destinator Console toolbar. 5.
6 - Maps Map Screen Interface On the Destinator Console, a collection of available maps is displayed, as shown in the figure below. Standard Maps Maps available for installation. My Maps Maps that have been customized from a standard map. Installed Maps Standard and customized maps that are already loaded on your device. Installing a Map You can install a map by selecting it from the Standard Maps pane in the Destinator Console and clicking the Install/Remove Maps button.
Maps You can use the Pan tool to move the map up, down, left, or right. You can use the Zoom tool to increase or decrease the map detail. You can also use the scroll bar to zoom in or out. You can use the Crop tool to designate an area on the map that you want to cut. When you have selected your focus by using the focus tools, as described below, click the Crop tool to designate an area on the standard map. You can use the Cut tool to create a customized map from your designated area.
Maps Corridor You can select the amount of surrounding area that is included along the route's path, as measured in kilometers or miles. Route You can select either the quickest route, as determined by speed limit, or the shortest physical route. Cut Map When you have designated your map area, click the Cut Map appears, as shown in the figure below. tool. The Cut Map dialogue box Figure 31 - Cutting a Map You must enter a map name and description.
Index Index Multistop Planner • 10, 28 My Contacts • 8, 20 My Favorites • 16, 31 My Favourites • 8 A N Add Favorite Locations • 17 Add to My Favorites • 17 Add to My Favourites • 14 Address Actions • 13 Address Modes • 12, 13 Avoid Road Groups • 24 Avoid Road Locations • 25 Avoid Roads • 9, 24 Navigating to an SMS Address • 10, 31 New Topic • 5 C Channel Auto-Search • 22 Console Toolbar • 36 Cut Map • 42 Cycling Through Screens • 11 D Defining Route Groups • 29 Destinations Menu • 8 Destinator Featur