WARRIOR 12000lb WINCH Assembly & Operating Instructions
INTRODUCTION Congratulations on your purchase of a high quality Winch. We design and build winches to strict specifications and with proper use and maintenance should bring you years of satisfying service. WARNING - Read, study and follow all instructions before operating this device. Failure to heed these instructions may result in personal injury and/or property damage.
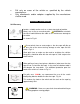
INCLUDED WITH YOUR WINCH DESCRIPTION QUANTITY 1. Winch Assembly with Wire Rope 1 2. Cap Bolt M10 × 35 4 3. Lock Washer Ø10 4 4. Thinck Flat Washer Ø10 4 5. Hex Flange Nut M10 4 6. Clevis Hook w/Pin 1 7. Control box of 12000 (Supplied for Prototype) 1 8. Control box of 12000-S (Supplied for –S Type) 1 9. Power Switch supplied by your choice 9.1 —R1, Remote control 1 9.2 —R2, Remote control 1 9.3 —R3, Remote control 1 9.
GETTING TO KNOW YOUR WINCH Your 12000lb winch is a powerful piece of machinery. It is important that you understand the basics of its operation and specifications so that when you need to use it, you can use it with confidence and safety. Below is a list of the components of your winch and their use. Practices using your winch before you are in a situation to need to use it. 1. Motor: Your 6.
11. Universal Flat Bed Mounting Channel: Your winch has been optional supplied with a flat bed mounting channel that can be mounted to most flat surfaces such as trailers, step bumpers, truck beds, etc. The mounting channel also has holes to accept your roller fairlead. 12. Snatch Block: If Your winch were supplied with a snatch block that, used properly, can double the pulling power of winch, or change your pulling direction without damaging the wire rope.
Washer (Part# 120004), Lock Washer (Part# 120003) and securing with M10 Nut(Part# 120005) (Make sure the bolt is placed through the mounting channel and roller fairlead from inside the channel. This will allow enough clearance for the winch to be placed in the channel without obstruction.) 3. Assemble the winch to the Mounting Channel (Part# 121000) by first pulling and releasing the clutch knob to “Off” position (Free Spooling).
8. Check for proper drum rotation. Pull and turn the clutch knob to the “off” position (Free-spooling). Pull out some cable from the drum, and then turn the clutch knob to the “In” position to engage the gears. Press the cable out button on the power switch. If the drum is turning and releasing more cable then your connections are accurate. If the drum is turning and collecting more cable then reverse the leads on the motor. Repeat and check rotation.
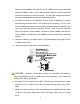
WARNING- Do not exceeds maximum line pull ratings shown on the tables. WARNING-When re-spooling the cable, ensure that the cable spools in the under-wind position with the cable entering the drum from the bottom, not the top. To re-spool correctly, and while wearing gloves, keep a slight load on the cable while pushing the remote button to draw in the cable. Walk toward the winch not allowing the cable to slide through your hands. Do not let your hands get within 12″of the winch while respooling.
CAUTION - Never release the free-spool clutch when there is a load on the winch. CAUTION - Use hand saver hook when handling the hook for spooling or un-spooling the wire rope. GENERAL TIPS FOR SAFE OPERATION The C12000 and its all derivative types are rated at 12000 lbs capacity when spooling the first rope layer on the drum. Overloads can damage the winch/motor/ or wire rope. For loads over 10000 lbs.
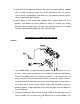
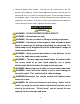
Pull only on areas of the vehicle as specified by the vehicle manufacturer. Only attachments and/or adapters supplied by the manufacturer shall be used. RIGGING TECHNIQUES Self Recovery Locate a suitable anchor such as a strong tree trunk or boulder. Fig 3.1 Always use a sling as an anchor point. CAUTION Do not attach the clevis hook back onto the cable as this could cause damage to the cable. As shown in Fig 3.
WINCHING TECHNIQUES A-Z a. Take time to asses your situation and plan your pull. b. Put on gloves to protect your hands. c. Disengage the clutch to allow free-spooling and also save battery power. d. Attach the hand saver hook to the clevis hook. e. Pull out the wire rope to your desired anchor point using the hand saver hook. f. Secure the clevis hook to the anchor point: Sling, chain or snatch block. Do not attach the hook back onto the wire rope. g. Engage the clutch. h.
s. Secure the vehicle. Be sure to set the brakes and place the vehicle in park. t. Release the tension on the wire rope. The winch is not meant to hold the vehicle for long periods of time. u. Disconnect the wire rope from the anchor. v. Rewind the wire rope. Make sure that any wire already on the drum has spooled tightly and neatly. If not, draw out the wire and re-spool from the point where the rope is tight. w. Keep your hands clear of the winch drum and fairlead as the wire rope is being drawn in. x.
TROUBLE SHOOTING SYMPTOM POSSIBLE CAUSE SUGGESTED ACTION -Switch Assembly not connected properly -Loose battery cable connections -Insert Switch Assembly all the way into the connector. -Tighten nuts on all cable connections. -Defective Switch Assembly -Replace Switch Assembly. -Defective motor -Check for voltage at armature port with Switch pressed. If voltage is present, replace motor. -Water has entered motor -Allow to drain and dry. Run in short bursts without load until completely dry.
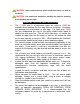
IN OUT 1 2 33 3 4 29 30 34 5 RA DIO 7 6 RE MO TE CO NT RO L 8 32 9 13 6 5 4 12 36 11 11 10 12 35 31 13 3 8 14 15 16 3 4 5 6 17 18 19 20 21 22 23 24 27 28 25 26 WINCH ASSEMBLY DRAWING C12000EWX
WINCH PARTS LIST (C12000EWX) No.
C12000EWX SPECIFICATION Rated line pulls: 12000 lbs (5443Kgs) Gear reduction ratio: 230:1(12V, 24V) Motor: Series Wound (Input Power) 6.5 hp / 4.6KW Overall dimensions: 22.8" (L) x6.30" (W) x9.00" (H) 579(L) mm X 160(W) mm X 229 (H) mm Drum size: Ø2.48" (D) x 8.8" (L) Ø 63(D) mm ×223(L) mm Cable: Ø 13/32" (D) x 83.7'(L) Ø 10.2mm (D) x 25.5m (L) Weight: 40kgs DUTY CYCLE Line speed and motor current (First layer) Line pull lb (kN) 0 6000(26.67) 8000(35.56) 10000(44.45) 12000(53.
WARRANTY Your winch has been manufactured and tested to the highest standards. Please ensure you read and understand the assembly and operating instructions before use. Failure to comply with these instructions or any improper use of the equipment will terminate the warranty. Please ensure you record the information below: Distributor Date of Purchase Invoice No Serial No In the unlikely event you experience problems, contact the distributor with this information.