CHIPPER ASSEMBLY GUIDE MODEL: OPC504 and OPC506 4 and 6 INCH COMMERCIAL CHIPPER DETAIL K2 INC. DK2 POWER USA 4301 S Valley View Blvd STE 10-11 Las Vegas, NV 89103 1-702-331-5353 DETAIL K2, INC. 1080 Clay Avenue Unit 2 Burlington, Ontario, Canada L7L0A1 DK2 USA EAST 6245 Industrial Parkway Whitehouse, OH 43571 PARTS AND SERVICE 702-331-5353 OR WWW.DK2POWER.
STEP 1: CHECK THE PACKING Open and unpack all items. Leave lots of working space. Inspect all parts. The Chipper is shipped in a crate. Leave the sides folded down and use as your work space. NOTE: UPON INSPECTION OF PARTS IF YOU FIND ANY DAMAGE OR MISSING PARTS PLEASE CALL DK2 POWER AT 702-331-5353 OR CONTACT US VIA OUR WEBSITE WWW.DK2POWER.
STEP 2: 1. Remove all hardware from axle. 2. Install 2 wheels, first wheel then washer, nut, pin and cap. 3. Your chipper tires are DOT approved and you can STREET tow not for highway tow. Safely tow at 25 mph max. 4. The extended axle is standard and adds stability on hills and corner turns when towing. Install wheel then washer.
STEP 3: 1. Place rear wheel axle assembly on Chipper using supplied bolts and install both wheels. 2. Install the bolts from the OUTSIDE with the nuts on INSIDE.
STEP 4: INSTALL THE TOWBAR AND STAND ASSEMBLY 1. INSTALL THE TOW BAR HITCH USING 4 BOLTS. PLACE BOLTS FROM OUTSIDE AND PLACE NUTS ON INSIDE. 2. ASSEMBLE TOW STAND AND INSERT THE HITCH PIN 3.
STEP 5: INSTALL CHIP CHUTE 1. INSTALL CHIP CHUTE ON BARN HINGES. SWING CHUTE CLOSED AND LOCK IT. 2. A RUBBER MALLET MAY BE USED IF NEEDED TO SET THE BARN HINGE PINS INTO THE MATING HINGES FOR THE FIRST TIME INSTALL.
STEP 6: INSTALL CHIP CHUTE DEFLECTOR 1. Install the Chip Chute Directional Deflector and tighten the locking handles.
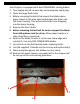
STEP 7: INSTALL FEED CHUTE 1. Install the feed chute on the 2 hinges. To seat the hinge pins for the first time a rubber mallet may be used to tap the pins into the hinges. These are tight fitting to reduce vibration noise. 2. Close the Chute and latch it. 3. Plug the safety key shut off wire connectors together.
STEP 8: READ THE KOHLER ENGINE MANUAL SUPPLIED WITH YOUR UNIT FOR FULL ENGINE OPERATION, SAFETY, AND MAINTENANCE. 2 3 1 6 5 4 7 1 ON/OFF KEY LOCK 2 GAS – USE MID GRADE OR HIGHER 3 CHOKE – LEFT IS ON / RIGHT IS OFF (RUN POSITION) 4 GAS ON/OFF SWITCH – LEFT IS OFF / RIGHT IS ON 5 THROTTLE – RABBIT FAST / TURTLE SLOW 6 PULL STARTER – PULL TIGHT- THEN PULL START 7 OIL – FILL TO MARK 10W30, WILL NOT START IF OIL IS LOW, HAS LOW OIL SHUTOFF PROTECTION. 2 YELLOW CAPS ARE OIL FILL CAPS.
Your Chipper is equipped with dual REVERSABLE cutting blades. 1. Turn engine key off, remove key and unplug the spark plug. 2. Open the large feed chute 3. Before removing the bolts that mount the blades place paper towels in the area opening between the drum and the drum housing. This will prevent bolts from dropping into the drum housing. 4. Remove the first 4 bolts. 5. Before removing the last bolt be sure to support the blade from sliding down into the drum.
No. Specification 1 feed hopper 2 outlet hopper 3 support foot 4 tow bar connecting part 5 wheel axle 6 crush house 7 tool box cover 8 M8 locknut 9 ⌀8lockwasher 10 washer⌀8*⌀16*1.6 11 plate for protection sheet 12 protection sheet 13 hexagon headed boltM8X25 14 key switch 15 pipe plug 16 wire 17 belt 18 Spacer sleeve⌀9*⌀14*44 19 Belt cover accessory plate 20 boltM8*60 21 engine pulley 22 washer⌀10*⌀40*3.0 23 bolt3/8-24UNF-25 24 belt cover 25 boltM8*16 26 boltM10X25 27 washer⌀10*⌀40*3.
OPERATION – BEFORE TURNING KEY AND PULL STARTING ENGINE CLEAR AREA OF ALL PEOPLE AND PROPERTY THAT COULD BE DAMAGED. THINK SAFETY. CHIPS ARE FLYING PROJECTILES AND CAN CAUSE INJURY. CHECK BOTH CHUTES AND MAKE SURE THEY ARE CLOSED AND LOCKED. WEAR SAFETY GLASSES, HEARING PROTECTION, AND GLOVES IF YOUR UNIT WILL NOT START – 1. CHECK ALL WHITE WIRE CONNECTIONS 2. CHECK KEY SWITCH IS TURNED TO THE ON – RIGHT HAND POSITION. 3. ALSO UNPLUG THE WHITE CONNECTOR FROM SWITCH AND TRY IT.
PLEASE DO NOT RETURN TO THE STORE YOU HAVE A 1 YEAR WARRANTY AND DK2 WILL REPLACE A DEFECTIVE PART FOR FREE CALL US AT 702-331-5353 FOR FAST WARRANTY PARTS AND QUESTIONS WHAT IS COVERED DK2 Inc. warrants to the original purchaser of any DK2 product that it will be free and clear of manufacturing defects in workmanship and materials under normal use and service for a period of one (1) year from the date of the original purchase.