
User guide


1600A-N1P
6. Under "Device Type", select TP 177A 6”.
7. Under "Connection", select Serial (via USB-PPI cable) for connection.
8. Click on the “Restore” tab.
9. Select the firmware file named “Detcon_1600AN1P_HMI_vXX.psb”.
XX represent current version.
10. Ensure that “Booting” check box is unchecked.
11. Press “Star Restore” to start the firmware upgrade.
NOTE: This operation may take some time, depending on the type of connection selected.
NOTE: Before entering Program Menu, an appropriate username and password may be required.
12. “Downloading successful” will display on the ProSave software once firmware upgrade has
completed.
13. Remove USB/PPI cable from touch screen.
14. Power cycle Model 1600A.
15. Verify the proper touch screen firmware version has been loaded.
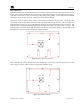
Touch screen version can be found in the top right corner of the “Screen Utilizes” menu.
Program Menu ► Screen Utilities: HMI v.XX
5.6.2 PLC Upgrade
Procedure:
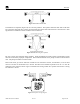
1. Install memory cartridge with new firmware (See Figure 31 for memory cartridge location).
2. Power cycle Model 1600A.
Firmware and CPU configuration are copied to the system once the system power cycles.
This operation takes approximately 15 seconds.
3. Once the 1600A has power cycled and returned to normal operation, remove memory cartridge.
NOTE: Powering on a PLC with a blank memory cartridge, or a memory cartridge that was
programmed in a different model of PLC, causes an error.
4. Verify the proper PLC firmware version has been loaded.
PLC version can be found in the top right corner of the “Screen Utilizes” menu.
Program Menu ► Screen Utilities: PLC v.XX
6.0 Spare Parts
Recommended spare parts list:
Detcon Part # Description
975-041400-000 RL-4 Relay Module (As applicable)
976-041400-000 DA-4 4-20mA Input Module (As applicable)
975-041401-000 AO-4 4-20mA Output Module (As applicable)
320-283934-700 VAC (230VAC) Over Voltage Module
320-283931-800 VDC (24VAC) Over Voltage Module
360-SWS150-024 24VDC Power Supply
1600A-N1P Instruction Manual Rev. 0.1 Page 29 of 40