Model MCX-32-N1P Model MCX-32-N4X Gas Detection Controller Operator’s Installation and Instruction Manual Covers all Model MCX-32 Control Systems DETCON, Inc. 4055 Technology Forest Blvd., The Woodlands, Texas 77381 Ph.281.367.4100 / Fax 281.298.2868 www.detcon.com May 16, 2014 • Document #3624 • Revision 3.
Model MCX-32 This page left intentionally blank Model MCX-32 Instruction Manual Rev.3.
Model MCX-32 Table of Contents 1.0 Introduction.............................................................................................................................................. 1 1.1 Description ........................................................................................................................................... 1 1.2 Wireless Option.................................................................................................................................... 1 1.
Model MCX-32 5.4.1 Auto Configure System Screen ................................................................................................... 37 5.4.2 Modbus Utilities Screen ............................................................................................................. 38 5.4.3 Alarm Inhibit Screen................................................................................................................... 42 5.4.4 Turn ON/OFF Channels Screen.......................................
Model MCX-32 Figure 13 Model AO-4 4-20mA Output Module .............................................................................................. 17 Figure 14 Model RL-4 Relay Output Module................................................................................................... 19 Figure 15 I/O Module Installation..................................................................................................................... 21 Figure 16 Modbus™ (Serial) Gas Sensor Connections............
Model MCX-32 Figure 65 Channel Description Entry................................................................................................................ 66 Figure 66 Gas/Units Entry................................................................................................................................. 67 Figure 67 Change Range Entry ......................................................................................................................... 67 Figure 68 Device Type Selection ...
Model MCX-32 1.0 Introduction 1.1 Description The Detcon MCX-32 is a multi-channel gas detection controller designed to serve as a host monitor and controller for a wired and wireless network of gas detection sensors as well as a wide range of other field devices. All MCX-32 models are configurable for up to 64 channels and can communicate with serial sensors via wired or wireless RS-485 Modbus™.
Model MCX-32 NOTE: Each device in a network (wired or wireless) must have a unique Modbus address. All wireless devices in a network must reside on the same RF channel/Network ID. Multiple networks must reside on different RF channels/Network IDs. If radio communication is limited due to distance or obstruction, each wireless device is capable of locating an alternate route and repeating broadcast communications.
Model MCX-32 1.3 System Operation The heart of the MCX-32 controller is the backlit touch screen LCD display. The controller communicates with serial sensors, I/O modules and wireless transceivers using RS-485 Modbus™ RTU Protocol. The MCX32 includes two separate Modbus™ ports. These ports are used to communicate directly with Modbus™ capable sensors, wireless transceivers or Detcon’s I/O Modules. The two ports will also provide 24VDC power at up to 3Amps combined.
Model MCX-32 24VDC input, the Interface PCA can provide a charging voltage for the battery if the charging circuitry is enabled on the PCA. The Interface PCA also includes two auxiliary relays for Fault and No-Comm. 1.3.2 Communication Ports To communicate efficiently with up to 64 sensors/devices and a compliment of I/O Modules, the MCX-32 utilizes three communications ports: 1.
Model MCX-32 connected to the controller. 1.4 Programming Configuration The MCX-32 controller can be configured for various I/O combinations at the Detcon factory based on application specific information provided by the customer on the Configuration Form. It must be verified that the correct quantity and type of I/O modules and wireless transceivers have been purchased to support the customer’s configuration requirements.
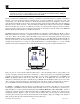
Model MCX-32 2.2 N1P and N1R Enclosure Installation 2.2.1 Mounting and Cable Installation The Model MCX-32-N1P controller is housed in a NEMA 1 panel mount enclosure for indoor use. Securely mount the Model MCX-32-N1P per the mounting dimensions provided in Figure 2. The enclosure is designed to fit a panel opening of 9.25” wide by 7.5” high. Keep AC power separate from DC power and signals within conduit runs. Allow at least 13" of Clearance for wiring 8" 10.5" 9.75" HOME ALARM RESET 3.
Model MCX-32 240VAC that can power up to 32 sensors and any associated I/O modules. The MCX-32 controller can also be powered by an external DC source that meets the input requirements of the unit if AC power is not available or desired. NOTE: The power supply for the MCX-32-N1P controller can power up to a maximum of 32 sensors and any associated I/O modules even though the controller is capable of communication with up to 64 sensors.
Model MCX-32 2.3 N4X Enclosure Installation 2.3.1 Mounting and Cable Installation The wall attachments must be able to withstand a force four times the weight of the equipment. CAUTION The MCX-32 must be mounted in a location that does not impair the operation of the external disconnection device. CAUTION The Model MCX-32-N4X controller is housed in a NEMA 4X water/corrosion proof enclosure for indoor/outdoor use. The controller includes gland plates on both the top and bottom of the enclosure.
Model MCX-32 NOTE: The power supply for the MCX-32-N4X controller can power up to a maximum of 32 sensors and any associated I/O modules and wireless transceivers even though the controller is capable of communication with up to 64 devices. An additional power supply will be required if powering more than 32 sensors. NOTE: The MCX-32-N4X controller can accommodate up to 16 I/O modules without the wireless option.
Model MCX-32 AC Cable Entry Point Drill Hole in Area for AC Cable Access Drill Hole in Area for Sensor, Relay Cable Access Figure 7 Cable Entry Points 2. Tie the AC power conductors together with a tie-wrap. 3. To maintain the safety approval for the MCX-32, the user must install a circuit breaker near the MCX32 so that it can be easily reached and labeled as the disconnection device for the MCX-32. The installed AC circuit breakers should be rated for 5A.
Model MCX-32 voltage to the batteries. See Section 5.4.5.6 Power Management Screen for setting up the charging voltage for the batteries. NOTE: The supply of power should be from an isolated source with over-current protection as applicable. The input voltage range must be between 19.2-28.8VDC. 1. Install the DC power as follows: a. Install external DC power by connecting the 19.2-28.8VDC to the terminals of the TB1 DIN rail mounted terminal block labeled 24VDC and DC Comm (Figure 8).
Model MCX-32 3.0 I/O Connections B A RS-485 VDC PORT2 Out + B A + B A RS-485 VDC RS-485 PORT1 Out There are two distinct RS-485 ports utilized in the MCX-32 controller labeled “RS-485 PORT1” and “RS-485 PORT2” (See Figure 9). These ports can be utilized for wired sensors, I/O Modules and wireless transceivers. Each port has three discrete input terminals labeled “A”, “B” and “Shld” corresponding to the RS-485 wiring.
Model MCX-32 NOTE Analog sensors used with the MCX-32 must supply 4mA for a zero reading and 20mA for a full scale reading. The sensors current output should be linear for readings between zero and full scale. Sensors that do not meet this requirement must not be used with the MCX32. NOTE External devices attached to the equipment must require a tool to access their wiring terminals to prevent unauthorized access.
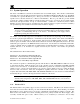
Model MCX-32 Sensor 4 Sensor 3 COMM M S D L S D 4-20mA INPUT Sensor 1 Sensor 2 Figure 11 Model DA-4 4-20mA Input Module and 4-20mA Gas Sensors Table 1 DA-4/DI-4 Modbus Addresses Port Module Channel # 1 2 1 3 4 9 10 2 11 12 Model MCX-32 Instruction Manual 1 2 3 4 5 6 7 8 9 10 11 12 13 14 15 16 33 34 35 36 37 38 39 40 41 42 43 44 45 46 47 48 Decimal Hex Module 64 40 5 65 41 6 66 42 7 67 43 8 72 48 13 73 49 14 74 4A 15 75 4B 16 Rev.3.
Model MCX-32 The 4-20mA signals from the sensors are communicated by the DA-4 modules to the controller using RS-485 Modbus™ RTU protocol. Therefore, each DA-4 module must have a unique Modbus™ address. Modules are serially addressed in hex using the two rotary switches on the module’s front panel labeled MSD (most significant digit) and LSD (least significant digit). Each DA-4 module will have four channels reserved based on its Modbus address with each channel corresponding to each of its four inputs.
Model MCX-32 NOTE External devices attached to the DI4 outputs must require a tool to access their wiring terminals to prevent unauthorized access. NOTE Hazardous live voltages of external devices attached to the equipment must be isolated or disconnected prior to accessing the terminals of the external devices NOTE The cable penetrations for the dry contact inputs must be made in the bottom of the enclosure (See Figure 7).
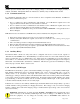
Model MCX-32 4-20 mA Signal Output 4 mA _ Output 3 mA _ There are four 4-20mA outputs on each AO-4 module. 4-20mA Input Control System COMM M S D L S D 4-20mA Output Output 1 _ mA Output 2 _ mA Figure 13 Model AO-4 4-20mA Output Module NOTE The terminals on the AO-4 module are rated for a maximum of 30VDC. They are designed to accept solid or stranded wire between 12AWG and 24AWG.
Model MCX-32 The AO-4 module would output a 4-20mA signal on its output 3 (Figure 13) corresponding to channel 39’s reading.
Model MCX-32 3.4 Alarm Relay Outputs (RL-4) There are four (4) Form C Single Pole Double Throw (SPDT), 5 Amp relays in each Model RL-4 module. Each relay in the module is assigned specifically to one alarm. Relay 1 is assigned to Alarm 1, relay 2 is assign to Alarm 2, relay 3 is assigned to Alarm 3, and relay 4 is assigned to Fault. These can be used to control (fire) annunciating devices or as signal inputs to other control devices.
Model MCX-32 the RL4/ALM Station Setup screen (see section 5.4.8). Once the relay modules have been addressed and installed on the Modbus™, the controller can communicate with the RL-4’s. For correct communication with an RL-4, the RL-4 must have a valid address, the bank that the RL-4 is addressed in must have that RL-4 enabled in the bank, and the RL-4 must be connected to the correct port (as prescribed on the RL4 Modbus Address Table 3).
Model MCX-32 reached (alarm relays) or the sensor is not in fault (fault relay). In energized mode, the normally open contact is closed if the alarm level has not been reached (alarm relays) or the sensor is not in fault (fault relay). Energized mode provides for fail-safe operation since a loss of power or cable failure will cause the contact to be open. 3.4.
Model MCX-32 NOTE: The male connector must be plugged into the I/O module at one end of the DIN rail and the female connector must be plugged into the I/O module at the other end of the stack of I/O modules. If these connectors are not properly installed, communication with other RS-485 devices will not be possible. NOTE: If no I/O modules are installed in the controller, the male connector must be plugged into the female connector for the RS-485 to communicate.
Model MCX-32 are set to default, (such as Alarm set points), and may need to be adjusted for proper operation. The Channel Description is left blank and the Relay Bank Assignment for each sensor will default to all sixteen banks assigned. 3.7 Wireless RXT-320 Modbus™ Devices and CXT-320 Sensors Detcon offers a wide range of wireless sensors and field devices for use with the MCX-32 wireless option if selected.
Model MCX-32 modified on the Channel Details screen for each channel corresponding to the appropriate RXT320 analog input.
Model MCX-32 Port WT 20 21 22 23 24 Analog Inputs Channel # Input 1 Input 2 Input 1 Input 2 Input 1 Input 2 Input 1 Input 2 Input 1 Input 2 39 40 41 42 43 44 45 46 47 48 Modbus Modbus Address Address (Decimal) (Hex) WT 36 24 28 37 25 29 38 26 30 39 27 31 40 28 32 Analog Inputs Channel # Input 1 Input 2 Input 1 Input 2 Input 1 Input 2 Input 1 Input 2 Input 1 Input 2 55 56 57 58 59 60 61 62 63 64 Modbus Modbus Address Address (Decimal) (Hex) 44 2C 45 2D 46 2E 47 2F 48 30
Model MCX-32 The CXT Sentinel Slave Controller has the option of employing a Relay Output PCA. The relay output PCA of the CXT Sentinel Slave Controller is controlled by the CXT Sentinel Slave Controller, and is not, and should not be considered as part of the MCX Alarms. The MCX has no control over the CXT Sentinel Slave Controller‘s relay output PCA.
Model MCX-32 3.10 SmartWireless® CX Sentinel Sensor Station Detcon offers a SmartWireless® CX Sensor Station which can be configured to the MCX-32 controller if the wireless option is selected. The CX Sensor Station is a wireless RXT320 device that transmits data from up to four wired analog sensors back to the MCX-32 wirelessly using radios that operate at 2.4GHz and conform to non-licensed radio frequency appliance usage around the world.
Model MCX-32 Table 5 Wireless CX Sensor Station Analog Input Card Modbus™ Addresses Port 1 2 CX CX Modbus CX CX Modbus Channel Channel Sensor Analog Address Sensor Analog Address # # Station Inputs (Hex) Station Inputs (Hex) Input 1 1 Input 1 17 Input 2 2 Input 2 18 1 40 5 44 Input 3 3 Input 3 19 Input 4 4 Input 4 20 Input 1 5 Input 1 21 Input 2 6 Input 2 22 2 41 6 45 Input 3 7 Input 3 23 Input 4 8 Input 4 24 Input 1 9 Input 1 25 Input 2 10 Input 2 26 3 42 7 46 Input 3 11 Input 3 27 Input 4 12 Input 4
Model MCX-32 3.11 Remote Monitoring and Control The MCX-32 has the ability for remote monitoring and control through a built in web server. This web server interfaces to TCP/IP local networks with a DHCP server through an Ethernet connection. When an MCX-32 is connected to a Local Area Network (LAN) with a DHCP server, it will automatically be assigned an IP address which can be viewed from the “About System” menu in the Main Menu.
Model MCX-32 These relays may be setup as Energized or De-energized, Silence or Non Silence, and Latched or Unlatched, refer to section 5.4.8 3.13 General Wiring and Configuration Notes Follow generally accepted guidelines for RS-485 serial networks. Do not wire I/O Modules and/or Modbus™ gas sensors in long-distance ‘T-Tap’ configurations. Instead, use a “daisy-chain” wiring scheme. Use Detcon Recommended cabling whenever possible.
Model MCX-32 4.0 CompactFlash Card The MCX-32 controller has a feature that allows data logging when a CompactFlash (CF) memory card is installed. The CF card must be installed in the CF slot located on the back of the controller’s display unit before the controller is powered up (Figure 23). The controller will automatically format the card and create the necessary files for data logging.
Model MCX-32 5.0 Operation 5.1 Main Display Screen The Main Display screen of the MCX-32 controller consists of two main sections. There is a primary sensor/device section and if wireless devices are configured, there is a secondary wireless transceiver section. The primary sensor section displays up to eight channels of information at a time per tab. One or more tabs may be displayed near the top of the channel display area. Each of these tabs displays information for up to eight channels.
Model MCX-32 Figure 25 Model MCX-32 Main Display Screen (Wireless Transceiver Section) Each tab display will remain on screen for approximately ten seconds (default) and will then move to the next tab if available. If any events such as alarms, status, faults are active, the screen will remain on the tab with the active event. If multiple events occur in different tabs, the screen will alternate every five seconds between the tabs with active events.
Model MCX-32 Figure 26 Model MCX-32 Main Display NOTE: Alarm Reset and Alarm Silence are configurable and operation is determined by the settings in the RL4/ALM STATION SETUP menu. See Section5.4.8. 5.1.1 Password Protection The MCX-32 controller incorporates password protection to keep un-authorized personnel from inadvertently changing the controller’s configuration.
Model MCX-32 Figure 27 Channel Details Screen The Channel Details screen is used to view or change information directly related to a sensor. The Channel Details screen displays the sensor’s description, the current reading, the gas type & units, the channel’s on/off status, the range of the sensor, the analog output status, the device type, the sensor status, the alarm values and the bank(s) the alarms are associated with. Refer to Section 6.
Model MCX-32 Figure 28 Wireless Transceiver Details Screen The Wireless Transceiver Details screen is used to view or change information directly related to a transceiver. The Wireless Transceiver Details screen displays the transceiver’s description, the current status, the transceivers on/off status, the voltage, the battery life, the wireless transceiver device type and the RF link quality. Refer to Section 6.
Model MCX-32 Figure 29 Main Menu Screen NOTE: The COMPACT FLASH menu button only appears if a CompactFlash card has been successfully installed in the MCX-32 controller. The Main Menu screen provides access to thirteen different menus that allow the user to change the controller’s configuration.
Model MCX-32 Upon entering the Auto Configure System menu, selecting the ‘Start’ button allows the controller to automatically start a search for serial sensors/devices on both ports simultaneously and poll the Modbus™ with a request for information on any sensor/device found. If a response is received, the controller will poll the sensor for information on the device type.
Model MCX-32 change the values for interval updates of RL4s, AO4s and wireless transceivers. Error counters can be reset as well from this screen. Figure 31 Modbus Utilities 5.4.2.1 Device Diagnostics Screen The Device Diagnostics menu button will display information associated with the controller’s 64 channel addresses, displaying 8 addresses per page and the Modbus™ address will be shown as a decimal value.
Model MCX-32 5.4.2.2 RL4/Alarm Station Diagnostics Screen The RL4/Alm Stn Diagnostics menu button will display information associated with the controller’s 32 alarm device addresses, displaying 2 addresses per bank and the Modbus™ address will be shown as a hexadecimal value. The information displayed consists of the Modbus Address, Status, COMM Error Count and COMM Error Total Time. Figure 33 RL4/Alm Stn Diagnostics Screen 5.4.2.
Model MCX-32 5.4.2.4 Modbus Timeouts Screen The Modbus Timeouts menu button displays four values pertaining to Modbus communications that can be modified if needed. Inter Poll Delay is the amount of time in milliseconds the MCX-32 will wait after receiving a poll response from one sensor/device before it polls the next sensor/device. Response Timeout is the amount of time in milliseconds the MCX-32 will wait for a sensor/device to respond to a poll request.
Model MCX-32 Figure 36 Update Intervals Screen 5.4.2.6 Reset All Counters Menu Selecting the RESET ALL COUNTERS menu button and selecting YES will reset all the COMM Error Count and the COMM Error Total Time values to zero. Figure 37 Reset All Counters Menu 5.4.3 Alarm Inhibit Screen The Alarm Inhibit screen allows the user to inhibit alarms for a pre-determined amount of time. The screen is identified as ‘ALARM INHIBIT’. The screen is typically used to inhibit alarms during calibration of a sensor.
Model MCX-32 When logged in, selecting the ‘INHIBIT TIME’ field will open a numeric keypad used to enter the length of time the controller will inhibit alarms. When the amount of time has been entered, select the ‘START’ button to start the time counter. The controller will inhibit all alarms until the time reaches ‘0’ (zero). While the Alarm Inhibit counter is running, the field will display ‘TIME REMAINING’ along with the active counter.
Model MCX-32 individually toggled on or off or they can all be turned on or off for each port by selecting the ‘ALL ON’ or ‘ALL OFF’ buttons located at the bottom of the screen. Figure 39 Turn ON/OFF Channels Screen 5.4.
Model MCX-32 Date, simply select the value and then select ‘ENTER’ on the virtual keypad. The value to be changed will be highlighted. Use the keypad arrow keys labeled ‘RAISE’ and ‘LOWER’ to increase or decrease the value. Use the keypad arrow keys labeled ‘PREV’ and ‘NEXT’ to move to a different value. Select ‘ENTER’ to save the value.
Model MCX-32 Figure 42 Automatic Screen Switching Screen 5.4.5.3 Contrast/Brightness Screen The Contrast/Brightness menu allows the user to customize the contrast and brightness of the MCX-32 display. To change these values, select the appropriate field and use the displayed numeric keypad. Select ‘ENTER’ to save the value. Figure 43 Contrast/Brightness Screen 5.4.5.4 Modbus Address Screen The Modbus Address Screen allows the setting of the address used for the Slave RS-485 Port (Port 3).
Model MCX-32 Figure 44 Modbus Address Screen 5.4.5.5 Calibration Screen The Calibrate Screen menu allows the user to calibrate the MCX-32’s touch screen display. Selecting this menu will launch the touch calibration application which instructs the user to touch the indicated squares accordingly. After a successful calibration, the application will close and exit back to the System Settings screen. Figure 45 Calibration Screen 5.4.5.
Model MCX-32 Figure 46 Power Management Screen (No Secondary Supply) The controller has the unique ability to provide a charging voltage for approved rechargeable batteries. If batteries are connected to the auxiliary 24VDC input, this feature will provide a nominal 27VDC @ 1Amp (maximum) to the auxiliary 24VDC input to charge the batteries. The circuit will monitor the batteries and keep the batteries at full charge.
Model MCX-32 Figure 47 Power Management with Battery Charge ‘ON’ When the battery feature is selected, DC POWER will change to BATTERY and if the battery charging circuit senses that the batteries need charging, CHARGING will appear below BATTERY, and both will be highlighted. The voltage displayed on the Secondary side will then reflect the charging voltage provided to the batteries. 5.4.
Model MCX-32 5.4.7 Turn ON/OFF WTS The Turn ON/OFF WTS screen allows selection of the number of active wireless transceivers that the controller will be able to communicate with. Each wireless transceiver corresponds to a specific channel number which defines the transceivers Modbus address. They can be turned ON or OFF by selecting the corresponding channel button associated with the transceiver.
Model MCX-32 To activate an alarm device, simply select the correct Modbus address in the desired bank and port to turn it ON. This makes the specific address for the specific port available. Next, define the type of alarm device by selecting whether it is an RL4 module or an alarm station in the field below the Modbus address. Figure 50 RL-4 Setup Screen All four relays will be displayed for each bank.
Model MCX-32 Figure 51 Auxiliary Relay Configuration Screen 5.4.9 Change Password Screen The Change Password screen allows the user to change the password required to log in to the MCX-32 controller. When selected, the user is prompted to enter ‘Current Password’, ‘New Password’, and ‘Re-Type New Password’. Passwords are numeric values ten digits or less.
Model MCX-32 Figure 53 WT Setup Screen 5.4.10.1 Low Battery Alarms Screen The Low Battery Alarms menu allows the user to set low battery alarm thresholds for wireless transceivers using Detcon’s Smart Battery Pack that are interfaced to the MCX-32. TTE represents the time to empty and is displayed in days. SOC represents the state of charge and is displayed as a percentage value. The TTE value is used for wireless transceivers interfaced to devices other than alarm stations.
Model MCX-32 The low battery threshold for these type of transceivers is set at 6.00V from the factory and a low battery status will appear on the display corresponding to the CXT transceiver when its battery voltage reaches 6.00V. Contact Detcon for instructions on how to change this threshold. To change the TTE value, simply select the up or down arrow accordingly. To change the SOC value, select the SOC field and use the numeric keypad to change the value. Select ‘ENTER’ to save the value. 5.4.10.
Model MCX-32 When selected, ALARM TEST MODE menu button will simulate alarm conditions by incrementing the gas readings from 0 for all active gas channels at 5% full scale. Once the concentration has reached full scale, the concentration will begin to decrement back to 0 and the controller will exit the test mode. The test mode can also be terminated at any time during the test cycle by selecting the ALARM TEST MODE menu button again.
Model MCX-32 Figure 57 Compact Flash Screen 5.4.12.1 View TWA & Peak Screen Selecting the VIEW TWA & PEAK button displays the TWA & PEAK screen which allows the user to view the recorded time weighted average (TWA) and peak readings for each channel represented by its assigned gas sensor. This data is calculated and recorded every 60 minutes and is displayed on the screen with the date, time, channel number, TWA and peak readings.
Model MCX-32 Figure 59 Events Screen 5.4.12.3 Backup Configuration Screen The BACKUP CONFIGURATION button allows the user to save the current configuration of the MCX-32 to the CF card. Figure 60 Backup Configuration Screen 5.4.12.4 Restore Configuration Screen The RESTORE CONFIGURATION button allows the user to load the saved configuration stored in the CF card. This allows for greater portability to other MCX-32 controllers that require similar configurations. Model MCX-32 Instruction Manual Rev. 3.
Model MCX-32 Figure 61 Restore Configuration Screen 5.4.12.5 Format Compact Flash Screen The CF card is automatically formatted upon power up of the MCX-32 controller which creates the necessary files for data logging. The FORMAT COMPACTFLASH button allows the user to reset (delete) all data stored in these logging files. When selected, a warning window will be displayed prompting the user to confirm the reset of the CF card.
Model MCX-32 5.4.13 About System Screen The About System screen displays important information about the MCX-32 controller including its IP address if connected to a LAN. Figure 63 About System Screen Model MCX-32 Instruction Manual Rev. 3.
Model MCX-32 6.0 Controller Setup The setup of the controller is critical for proper operation. Modbus™ addresses must be correct on all the devices connected to the controller before the controller will acknowledge them. If manually configured, the number of sensors and wireless transceivers, if any, must be entered into the controller to allow it to communicate with them. Alarm devices must be enabled on the correct port before they can be utilized.
Model MCX-32 Table 6 Input Device Modbus™ Addresses for Port 1 PORT CHANNEL 1 Model MCX-32 Instruction Manual 1 2 3 4 5 6 7 8 9 10 11 12 13 14 15 16 17 18 19 20 21 22 23 24 25 26 27 28 29 30 31 32 SERIAL SENSORS (Hex) 1 2 3 4 5 6 7 8 9 A B C D E F 10 11 12 13 14 15 16 17 18 19 1A 1B 1C 1D 1E 1F 20 Rev. 3.
Model MCX-32 Table 7 Input Device Modbus™ Addresses for Port 2 PORT CHANNEL 2 33 34 35 36 37 38 39 40 41 42 43 44 45 46 47 48 49 50 51 52 53 54 55 56 57 58 59 60 61 62 63 64 SERIAL SENSORS (Hex) 21 22 23 24 25 26 27 28 29 2A 2B 2C 2D 2E 2F 30 31 32 33 34 35 36 37 38 39 3A 3B 3C 3D 3E 3F 40 Wireless Sensors (Hex) 21 22 23 24 25 26 27 28 29 2A 2B 2C 2D 2E 2F 30 31 32 33 34 35 36 37 38 39 3A 3B 3C 3D 3E 3F 40 DA4/DI4 & CX INPUTS (Hex) 48 48 48 48 49 49 49 49 4A 4A 4A 4A 4B 4B 4B 4B 4C 4C 4C 4C 4D 4D 4D
Model MCX-32 Table 8 Input Device Configuration Example for Port 1 CHANNEL CHANNEL STATUS INPUT DEVICE DEVICE TYPE MODBUS ADDRESS (Hex) WTS ON/OFF Page 1 ON RXT w/Analog Sensor 1 RXT Analog 01 1 2 OFF N/A N/A N/A N/A 3 ON 2 ON RXT Analog RXT Analog 02 4 02 2 5 ON DA4 41 N/A 6 ON RXT w/Analog Sensor 1 RXT w/Analog Sensor 2 DA4 w/Analog Sensor 1 DA4 w/Analog Sensor 2 DA4 41 N/A 7 OFF N/A N/A N/A N/A 8 OFF N/A N/A N/A N/A 9 ON DA4 42 N/A 10 ON DA4 42
Model MCX-32 The RXT with one analog input sensor is assigned Modbus address 01h which corresponds to Channel 1 and Channel 2 for an RXT Analog device type. Channel 1 will display the information of an analog sensor connected to the first analog input of the RXT via AN1 of the Model 100 Terminal Board. Channel 2 will display the information of an analog sensor connected to the second analog input of the RXT via AN2 of the Model 100 Terminal Board.
Model MCX-32 The CXTDM sensor is assigned Modbus address 15h which corresponds to Channel 21 for a CXT 320 device type. Channel 21 will display the information for the CXTDM sensor accordingly. Additionally, since this is a wireless device, the transceiver needs to be turned ON accordingly in the WTS ON/OFF page to access the transceivers information which corresponds to WTS 21 based on its Modbus address of 15h. Refer to section 3.
Model MCX-32 2. The sensor/device can be input manually by selecting the Device Type. This will open a window that will allow the user to select the type of device that is being attached (Figure 68). The controller will then try to communicate with the appropriate sensor or I/O module. After a channel is added, the information on the Channel Details screen will need to be checked and/or updated to insure that the configuration for that sensor is correct and accurate.
Model MCX-32 Figure 66 Gas/Units Entry Channel (ON/OFF) The Channel field is used to turn the channel ‘ON’ or ‘OFF’. If the Channel field is ‘OFF’, the controller will not attempt to communicate with a sensor or I/O Module connected to the channel. This is useful if the sensor is not working properly and needs to be removed from being polled. Note that the channel is not actually removed from the configuration, but is only disabled.
Model MCX-32 Analog Out The Analog Out field is set to ‘ON’ or ‘OFF’. Unless there is and AO-4 associated with this channel, this field should be left as ‘OFF’. To turn on the Analog Out, select the Analog Out field on the screen, and the controller will change the status from ‘OFF’ to “ON’ or from ‘ON’ to ‘OFF’. Device Type The Device Type field will display the type of device connected. If the Auto Configure did not find a valid device type, this field will display ‘Model 700’ as the default value.
Model MCX-32 select the appropriate field for the alarm. If selecting the alarm set-point, the display will prompt for a numeric input. The Ascending/Descending will change from ‘ASC’ to ‘DEC’ or from ‘DEC’ to ‘ASC’ when selected. Figure 69 Alarm Level Set There are sixteen banks of alarms that the sensor can be assigned to. The Relay Bank Assignment is used to select which bank the sensor is assigned.
Model MCX-32 6.2 Wireless Transceiver Channel Setup When a wireless transceiver is being added to the controller, information for that transceiver will need to be added or modified on the WT Details screen. The Wireless Transceiver Details screen is used to view or change information directly related to a wireless transceiver.
Model MCX-32 The Status is read from the transceiver and cannot be changed. WT (ON/OFF) The WT field is used to turn the transceiver ‘ON’ or ‘OFF’. If the WT field is ‘OFF’, the controller will not attempt to communicate with the transceiver. This is useful if the transceiver is not working properly and needs to be removed from being polled. Note that the transceiver is not actually removed from the configuration, but is only disabled.
Model MCX-32 7.0 Remote Display The Remote Display option affords the ability to connect a remote monitoring station to the MCX-32 Controller System. The Remote Display contains the same touch screen display and interface PCA as the MCX-32, but it does not have the ability to communicate directly with any of the devices connected to the MCX-32 controller.
Model MCX-32 4. A set of terminal blocks labeled “RS-485” is available for connection to the MCX-32 Controller. Connect the RS-485 cable from the MCX-32 Controller to these terminals. 7.2 Operation The Remote Display operates like the MCX-32 controller, with some important differences. The Remote Display obtains most of the basic information from the controller, such as gas concentration, and alarm or fault conditions.
Model MCX-32 NOTE: Alarm Reset and Alarm Silence are configurable at the controller only and operation is determined by the settings in the RL4 Setup screen on the main MCX-32 controller. See Section 5.4.2. 7.2.1 Channel Details Screen Detailed information for any sensor can be found on the Channel Details Screen. This screen does not allow the setting of alarm set-points or RL4 Banks. These settings are configured in the MCX-32 Controller.
Model MCX-32 Figure 75 Remote Display System Configuration Screen The System Configuration Screen provides access to six different aspects of the remote display that can be changed by the operator. SET # OF CHANNELS CHANGE PASSWORD DISPLAY SETTINGS RESTORE DEFAULTS POWER MANAGEMENT AUXILIARY RELAYS 7.2.2.1 Set # of Channels Screen The Set # of Channels screen allows setting the maximum number of active channels that the controller will be able to communicate with.
Model MCX-32 7.2.2.5 Power Management Screen The Remote Display has the ability to monitor the voltage from the internal power supply, and an auxiliary 24VDC input voltage to the controller. The Power Management screen provides a digital display of the voltages applied. If an auxiliary 24VDC is not connected to the controller the voltage displayed will be correct for the primary, and the secondary will display 0.00.
Model MCX-32 8.0 Troubleshooting If the MCX-32 display does not come on when power is applied to the unit, check the Power Supply Voltage for an output of 24VDC. Also check the Interface PCA, J5 PWR to GND for 24VDC out to the monitor. The MCX-32 provides features to aid in troubleshooting communication problems in the sensor network. Problems with Modbus™ communications can be identified with the aid of the System Configuration’s Modbus™ Utilities (Section 5.4.2).
Model MCX-32 2. If I/O Modules are installed in the controller, ensure that the appropriate RS-485 connector is plugged into the top module (TB1-J1 or TB2-J1), and the connector to the terminal blocks is plugged into the bottom module (TB1-J2, or TB2-J2). a. Ensure that the Controller Setup is correct for the I/O Module(s) installed (Section 6.0). b. Ensure that the address of the I/O Module(s) is set correctly. c.
Model MCX-32 8.1 Wireless Troubleshooting 1. COMM ERR a. Verify all devices on a specific port are set to the same RF Channel. b. Verify controller address is set to F0. (Switches on term board, grounded I2C wire or jumper/battery board on black box transceiver.) c. Verify all slave devices have a unique Modbus ID number. d. Verify Network ID is the same as RF Channel. e. Verify Modbus timeout values are set to recommended default values. f. Verify Modbus baud rates are set to recommended default values.
Model MCX-32 9.0 Warranty and Customer Support Detcon Headquarters Shipping Address: 4055 Technology Forest Blvd., The Woodlands Texas 77381 Mailing Address: P.O. Box 8067, The Woodlands Texas 77387-8067 Phone: 888.367.4286, or 281.367.4100 Fax: 281.292.2860 • www.detcon.com • service@detcon.com • sales@detcon.com All Technical Service and Repair activities should be handled by the Detcon Service Department via phone, fax or email at contact information given above.
Model MCX-32 10.
Model MCX-32 10.
Model MCX-32 10.2 Remote Display RS-485 Register Map The Characteristics of the Modbus slave port are; 9600 baud, 8 bits, no parity, 1 stop bit.
Model MCX-32 Modbus Register MCX-32 Channel Description Modbus Register Status* 40079 Reading 40080 Status* 40081 Reading 40082 Status* 40083 Reading 40084 Status* 40085 Reading 40086 Status* 40087 40035 40036 40037 40038 40039 40040 19 20 21 40041 40042 40043 22 MCX-32 Channel 41 42 43 Description Modbus Register Status* 40123 Reading 40124 Status* 40125 Reading 40126 Status* 40127 Reading 40128 MCX-32 Channel Description Status* Reading 63 64 --- Status* Read
Model MCX-32 Bit 8 Not Used Bit 9 Not Used Bit 10 Not Used Bit 11 Not Used Bit 12 Not Used Bit 13 Not Used Bit 14 Not Used Bit 15 Not Used Notes: 1) 2) 3) Registers 40001~40128 are read only registers. Use Modbus™ Function Code 3 only Register 40129 will accept Modbus™ Function 03 or 06 only The decimal point specifies the divisor for reading registers. Example: Assuming the channel is 01 (40000-40001): 40000=150, 40001=0x0040 (divisor of 10).
Model MCX-32 11.0 Appendix 11.1 MCX-32 IP Address Documentation The MCX-32 has been configured for remote management through a built in web server. The web server interfaces to TCP/IP local networks with a DHCP Server. Requirements: DHCP Server on the local network Recommendations: General working knowledge of TCP/IP networking protocol for IP networks and/or consultation with an IT representative or consultant.
Model MCX-32 WHAT IS DHCP? The Dynamic Host Configuration Protocol (DHCP) is a network protocol that is used to configure network devices so that they can communicate on an IP network. A DHCP client uses the DHCP protocol to acquire configuration information, such as an IP address, a default route and one or more DNS server addresses from a DHCP server. The DHCP client then uses this information to configure its host.
Model MCX-32 Shipping Address: 4055 Technology Forest Blvd., The Woodlands Texas 77381 Mailing Address: P.O. Box 8067, The Woodlands Texas 77387-8067 Phone: 888.367.4286, 281.367.4100 • Fax: 281.292.2860 • www.detcon.com • sales@detcon.com Model MCX-32 Instruction Manual Rev.3.