
Instruction manual

RXT Wireless Configuration Tool
RXT WCT Instruction Manual Rev 0.0 Page 31 of 33
NOTE: Found RXTs will not clear automatically from the list if a search of a different
channel is performed. Newly found RXTs will simply be added to the existing RXTs in the
list.
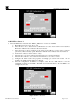
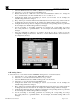
26. Select the RXTs to be moved from the list individually or use the buttons at the bottom to select
multiple RXTs. From our sample exercise, all five RXTs will be selected.
27. Select the Move To My Network button in the Operations section to move the highlighted RXTs to the
current Channel/Network ID which in this case is Channel 1/Network ID 1. The red status line at the
bottom of the screen will indicate the RXTs being moved and when the process is complete.
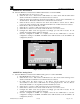
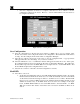
28. Select the Close button which will return back to the Wireless Network screen.
29. Select Search My Network in the Operations section. All five RXTs from the sample exercise will
now be listed in the RXTs In My Network section and reside on Channel 1/Network ID 1 as indicated
by the My Network section.
30. Clear out any unwanted RXTs that appear on the list and select all five RXTs from our sample
exercise.
Upload RXTs
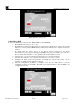
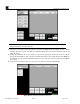
31. Select the Config Mode button in the Operations section. A pop-up window will appear and select
ON. This will set the RXTs in re-config mode which allows them to be configured.
NOTE: When RXTs are in re-config mode, their displayed text color will change to red.
32. Select the Configure RXT(s) button which will open the file manager screen.
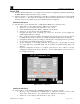
33. Select the configuration file “Configuration Example” from the screen and select the Open button.
This will upload the selected configuration file to all the RXT’s in re-config mode. The red status line
at the bottom of the screen will indicate the RXTs being configured.
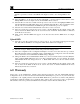
34. Change the WCT’s current Channel/Network ID (1/1) to the new current wireless network (10/10) the
newly configured RXT-300s reside in as set in their configuration file. For our example, the current
Channel/Network ID was changed from 1/1 to 10/10 which will now be the new current wireless
network.
35. Select Search My Network in the Operations section. All five RXTs from the sample exercise will
now be listed in the RXTs In My Network section and reside on Channel 10/Network ID 10 as
indicated by the My Network section.
6.0 Warranty
Detcon, Inc., as the manufacturer, warrants under intended normal use each new Model RXT Wireless
Configuration Tool to be free from defects in material and workmanship for a period of one year from the date
of shipment to the original purchaser. Should the RXT WCT fail to perform in accordance with published
specifications within the warranty period, return the unit to Detcon, Inc. for necessary repairs or replacement.
All warranties and service policies are FOB the Detcon facility located in The Woodlands, Texas.