
Instruction manual


INSTALLATION
Unpacking
Before beginning installation of your scale, make certain the instrument has been received in
good condition. When removing the scale from its packing, inspect it for signs of damage,
such as exterior dents and scratches. Keep the carton and packing material for return
shipment if it should become necessary. It is the responsibility of the purchaser to file all
claims for any damages or loss incurred during transit.
1. Remove the scale from the shipping carton and inspect it for any signs of damage.
2. Remove the protective strip on the CR2032 memory battery.
3. Remove the red transport protection located on the reverse side of the scale.
4. Plug-in the AC adapter or install the optional 9V battery. Refer to the AC Adapter or
Optional 9V Battery sections of this manual for more instruction.
5. Place the scale on a flat level surface, such as a table or bench.
6. Slide the tray carefully on to the platform.
7. The scale is now ready for operation.
AC Adapter
To apply power to the scale using the UL listed AC adapter, insert the plug from the AC
adapter cable into the power jack on the back of the scale and then plug the AC adapter into
the proper electrical outlet.
Optional 9V Battery
The scale can use a "9V" size alkaline battery (not included). If you wish to operate the scale
from a battery, you must first obtain and install the battery. The battery is contained in a
holder inside the scale. Access is via a removable panel on the bottom of the scale.
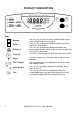
Setting the Clock
NOTE! Upon plugging in the AC adapter (or installing the optional 9V battery), the display will
alternately show the time 00:00 (24-hr mode) and the date 01.01 (month/month/day/day).
1. Press the Clock Set key to set the time.
2. Press the Adjust key to set the hour.
3. Press the Clock Set key to confirm the hour setting and then advance to the minute.
4. Press the Adjust key to set the minute.
5. Press the Clock Set key to confirm the minute setting and then advance to the year.
6. Press the Adjust key to set the year.
7. Press the Clock Set key to confirm the year setting and then advance to the month.
8. Press the Adjust key to set the month.
9. Press the Clock Set key to confirm the month setting and then advance to the day.
10. Press the Adjust key to set the day.
11. Press the Clock Set key to return to the clock mode with new date and time displayed.
NOTE! The Clock Set key must be pressed within 10 seconds after entering the new setting,
otherwise the scale will exit clock setting mode automatically without saving.
Weighing Unit Switch
The weighing unit switch (kg / lb.oz switch) is a push-button switch located on the bottom of
the scale. Press the switch to change between kg and lb.oz.
8535-M215-O1 Rev C 8440 Operation
3