DETEXI Network Video Management System 6.2 EXPAND YOUR CONCEPTS OF SECURITY DETEXI NVR Domain Controller CORE COMPONENT FOR MULTI-SITE CONNECTIVITY DETEXI NVR Domain Controller allows to control remotely NVR domain — a network of NVRs that are logically attached to the main NVR — NVR Domain Controller. USER GUIDE June 2010 Canada ON, Toronto, www.detexi.
DETEXI Network Video Management System EXPAND YOUR CONCEPTS OF SECURITY DETEXI NVR Domain Controller ..................................................... 3 DETEXI NVR Domain Model .........................................................................3 What is DETEXI NVR Domain Controller?................................................5 Setup DETEXI NVR Domain ..........................................................................6 How to Setup NVR Domain?............................................
1. Update Camera Settings....................................................................................................22 2. Synchronize Updates..........................................................................................................23 Event Management (Tasks) ....................................................................................... 23 1. Update Tasks ........................................................................................................................
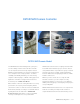
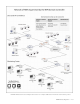
DETEXI NVR Domain Controller DETEXI NVR Domain Model The DETEXI Network Video Management system gives NVR Domain Controller learns everything about the NVR’s users the ability to monitor and record video and audio in the NVR network and their group of cameras, whereas over an IP (Internet Protocol based) computer network.
DETEXI NVR domain model is indispensable solution for complex distributed environments and monitoring centers.
What is DETEXI NVR Domain Controller? If you security installation has two or more DETEXI NVRs Centralized User Access Control and Camera in different locations or a single site with hundreds of Management cameras, you should explore upgrading with the DETEXI The NVR Domain Controller maintains a single Users List NVR Domain Controller module in order to organize the with security information for all domain users and NVR domain consisting of the main NVR — Domain authenticates all Remote DETEXI Cli
Setup DETEXI NVR Domain How to Setup NVR Domain? Weather you want to centralize user access control and camera management for existing IP surveillance system, or configure a new security installation consisting of several NVRs that are logically attached to the NVR Domain Controller, there are several steps to follow. 1.
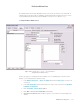
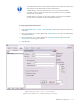
Exclusive Master User The NVR Domain Controller and child NVRs must be connected to the Internet or the same LAN. To establish logical connection between child NVRs and the NVR Domain Controller at least one user in every child NVR and in the Domain Controller must be set as E x c l u s i v e M a s t e r U s e r . 1. Setup Exclusive Master User Fig 1. NVR Control Center — Users — User Information (Setup Exclusive Master User.
9 A child NVR administrator must provide the NVR exclusive master user login name and password to the NVR Domain Controller administrator. 9 The NVR Domain Controller administrator in turn must provide the Domain Controller exclusive master user login name and password to every child NVR administrator in the domain. 9 The NVR Domain Controller has the same graphical user interface named NVR Control Center as the NVRs just with expanded functionality. 2. Setup Login Name & Password 1.
Register NVR on the Domain Controller To register NVR on the Domain Controller as a member of domain network the NVR E x c l u s i v e M a s t e r U s e r should send request to get connected to the NVR Domain Controller. The authorization of request will be required — credentials supplied by the NVR Domain Controller administrator should be provided. 1. Define NVR Domain Controller Address 1. In the NVR Control Center go to the General — Global Settings (Fig 3). 2.
9 Registration not complete — registration request is waiting to be accepted by the Domain Controller; 9 Registration rejected — registration request is rejected by the Domain Controller; 9 Registered — registration request is successfully completed. Fig 4. NVR Control Center — General — Global Settings (Define NVR Domain Controller Address — Provide Credentials.
3. Registration not Complete — the NVR registration request is not accepted or rejected — the NVR and Domain Controller logical connection stays in a NEW mode when the Domain Controller can "see" the NVR components and settings but can not remotely update any of them. 9 The registration request in a NEW mode may be accepted or rejected at any time. 1. Accept Registration Request Fig 5. Domain Controller NVR Control Center — General — NVR Locations (Accept Registration Requeat.) 1.
9 Connection settings can be changed. Click Save button to save changes. 9 The authorization will be required — credentials supplied by the NVR administrator should be provided. 9 The NVR Domain Controller has the same graphical user interface named NVR Control Center as the NVRs just with expanded functionality. 2. Reject Registration Request 1. In the Domain Controller NVR Control Center go to General — NVR Locations (Fig 5). 2.
1. In the NVR Control Center — General — Global Settings under the NVR Controller Settings 2. Provide credentials supplied by the NVR Domain Controller administrator to send the request. for HOST click Unregister site on Domain Controller toggle button. Fig 6. NVR Control Center — General — Global Settings (Request to unregister on Child NVR.) 2. Unregister on Domain Controller To unregister a specific child NVR on the NVR Domain Controller — 1.
Fig 7. Domain Controller NVR Control Center — General — NVR Locations (Request to Unregister on Domain Controller. Make Child NVR Temporarily Inactive) Temporarily Inactive Child NVR The NVR Domain Controller allows users to administer and control all cameras in the domain from a single Domain Controller interface considering all child NVRs as one powerful NVR.
Centralized Control and Management What is the Role of NVR Domain Controller? Setting up DETEXI NVR domain — the network of DETEXI NVRs managed by the NVR Domain Controller — allows centralized user access control and camera management while each particular NVR is responsible for recording video from its own set of cameras configured in the NVR Cameras List. 1.
System Health and Status A background service in Windows, DETEXI NVR will start automatically upon system start-up and continue running even after the user logs out. The underlying structure of the DETEXI NVR software consists of many individual services, which allow execute and organize all the tasks it is responsible for. From the Domain Controller user interface — NVR Control Center — system administrators can perform system health and status checks.
or on alarms or events. Get Shots service captures still shots related to alarms from streaming video, when configured, and stores them in a special location in the archive. Port Mapper service, when configured, routes network requests between two network connections on different subnets or networks. This allows for separate security and corporate networks across which the DETEXI system can communicate.
Fig 8. Domain Controller NVR Control Center — General — NVR Locations (Get NVR Status in the Domain. Restart Windows.) Update Child NVR Status From the Domain Controller user interface — NVR Control Center — users can update the operational status of all network video recorders in the domain. 1. In the Domain Controller NVR Control Center go to General — NVR Locations (Fig 9). 2. Select the NVR by its l o c a t i o n n a m e from the Servers Locations list. 3.
uncheck the service checkbox to disable monitoring, than you can click on any service name to turn it red to stop the service or black — to run. 9. To synchronize the services with the current configuration click Synchronize Location button. Fig 9. Domain Controller NVR Control Center — General — NVR Locations (Update NVR Status in the Domain. Restart Windows. Restart NVR.
connection time, task control, etc. are configurable on a per-user basis. 9 Any child NVR in the domain can have its own users list. This is not forbidden but is not necessary in the NVR Domain Controller configuration. These users have access to this NVR resources only. 1. Add New User 1. In the Domain Controller NVR Control Center — Users — User Information select This Location from the Servers Locations list, update the list (Fig 10). 9 This Location means the NVR Domain Controller.
the NVR before the connection will be terminated. User may login again if desired. A value of 9999 designates no time limit. 7. Check Master User checkbox to give the user permission to terminate other user sessions from the Client — Get Users. 8. Check Can Search Archive checkbox to give the user permission to view NVR archive. 9 Remember that User Cameras to Interact also must be setup. 2. Define User Cameras to Interact To define the cameras user has access to — 1.
Managing Cameras across Domain When the NVR registration request to become a domain member is accepted — the NVR Domain Controller imports and keeps up-to-date information about the remote (child) NVR cameras that allows users to administer and control all cameras in the domain from a single interface. 9 Any updates made in the cameras settings on the NVR Domain Controller will be automatically propagated to the child NVRs and vise versa.
y Setup camera recording instructions including alarms and motion detection y Configure camera Inputs/Outputs etc. For the detailed instructions, refer to the DETEXI NVR — Managing Cameras manual. 9 This Location means the NVR Domain Controller. 9 The NVR Domain Controller has the same graphical user interface named NVR Control Center as the NVRs just with expanded functionality. 9 2. Synchronize Updates When you are ready for your changes to take effect: 1.
Fig 12. Domain Controller NVR Control Center — Tasks (Select Server Location — Add/Select Task.) 2. Synchronize NVR Location When you are ready for your changes to take effect, you should s yn c h r o n i z e the services running on the NVR holding the updated TASKS with the current configuration. 9 If updates were made to the Domain Controller Users tasks click Synchronize button in the top right corner to activate the new configurations.
Domain Configuration Health Monitoring What Can Be Done? What can be done to ensure the DETEXI domain configuration health? First of all, the reliability settings should be configured for each NVR in the domain. Then — be aware weather all child NVRs are alive and properly respond to the domain controller. And finally, the domain database held by the NVR Domain Controller should always be synchronized with the child NVRs data. 1.
Setup Child NVR Check Alive Procedure Although every NVR in the NVR Domain Controller configuration should have its own reliability settings there is a new intercommunication layer between the NVR Domain Controller and a child NVR, which could also fail and therefore the system administrator must be able to check its status.
9 Recommended Settings — Interval for monitoring (sec) — 300, Attempts — 3, Each (in sec)— 60 9 If you know for a fact that the site is t e m p o r a r i l y d o w n for maintenance or other issues, simply uncheck the Check Alive check box. In this case the system will NOT initiate unnecessary tasks for a known problem and will return to monitoring only after you check the box again.
Fig 15. Domain Controller NVR Control Center — General — Global Settings (Synchronization Failure Message.) 9 The child NVR location name in the NVR Control Center — General — NVR Locations — Servers Locations list will stay red until the synchronization is restored. 3. Restore Synchronization 1. In the Domain Controller NVR Control Center go to General — NVR Locations. 2. Select the N V R l o c a t i o n in the Servers Locations list. 3. Click Import button to import the NVR cameras settings.
Fig 16. Domain Controller NVR Control Center — General — NVR Locations (Import Data from Failed Child NVR.