
User guide

DETEXI Basic Configuration 11 - 31
3. Registration not Complete — the NVR registration request is not accepted or rejected — the NVR
and Domain Controller logical connection stays in a NEW mode when the Domain Controller can
"see" the NVR components and settings but can not remotely update any of them.
9 The registration request in a NEW mode may be accepted or rejected at any time.
1. Accept Registration Request
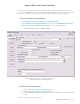
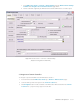
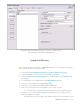
Fig 5. Domain Controller NVR Control Center — General — NVR Locations
(Accept Registration Requeat.)
1. In the Domain Controller NVR Control Center go to General — NVR Locations (Fig 5).
2. A NEW location appears in the Servers Locations list defining the NVR-requester settings —
9 Name — the NVR location name;
9 Camera Server Connect Settings — the NVR IP Address and Port number, Proxy Address
and Port number if proxy server is used to connect to the Internet — will be used by the DETEXI
Client connected to the Domain Controller to get the child NVR address when searching the
NVR archive.
9 Host Name — the NVR name/address;
9 INTERNET Name or Address — the NVR name/address (must be the same as in the Camera
Server Connect Settings).
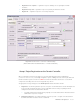
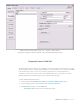
3. Click Import button to import the NVR-requester cameras settings. Provide credentials and wait until
the data import is complete.
9 The NVR becomes registered on the successful completion of the data import process —
proper messages appear on both sides.