
User guide

NVR
22
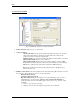
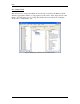
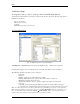
Many lines can be added to the schedule for each sub-camera. It is worth mentioning that, lines are the
scheduled recordings, located at the schedule box (Fig. 14.).
Different sections are to be set for each line of the schedule (Fig. 14):
1. Schedule section
- Click on “Add”, “Save”, or “Delete” buttons to add, save, or delete schedules
respectively.
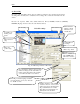
2. Connect/Stop Button
- Gives permission to Start (connect)/Stop recording
- This option is enabled on the “cameras recording” window, when the option “connect
camera immediately” is not selected (Fig. 2).
- This feature enables the user to have the ability to setup a camera and record, while not
mounted.
3. Motion settings
- Please refer to Motion setting section provided later in this document (Fig. 15.).
4. Time restrictions section
- No time restrictions (recording at all times)
- Restricted between (records only on selected days between specific hours (FROM/TO).
- Take shots between (records predefined number of shots on selected days between
specific hours (FROM/TO).
5. Image and position setup section
- Image size
- Recording frequency (FPS): number of frames per second
- Image compression
6. Move to position section
- “Pan/Tilt/Zoom” OR “Preset”: position that camera will move to, before recording
starts
7. Motion and Alarm section
- Motion detection
- index file by “frames with motion” will be created for playing back
from the archive. Only “frames with motion” are always recommended. To create the
index file, program uses “Motion step” and “Post motion” settings. Usually “Motion step”
and “Post motion” should be 1/2 or 1/3 from “FPS” value. In order to detect motion,
Recorder uses “Motion Settings” parameters (Fig. 15.).
- Motion only – places “frames with motion” in archive (could save archive space). It is
possible to move the camera to predefined “Pan/Tilt/Zoom” OR “Preset” position when
motion is detected.
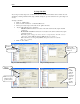
- Move Camera on Motion area (if checked):
o PTZ Æ camera will be moved to this position when motion is detected.
o Preset Æ camera will be moved to this preset position.
o Zoom area with motion Æ camera will be moved to the area where motion is
detected with the predefined zoom.
o Reset camera position → indicates that, camera should be pointed to the initial PTZ
or Preset position (if set).
- Alarm on motion – raises an alarm if motion has been detected. The raised alarm will be
selected from the “Execute Task” pull down menu.
Note: If a task is already selected from the pull down menu, to deselect it, press delete on
the keyboard.
- Alarm on Input ports – forces to detect alarm on cameras I/O block, and executes the
selected task (actions and notification) that has been chosen from “Execute task” pull
down menu (Fig. 14). These alarms are bounded to TASKS (for more information on
Tasks, please refer to section 4).
Note: Pre-alarm (frame), Post-alarm (frame), and Dwell (Second) are used for frame
settings.
8. Connection type section
- Use locally (without proxy)– forces the “Recorder” to connect to camera without using
proxy setting.