
User guide


DETEXI NVR 11 - 169
Setup a Functioning DETEXI NVR / Client
After installing the DETEXI software, it must be
configured for your cameras and video encoders. There
are minimum DETEXI NVR and Remote DETEXI Client
configurations necessary to have a functioning DETEXI
NVR with live video. The recording, motion detection, and
alarms also should be setup.
It is important to know how to properly setup the DETEXI
software components and what functionality could be
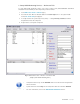
achieved. All dialogs that allow control and configuration of
all aspects of the DETEXI NVR are found under the NVR
Control Center — the NVR graphic user interface.
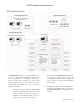
DETEXI Basic Configuration Steps
DETEXI NVR
Local
DETEXI Client
Remote
DETEXI Client
DETEXI
Archive Viewer
Start/Stop the NVR
Setup Recording Storage
Define Camera/Connection
Test Camera/Connection
Define User Information
NVR Services
Services Health Monitoring
Test —
Camera Connection
Driver Selection
PTZ functioning
Setup NVR for the Client
General Settings
Setup Authentication
24/7 Recording Schedule
Scheduled Recording with
Motion Detection
Multiple Recording Schedules
Motion Only recording
Setup Alarm on Motion
Adjust Motion Settings
Recording Settings
Check Recording Status
View/Monitor Cameras,
Alarm Notifications
Access/View/Export
Recorded Video
Access/View/Export
Recorded Video
Access/View/Export
Recorded Video
9 Refer to the DETEXI Software Components to learn the difference between
Local and Remote DETEXI Client.
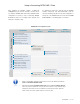
9 Although the DETEXI Client Archive Tool
and the DETEXI Archive Viewer
have very similar capabilities, they access the archives in very different ways
allowing for both tools to excel in different environments and for different
needs. There are a few unique features in each as well.