
User guide


DETEXI NVR 51 - 169
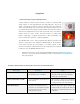
2. Video Servers (Encoders)
A video server (also called video encoder) makes it possible to integrate an
analog camera into a network video system without having to discard existing
analog equipment. A video server digitizes analog video signals and distributes
digital images directly over an IP-based network, turning analog cameras into
network cameras. It brings new functionalities to analog equipment and
eliminates the need for dedicated equipment such as coaxial cabling, analog
monitors and DVRs — the latter becoming unnecessary as video recording can
be done using standard PC servers. A video server typically has between one
and four analog ports for analog cameras to plug into, as well as an Ethernet
port for connection to a network.
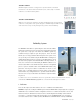
Like network cameras, a video encoder contains a built-in Web server, a
compression chip, and an operating system so that incoming analog feeds can
be converted into digital video, sent, and recorded over a computer network for
easier accessibility and viewing.
9 In addition to the video input, a video encoder can also support other functionalities such as audio,
alarm activation via digital inputs and outputs, and the control of PTZ (pan, tilt, zoom) mechanisms
through serial ports.
9 A video encoder also can be connected to a wide variety of specialized cameras, such as a highly
sensitive thermal camera, a miniature camera, or a microscope camera.
9 Before live video can be viewed in the DETEXI Client a network camera/video
server must be defined in the
NVR Control Center — Cameras.
Define Camera / Video Server
The DETEXI NVR supports most network cameras as well as analog to IP video servers (encoders).
Before recording can occur or live video can be viewed in the DETEXI Client network camera must be
defined in the NVR Control Center.
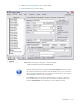
1. In the NVR Control Center switch to the Cameras — Cameras Settings (Fig 27).
2. Below the Cameras List make sure that Video Server is chosen as a d d t yp e from the drop-
down list next to Add button, then click Add button to open blank Cameras Settings dialog;
— or —
Click Dup button to open a copy of selected camera settings for editing.
3. Enter a descriptive name for the camera/video server into the Name input field.
4. From the Type drop-down list, choose camera type.
5. Type camera IP address and p o r t n u m b e r into Address input fields.
6. If camera is already installed, click Determine camera driver button to allow the NVR a u t o -
c o n f i g u r e the driver to be used for communication.
7. If camera has P a n / T i l t / Z o o m capabilities, With PTZ checkbox must be checked to enable
them in the NVR and Client.