
User guide


DETEXI NVR 75 - 169
2. Event Based Recording
Recording on NVR event — video is recorded for any defined camera when a chosen event occurs in the
NVR. The NVR response configuration is based on the NVR Task Execution Engine. In the NVR trigger is
a set of criteria that, when met, starts the execution of assigned task. When an event is triggered, some of
the common responses can occur, if configured. Recording occurs if assigned task includes the Record
Camera action.
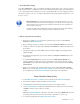
9 Record Camera action records alarm video for a user-defined camera or for the
camera associated with the event that triggered it. The length, picture quality, and
camera position of the recording can be defined if desired. An alarm snapshot can
also be taken by this task.
9 Learning the NVR event management system should allow a better understanding
of how to configure system settings including recording instructions.
3. What is Important to Remember
• Before any recording can occur an IP device (network camera or video encoder) must be
defined in the NVR Control Center.
• Before setting up any type of recording ensure first that recording is enabled for the IP device.
• Turning on continuous recording requires at least one schedule to be added and configured for
the IP device.
• Scheduled recording can combine both continuous and alarm-triggered recording instructions
(within schedule).
• Recording can be triggered by any event in the NVR by including Record Camera action in the
assigned task.
• If recording on Input Alarm method is setup, the IP device inputs must be defined in the
cameras settings for the NVR to be aware of external devices connected to the inputs and the
Check Alarm service responsible for watching the status of IP device inputs should be running
and monitored.
• When you are ready for your recording settings to take effect, start the Recorder and Check
Drive services from the NVR Control Center — Monitor or if the services were running during
the configuration just click the Synchronize button to activate the new configurations.
Setup Schedule, Video Quality
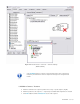
1. In the NVR Control Center — Cameras select a camera from the Cameras List (Fig 48).
2. Ensure that recording is enabled and switch to the Recording.
3. Click Add button under the blank Schedule list to add a new recording schedule.
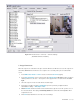
4. Leave No Time Restrictions radio button selected, and leave all days of the week checkboxes
checked to configure a 24/7 continuous schedule;
— OR —
Select the Restricted Between radio button and define a time range FROM - TO and leave
proper days of the week checked to have the schedule repeated these days only.
5. To setup video quality under the Image and Position Setup —