
User guide


DETEXI NVR 88 - 169
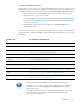
2. Define the Root Directory on the NVR FTP Server.
3. Enter Port to listen number and specify Disconnect when idle time.
4. Click the Add button below the users list to create a new user.
5. Enter User Name and Password — for the camera’s FTP connection authentication.
9 Even though a specific username/password can be used for each network camera, the same
username/password can also be used for all of them.
9 Proper authentication information must be provided to the cameras.
6. Leave the User Home Directory (standard FTP Server setting) blank — images from each camera
will be saved in a subfolder, named based on the Images path for the FTP Server camera’s setting.
7. During normal operation the Do not Filter Files checkbox must be unchecked.
8. Any user from the users list could be temporarily disabled by selecting Disable radio button.
Camera FTP Setting in the NVR
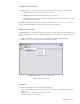
To define where the images FTP’ed from an IP device will be stored when uploaded —
1. In the NVR Control Center — Cameras select a camera from the Cameras List and switch to the
Recording (Fig 58).
2. Enter the Images path for FTP Server; the images FTP’ed from the camera will be saved in this folder
in the FTP Server Root Directory, specified in the NVR Control Center — General — FTP
Server.
9 The same path must be setup in the IP device built-in FTP Client for the FTP’ed files upload
path.
Fig 58. NVR Control Center — Camera Settings
(Define Images Path for NVR FTP Server.)