
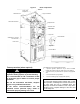
Technical data
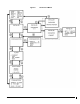

7
SECTION 2 OPERATION
2 ADJUSTMENTS AND START-UP
CAUTION
The boiler must be filled with water and all air
purged from the system, before turning on the
power.
CAUTION
If the power is turned on before the boiler is filled
with water, the elements will become seriously
damaged.
1. Adjust the set point of the boiler on the electronic control. See
control section for adjustments.
2. Turn on the power, set the thermostat at 30°C (85°F). The
circulator should start as well as the electrical elements in
sequence with a 12 seconds delay;
3. The circulator stays on for as long as there is a call for heat
except if differently configured on the electronic control.
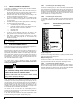
2.1 MECHANICAL HIGH LIMIT
Mechanical High Limit Control
The mechanical limit aquastat must be set 20
o
F above the set point
temperature on the electronic control.
Manual reset high limit control
Disconnect the unit before resetting the high limit. The manual reset
high limit is set at 100°C (212°F). To reset this protection, the boiler
needs to cool down. Then the red button shall be pressed using a
pen or screwdriver.
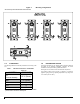
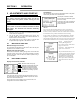
2.2 ELECTRONIC CONTROL
Display and electrical controller:
Pump: Shows the state of the pump.
Set P
: Indicates the temperature set point.
Target:
Indicates the target temperature.
T° in
: Temperature inside of the device.
T° out
: Temperature outside of the device
Cmd
: Indicates the percentage of power
sent to the elements
From this screen and by pressing the directional buttons, the user
can switch from the various menus available and press the central
button to access the desired menu.
These menus are the consumption menu, the alarm menu, the
configuration menu and the installer menu.
Consumption:
The consumption menu shows an approximated value of the power
consumed by the boiler since it was last reset.
Consumption is written in kilowatt
hour and time since last reset is given
in hours or in days.
As shown on the screen, pressing the
central button will reset the time and
power consumed.
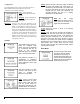
Alarms:
Some events may alter the functionality of the device in an undesired
manner. These events trigger alarms in the system that remains stored in
the device’s memory. Reasons for alarms are: troubles with the internal or
the external heat sensor, problems with elements and overheating.
In case of alarm, the controller’s screen will be illuminated by a flashing
red light. It is strongly advised that you tell an installer about this issue.
Using the left and right buttons, the arrow on the screen can be moved and
the central button will allow the user to activate the element pointed by it.
Current: Indicate the alarms
currently afflicting the device.
Past: Shows an history of the alarms
triggered on the device.
Clear alarm: Ends alarms that still
appear active on the device.
The past alarm function allows you to
revisit the previous 25 alarm messages
and an approximated time span since
they happened. The arrow buttons
allow the user to scroll through the
alarm reports and the central button
allows them to return to the alarm
menu.