
Programming instructions


Floor Sensing Programming Instructions for
Devireg 535 Timer Thermostat
Setting your 535
Setting (altering or checking) your Program settings
When you first connect your 535 to the Power source the
default settings are:
• Floor Sensing
• Max Floor Temp 35°C
• Display in °C
• Manual mode P1 and the Clock requires to be set
Now Press Btn “b” (see picture) to enter the Setup Fields.
Your 535 now shows the Time Clock field.
Press and the Hour field flashes
Alter with buttons
Press to accept your settings & the Minutes field will now
flash. Alter with the buttons & Press to accept.
Press to move to the Week Day field
Press to alter & use buttons to select the correct day
Press to accept
Press to select the Morning Start Heating time field
Press & alter to suit using buttons
Press and the display now shows the Morning Stop
Heating time
Press & use buttons to adjust.
Press to accept and the display now shows the Evening Start Heating time
Press & use buttons to adjust.
Press to accept and the display now shows the Evening Stop Heating time
Press & use buttons to adjust
Press to accept & the display now shows the Floor Comfort Temp (the Temperature your floor will operate at)
Press & use buttons to adjust & Press to accept.
Now press to move to the Savings Temp – this is the temp the floor will never fall below. The default setting is 5°C.
(If you change this to say 18°C, the floor will never fall below this temperature, meaning the heating will come on
during the “Heating Off” period to maintain the 18°C).
To alter the Savings Temperature, press & adjust with the buttons.
The setup of your 535 is now complete.
Push Btn “b” once to accept your settings & to exit the set-up process.
Now press & hold for 2 secnds. Use buttons to select P2 & Press . Your 535 is now set for Programme use.
Note: Your Devireg 535 will be set at, or revert to, P1 (manual) mode everytime the clock setting is lost. You MUST
reset the Clock to be able to select the Timer Programme option - P2.
During the Heating ON period, use the buttons to increase/decrease the Floor temperature & press to accept
the change. These changes will be remembered for all future Heating On periods.
During the Heating OFF period, use the buttons to increase/decrease the Savings temperature & press to
accept the change. This change will ONLY APPLY for the Savings Period applicable at the time of change. To make
permanent changes to the Savings Temperature, re-enter the Setup process by pressing Btn “b” and scrolling to the
Savings Temperature Setting field – see above.
If a screen is flashing, you are being prompted to make a
change. Press buttons to alter & press to accept.
A flashing value will auto accept after 10 seconds.
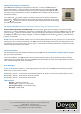
LED
Power
On/Off
Button
The display indicates:
Weekdays
Settings
Room temperature
Floor
temperature
Actual temperature
is displayed
Maximum / Minimum
Day rhythm periods
and comfort / economy
temperature
Frost protection Childproof
Btn “a”
Btn “b”
Child Proof
Btn