GB Installation And User Instructions Devimat™ Warm Floor System Installation Instructions User Guide Trouble Shooter 1
Existing Floor Wooden Floors Concrete Floors Maximum load per m2 100 W/m2 150 W/m2 In all above situations, the floor temperature must be controlled with a DEVI floor sensor and Devireg™ 550 thermostat/timer, or Devireg™ 130 thermostat. INSTALLATION: KEY POINTS • Before laying the mat the floor sensor (in controller box) MUST be installed. The sensor is fitted into a tube (in mat box) which should be laid 20-30cm across the floor under the mat between a cable loop.
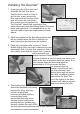
Installing the Devimat™ 1. Draw up a plan of the room and calculate the free floor area. Use the plan to work out how to lay the mat evenly across the floor and show the location of the cold tail (where the mat starts), floor sensor and connection box. The Devimat™ should laid avoiding all floor obstructions and close floor fitting objects like pipes, baths and cupboards. It is acceptable to lay the devimat under suspended cupboards and wash basins. 2.
5. Before laying the mat should be tested-see page 7. Remove the plastic outer and place the cold tail of the mat at the connection point. The Devimat™ has a self-adhesive backing, lay this to the floor and roll the mat out, if necessary the mat can be laid with the cable face down. In situations where the mat has to be turned over it can be secured using Devipins, hot glue gun (taking care not to damage the heating cable), staple gun or double sided tape. 6.
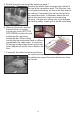
8. The mat should be tested-see page 7. The mat can now be covered in one of two methodsConcrete and wooden floors using flexible tile adhesives Working with a width of devimat at a time, apply flexible tile adhesive through the mat with a rubber back trowel or similar so that the heating cable is covered, making sure that there are no air pockets. Another layer of adhesive can then be applied carefully using a suitable notched trowel to comb the adhesive before applying the tiles.
Wiring and controlling the devimat A qualified electrician must connect the heating mat, in accordance with the current wiring regulations BS 7671. It is recommended that the Devimat™ be connected via a 30mA RCD (residual current device). Wiring regulations state that the thermostat should be located away from sources of water, i.e. outside the bathroom. As the thermostat is sensing floor temperature, the control unit can be located at any level from the floor.
Installation complete Following installation the Warranty Certificate on the back of this user guide should be filled in. The Devimat™ system should not be turned on until the adhesive and tile grout has completely dried, then once dried it can be turned on gradually over a 48 hour period. No close fitting objects should be laid or fixed to the warm floor area, for example thick mats or beanbags.
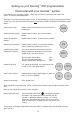
Setting up your Devireg™ 550 programmable thermostat with your devimat™ system If the thermostat is displaying ‘CODE’, initially you will ONLY be presented with step 1 and step 4, set these as described below. Once you have either completed steps 1 and 4, or the controller is displaying something other than ‘CODE’, you must press and hold the button until the word ‘CODE’ is displayed and follow the steps below: Step 1-Setup code Rotate button to select code 0044 and then press button once.
Finally you can now set how you wish the controller to operate. You can operate the controller in either Manual or Timer Mode, by pressing the button you can toggle between these two modes. Manual Mode In this mode the temperature set on the display is maintained 24 hours a day, i.e. no timing facility and therefore no ‘ ‘ displayed. Whilst in manual mode, if you rotate the dial to level 1.0 then turn the dial further anti-clockwise, the thermostat will switch off and display ‘OFF’.
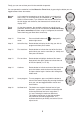
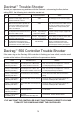
Devimat™ Trouble Shooter Should you experience any problems with the Devimat™ not warming the floor, before calling DEVI, the following tests should be carried out: No. Test Action Expected Outcome 1 Check for a 230V supply to the thermostat on terminals 1 and 2. 230V If no voltage present, connect supply. 2 Rotate thermostat dial to position 10 and test for a 230V output on terminals 3 and 4. This may take a few minutes to switch on. 230V Firstly, check resistance of floor sensor first (step 3).
The DEVI Warranty: You have purchased a Deviheat™ system, which we are certain will improve your home comfort and economy. The obligation of DEVI will be to repair or supply a new unit, free of charge to the customer, DEVI are not responsible for secondary charges linked to repairing the unit.
Warranty Certificate The DEVI Warranty is granted to: Name: Phone: Address: Postal code: Please Observe! In order to obtain the DEVI Warranty, the following must be carefully filled in. See other conditions on the overleaf.