
Operating instructions


8—ENG
MAINTENANCE AND STORAGE
When replacing high pressure hose, a hose of
the same PSI rating should be used. Failure to
do so could cause damage to the unit, property,
or personal injury.
WINTER STORAGE
This pressure washer should be stored in such a way to
protect it from freezing. Do not store this unit outdoors
or in an area where temperatures will fall below 32ºF.
This can cause extensive damage to this unit. Drain as
much water as possible from the unit before storing.
If unit has to be stored under freezing conditions, a
non-toxic R.V. anti-freeze can be used to protect from
freezing.
Add anti-freeze as follows:
1. Be sure the unit is turned off, the water supply
hose is disconnected, and the pressure has been
relieved from the gun.
2. Remove gun/hose assembly from the pressure
washer.
3. Tip the unit on end with the water inlet fitting
pointing upward, and start the motor.
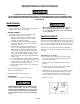
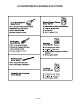
4. Quickly pour approx. 1/4 cup of non-toxic R.V. anti-
freeze down the plastic fitting where the water
hose attaches while the motor is running (See
Figure 1 below). Let unit run for a few seconds.
5. Turn the unit off .
HIGH PRESSURE HOSE: Damaged high pressure
hoses can burst which can cause a potentially
hazardous situation. High pressure hoses should
not be kinked, crushed, twisted, or damaged in
any way. Replace high pressure hose should this
occur.
TO AVOID ELECTRICAL SHOCK, ALWAYS DISCONNECT THE PLUG FROM THE ELECTRICAL
SUPPLY BEFORE ANY MAINTENANCE IS STARTED. IF AN EXTENSION CORD IS IN USE, DISCONNECT FROM
OUTLET BEFORE DISCONNECTING PRESSURE WASHER CORD FROM EXTENSION CORD, AS ELECTRIC SHOCK
COULD OCCUR.
MAINTENANCE
1. WATER SCREEN:
Inspect the water screen before attaching water
supply. Clean water screen if dirty.
2. NOZZLE CLOGGED:
A clogged nozzle will cause a distorted spray
pattern and/or low pressure output.
a. Unplug power supply, pull trigger on gun
handle to relieve pressure, remove wand
assembly from gun assembly.
b. Clean the nozzle with a straightened paper
clip by inserting into nozzle end and slowly
moving in and out.
c. If this does not improve performance, Un-
screw (counterclockwise) rotary head from
wand. Remove nozzle assembly from rotary
head. Inside you will find a white plastic disc,
stem, and one ball bearing. The disc has four
ports in which water travels through to the
nozzle end. Clean these ports and reassemble
nozzle head.
d. To reassemble rotary nozzle, place ball bearing
into stem opposite nozzle end. Place stem with
nozzle tip first into rotary head. Place disc with
nipple up into head until it stops.
e. Screw rotary head clockwise onto wand until
hand tight.
3. Flush wand assembly backwards with
water or compressed air.
4. If problems still exist, repeat steps 1-3.
5. LUBRICATION:
No lubrication is required for this pump.
Figure 1