
Operation Manual

19
ENGLISH
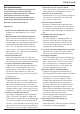
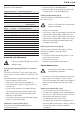
Also refer to the table below.
Conductor size (mm
2
) Cable rating (Amperes)
0.75 6
1.00 10
1.50 15
2.50 20
4.00 25
Cable length (m)
7.5 15 25 30 45 60
Voltage Amperes Cable rating (Amperes)
115 0-2.0 66 66 610
2.1 - 3.4 6 6 6 6 15 15
3.5 - 5.0 6 6 10 15 20 20
5.1 - 7.0 10 10 15 20 20 25
7.1 - 12.0 15 15 20 25 25 -
12.1 - 20.0 20 20 25 - - -
230 0 - 2.0 6 6 6 6 6 6
2.1 - 3.4 6 6 6 6 6 6
3.5 - 5.0 6 6 6 6 10 15
5.1 - 7.0 10 10 10 10 15 15
7.1 - 12.0 15 15 15 15 20 20
12.1 - 20.0 20 20 20 20 25 -
Assembly and adjustment
Prior to assembly and adjustment always
unplug the tool.
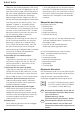
Inserting and removing SDS-plus
®
accessories
(fig. B)
This tool uses SDS-plus
®
accessories (refer to the
inset in fig. B for a cross-section of an SDS-plus
®
bit
shank).
We recommend to use professional accessories only.
• Clean and grease the bit shank.
• Insert the bit shank into the tool holder (4).
• Push the bit down and turn it slightly until it fits
into the slots.
• Pull on the bit to check if it is properly locked.
The hammering function requires the bit to be
able to move axially several centimetres when
locked in the tool holder.
• To remove a bit pull back the tool holder locking
sleeve (7) and pull out the bit.
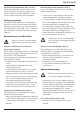
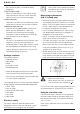
Indexing the chisel position (fig. C)
The chisel can be indexed and locked into
12 different positions.
• Insert the chisel as described above.
• Rotate the collar (3) in the direction of the arrow
until the chisel is in the desired position.
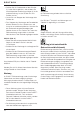
Fitting the side handle (fig. D)
The side handle (6) can be fitted to suit both
RH- and LH-users.
Always use the tool with the side handle
properly assembled.
• Loosen the side handle.
• For RH-users, slide the side handle clamp over the
collar behind the tool holder, handle at the left.
• For LH-users, slide the side handle clamp over the
collar behind the tool holder, handle at the right.
• Rotate the side handle to the desired position
and tighten the handle.
Replacing the dust cover (fig. B)
The dust cover (5) prevents dust ingress into the
mechanism. Replace a worn dust cover
immediately.
• Pull back the tool holder locking sleeve (7) and
pull the dust cover (5) off.
• Fit the new dust cover.
• Release the tool holder locking sleeve.
Instructions for use
Always observe the safety instructions
and applicable regulations.
• Be aware of the location of pipework and wiring.
• Apply a pressure of approx. 5 kg to the tool.
Excessive force does not speed up chiselling but
decreases tool performance and may shorten
tool life.
Switching on and off (fig. A & E)
• To run the tool, press the on/off switch (1).
• For continuous operation, press and hold down
the switch (1), slide the lock-on slider (2) into the
lock position and release the switch.
• To stop the tool, release the switch.
• To stop the tool in continuous operation, press
the switch briefly and release it. Always switch off
the tool when work is finished and before
unplugging.