
Operation Manual

18
ENGLISH
Also refer to the table below.
Conductor size (mm
2
) Cable rating (Amperes)
0.75 6
1.00 10
1.50 15
2.50 20
4.00 25
Cable length (m)
7.5 15 25 30 45 60
Voltage Amperes Cable rating (Amperes)
115 0-2.0 66 66 610
2.1 - 3.4 6 6 6 6 15 15
3.5 - 5.0 6 6 10 15 20 20
5.1 - 7.0 10 10 15 20 20 25
7.1 - 12.0 15 15 20 25 25 -
12.1 - 20.0 20 20 25 - - -
230 0 - 2.0 6 6 6 6 6 6
2.1 - 3.4 6 6 6 6 6 6
3.5 - 5.0 6 6 6 6 10 15
5.1 - 7.0 10 10 10 10 15 15
7.1 - 12.0 15 15 15 15 20 20
12.1 - 20.0 20 20 20 20 25 -
Assembly and adjustment
Prior to assembly and adjustment always
unplug the tool.
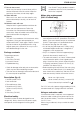
Forward/reverse slider (fig. B)
• To select forward or reverse rotation, use the
forward/reverse-switch (3).
Always wait until the motor has come to
a complete standstill before changing the
direction of rotation.
Inserting and removing a drill bit (fig. A)
Keyed chuck
• Open the chuck by turning the sleeve (5)
counterclockwise and insert the bit shank.
• Put the chuck key (6) into each hole in the side of
the chuck and turn clockwise until tight.
• To remove the bit, proceed in reverse order.
Keyless chuck
• Open the chuck by turning the sleeve (5)
counterclockwise and insert the bit shank.
• Tighten firmly by turning the sleeve clockwise.
• To remove the bit, proceed in reverse order.
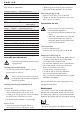
Chuck removal (fig. C & D)
• Open the chuck jaws as far as possible.
• Tighten an Allen key into the chuck and strike it
with a hammer as shown.
Instructions for use
• Always observe the safety instructions
and applicable regulations.
• Be aware of the location of pipework and
wiring.
• Apply only a gentle pressure to the tool.
Excessive force does not speed up
drilling but decreases tool performance
and may shorten tool life.
Prior to operation:
• Insert the appropriate bit.
• Mark the spot where the hole is to be drilled.
Switching on and off (fig. A)
• To run the tool, press the variable speed switch (1).
The pressure exerted on the variable speed
switch determines the tool speed.
• For continuous operation, press and hold down
the variable speed switch, press the lock-on
button (2) and release the switch.
• To stop the tool, release the switch.
• To stop the tool in continuous operation,
press the switch briefly and release it.
Always switch off the tool when work is finished
and before unplugging.
Consult your dealer for further information on the
appropriate accessories.
Maintenance
Your DEWALT Power Tool has been designed to
operate over a long period of time with a minimum
of maintenance. Continuous satisfactory operation
depends upon proper tool care and regular cleaning.
Lubrication
Your power tool requires no additional lubrication.