® D25102(K) D25102C D25103K D25104K D25203K 1
Dansk 6 Deutsch 14 English 23 Español 31 Français 39 Italiano 47 Nederlands 55 Norsk 63 Português 71 Suomi 79 Svenska 87 Türkçe 95 EÏÏËÓÈη 103 Copyright DEWALT 2
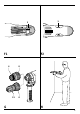
9 7 4 5 4 5 3 1 2 1 6 11 10 D25203K 9 7 6 11 10 D25103K 8 4 D25102(K) D25102C D25104K A 3
5 6 B1 7 4 B2 12 5 C 10 9 D 4 E 11
3 3 F1 F2 8 6 13 G 8 H 5
DANSK ROTERENDE BOREHAMMER D25102(K)/ D25102C/D25103K/D25104K/D25203K Tillykke! Du har valgt et DEWALT værktøj. Mange års erfaring, ihærdig produktudvikling og innovation gør DEWALT til en af de mest pålidelige partnere for professionelle brugere.
DANSK D25102(K) D25102C D25103K LpA (lydniveau) dB(A)* 90,5 90,5 90,5 LWA (akustisk styrke) dB(A) 99 99 99 D25104K D25203K LpA (lydniveau) dB(A)* 90,5 90,5 LWA (akustisk styrke) dB(A) 99 99 * ved operatørens øre Anvend høreværn.
DANSK 13 Brug egnet værktøj Denne instruktionsbog rummer en beskrivelse af de formål, som dette værktøj er beregnet til. Tving ikke små maskiner eller tilbehør til at udføre et arbejde, som kræver en kraftig maskine. Maskinen gør arbejdet bedre og mere sikkert ved den hastighed, som den er beregnet til. Værktøjet må ikke forceres.
DANSK Sikkerhedskobling Borehammeren er udstyret med en sikkerhedskobling, som reducerer det maksimale drejningsmoment, der overføres til brugeren i tilfælde af, at et bor blokeres. Denne funktion forhindrer også, at gearet og elmotoren går i stå. Sikkerhedskoblingen er indstillet fra fabrikken og kan ikke justeres. El-sikkerhed Elmotoren er kun beregnet til én spænding. Kontroller, at strømforsyningen svarer til spændingen på typeskiltet.
DANSK Hammerfunktionen kræver, at bittet skal kunne bevæge sig adskillige centimeter aksialt, når det er fastlåst i værktøjsholderen. • Værktøjet fjernes ved at trække patronens låsebøsning (12) tilbage og trække værktøjet ud af patronen. Montering af sidehåndtaget (fig. D) Sidehåndtaget (10) kan monteres, så det passer både til højre- og venstrehåndede brugere. Brug altid værktøjet med sidehåndtaget korrekt monteret. • Løsn sidehåndtaget.
DANSK Stort tryk øger ikke borehastigheden, men nedsætter værktøjets ydeevne og evt. også levetiden. • Bor eller skru ikke for dybt for at undgå skade på støvbeskyttelseskappen. • Hold altid værktøjet fast med begge hænder, og sørg for at indtage en sikker fodstilling (fig. H). Sørg for at sidehåndtaget altid er solidt monteret, når maskinen er i brug. Starte og stoppe (fig. A) D25102(K)/D25102C/D25103K/D25104K • Start værktøjet ved at trykke på afbryderen (1).
DANSK Ved skruning af kærvskruer skal der altid anvendes klinger med kærvsøger. • Tryk forsigtigt på den variable hastighedsafbryder (1) for at undgå skade på skruehovedet. Ved tilbagerotation (mod venstre) reduceres værktøjets hastighed automatisk for let udtagning af skrue. • Når skruen er i plan med arbejdsemnet, slip da den variable hastighedsafbryder for at undgå at skruehovedet trænger ind i arbejdsemnet. D25103K/D25104K/D25203K - Mejsling (fig.
DANSK GARANTI • 30 DAGE TILFREDS-KUNDE GARANTI • Fuld tilfredshed eller pengene tilbage. Hvis du ikke er helt tilfreds med dit DEWALTværktøj, kan du returnere værktøjet til forhandleren inden 30 dage efter købet og få dine penge refunderet eller værktøjet ombyttet. Værktøjet skal indleveres komplet, og købsnotaen skal forevises.
DEUTSCH BOHRHAMMER D25102(K)/D25102C/ D25103K/D25104K/D25203K Herzlichen Glückwunsch! Sie haben sich für ein Werkzeug von DEWALT entschieden, das die lange DEWALT-Tradition fortsetzt, nur ausgereifte und in zahlreichen Tests bewährte Qualitätsprodukte für den Fachmann anzubieten. Lange Jahre der Erfahrung und kontinuierliche Weiterentwicklung machen DEWALT zu Recht zu einem verläßlichen Partner aller professionellen Anwender.
DEUTSCH Die Höhe des Schalldrucks entspricht den Richtlinien der Europäischen Gemeinschaft 86/188/EWG und 98/37/EWG gemessen nach EN 50144: D25102(K) D25102C D25103K LpA (Schalldruck) dB(A)* 90,5 90,5 90,5 LWA (Schalleistung) dB(A) 99 99 99 D25104K D25203K 3 LpA (Schalldruck) dB(A)* 90,5 90,5 LWA (Schalleistung) dB(A) 99 99 4 * Arbeitsplatzbezogener Emissionswert Tragen Sie einen geeigneten Gehörschutz.
DEUTSCH 10 Schließen Sie Vorrichtungen zur Staubabsaugung an! Falls Vorrichtungen zur Absaugung oder zum Sammeln von Staub an das Werkzeug angeschlossen werden können, vergewissern Sie sich, daß diese angeschlossen sind und ordnungsgemäß verwendet werden. 11 Lassen Sie keine Werkzeugschlüssel stecken. Überprüfen Sie vor dem Einschalten, ob die Schlüssel und Einstellwerkzeuge entfernt sind.
DEUTSCH 1 Bedienungsanleitung 1 Explosionszeichnung • Vergewissern Sie sich, daß das Elektrowerkzeug sowie die Zubehörteile beim Transport nicht beschädigt wurden. • Lesen Sie vor der Inbetriebnahme die Bedienungsanleitung gründlich durch. Ihr Hochleistungsbohrhammer D25102(K)/ D25102C/D25103K/D25104K/D25203K wurde für professionelle Bohr-, Schlagbohr-, Schraub-, Meißel- und Abbrucharbeiten sowie zum Durchführen von Kernbohrungen mit Karbidspitze entwickelt.
DEUTSCH Nur Hämmern: für Meißel- und Abbrucharbeiten. In dieser Betriebsart lässt sich das Werkzeug auch als Hebel zum Entfernen eines blockierten Bohrers verwenden. Bit-Rotation: diese Position wird nur verwendet, um einen flachen Meißel in die richtige Stellung zu drehen. • Zur Wahl der Betriebsart halten Sie die Sicherheitssperre (5) gedrückt und drehen den Betriebsart-Wahlschalter (4) auf das Symbol der gewünschten Betriebsart.
DEUTSCH • Schieben Sie den Schalter (3) in die mittlere Stellung, um das Elektrowerkzeug in ausgeschaltetem Zustand zu verriegeln. • Lassen Sie den Arretierring der Werkzeugaufnahme los. Gebrauchsanweisung Warten Sie immer, bis der Motor völlig stillsteht und ändern Sie erst dann die Laufrichtung. D25102(K)/D25102C/D25103K/D25203K Montage des Spannfutter-Adapters und des Spannfutters • Schrauben Sie das Spannfutter auf das Gewindeende des Spannfutter-Adapters.
DEUTSCH D25203K • Betätigen Sie zum Starten des Elektrowerkzeuges den Drehzahl-Regelschalter (1). Je tiefer der Drehzahl-Regelschalter gedrückt wird, um so höher ist die Drehzahl des Antriebsmotors. • Lassen Sie zum Stoppen des Werkzeuges den Schalter los. • Um das Akku-Werkzeug vor unbeabsichtigtem Einschalten zu schützen (z.B. beim Transport im Werkzeugkoffer), schieben Sie den Rechts-/ Linkslaufschalter (3) in die Mittelposition. Hammerbohren (Abb.
DEUTSCH • Setzen Sie das entsprechende Schraubendreher-Bit ein. Für das Verarbeiten von Schlitzschrauben sollten immer Einsatzwerkzeuge mit Führungshülse verwendet werden. • Drücken Sie den Drehzahl-Regelschalter (1) langsam ein, um Schäden am Schraubenkopf zu vermeiden. Im Linkslauf wird die Drehzahl zum leichten Ausschrauben automatisch begrenzt. • Wenn die Schraube mit dem Werkstück fluchtet, laasen Sie den Drehzahl-Regelschalter los, damit der Schraubenkopf nicht in das Werkstück eindringt.
DEUTSCH GARANTIE • 30 TAGE GELD ZURÜCK GARANTIE • Wenn Sie mit der Leistung Ihres DEWALTElektrowerkzeuges nicht völlig zufrieden sind, können Sie es unter Vorlage des OriginalKaufbeleges ohne weiteres innerhalb von 30 Tagen bei Ihrem DEWALT-Händler im Original-Lieferumfang zurückgeben und erhalten Ihr Geld zurück. Die Geld zurück Garantie gilt nicht auf Zubehör.
ENGLISH HEAVY DUTY ROTARY HAMMER DRILL D25102(K)/D25102C/D25103K/D25104K/ D25203K Congratulations! You have chosen a DEWALT tool. Years of experience, thorough product development and innovation make DEWALT one of the most reliable partners for professional power tool users. Technical data Voltage (U.K.
ENGLISH D25102(K) D25102C D25103K LpA (sound pressure) dB(A)* 90.5 90.5 90.5 LWA (acoustic power) dB(A) 99 99 99 D25104K D25203K LpA (sound pressure) dB(A)* 90.5 90.5 LWA (acoustic power) dB(A) 99 99 * at the operator’s ear Take appropriate measures for the protection of hearing. Weighted root mean square acceleration value according to EN 50144: D25102(K) D25102C D25103K D25104K D25203K 9.2 m/s2 9.2 m/s2 9.2 m/s2 9.2 m/s2 9.
ENGLISH The tool will do the job better and safer at the rate for which it was intended. Do not force the tool. Warning! The use of any accessory or attachment or performance of any operation with this tool other than those recommended in this instruction manual may present a risk of personal injury. 14 Check for damaged parts Before use, carefully check the tool and mains cable for damage.
ENGLISH Your DEWALT tool is double insulated in accordance with EN 50144; therefore no earth wire is required. Mains plug replacement (U.K. & Ireland only) • Should your mains plug need replacing and you are competent to do this, proceed as instructed below. If you are in doubt, contact an authorized DEWALT repair agent or a qualified electrician. • Disconnect the plug from the supply.
ENGLISH In this mode the tool can also be used as a lever to free a jammed drill bit. Bit rotation: non-working position used only to rotate a flat chisel into the desired position. • To select the operating mode, press the safety lock (5) and rotate the mode selector switch (4) until it points to the symbol of the required mode. • Release the safety lock and check that the mode selector switch is locked in place. Do not select the operating mode when the tool is running.
ENGLISH D25104K - Replacing the tool holder with the chuck (fig. G) • Turn the locking collar (8) into the unlocking position and pull the tool holder (6) off. • Push the chuck (13) onto the spindle and turn the locking collar into the locking position. • To replace the chuck with the tool holder, first remove the chuck the same way as the tool holder was removed. Then place the tool holder the same way as the chuck was placed. Never use standard chucks in the hammer drilling mode.
ENGLISH • Always switch off the tool when work is finished and before unplugging. Rotary drilling (fig. A) • Set the mode selector switch (4) to the “rotary drilling” position. • Depending on your tool, follow either of the following instructions: - Fit the chuck adapter/chuck assembly (D25102(K)/D25102C/D25103K/D25203K). - Replace the tool holder with the chuck (D25104K). • Proceed as described for hammer drilling. Never use standard chucks in the hammer drilling mode. Screwdriving (fig.
ENGLISH GUARANTEE • 30 DAY NO RISK SATISFACTION GUARANTEE • If you are not completely satisfied with the performance of your DEWALT tool, simply return it within 30 days, complete as purchased, to the point of purchase, for a full refund or exchange. Proof of purchase must be produced. • ONE YEAR FREE SERVICE CONTRACT • If you need maintenance or service for your DEWALT tool, in the 12 months followingpurchase, it will be undertaken free of charge at an authorized DEWALT repair agent.
ESPAÑOL MARTILLO ROTATIVO CON PERCUSIÓN D25102(K)/D25102C/D25103K/D25104K/ D25203K ¡Enhorabuena! Usted ha optado por una herramienta DEWALT. Muchos años de experiencia y una gran asiduidad en el desarrollo y la innovación de sus productos han convertido DEWALT en un socio muy fiable para el usuario profesional.
ESPAÑOL LpA (presión acústica) dB(A)* LWA (potencia acústica) dB(A) LpA (presión acústica) dB(A)* LWA (potencia acústica) dB(A) D25102(K) D25102C D25103K 90,5 90,5 90,5 99 99 99 D25104K D25203K 90,5 90,5 99 99 3 * al oído del usuario Tome medidas adecuadas para la protección de los oídos.
ESPAÑOL 10 Conecte los accesorios para la extracción de polvo. Si se suministran adaptadores para la conexión de accesorios extractores y para el almacenamiento del polvo, asegúrese de que conectarlos y utilizarlos adecuadamente. 11 Retire las llaves de maniobra Antes de poner la herramienta en marcha, asegúrese de que las llaves y utensilios de reglaje hayan sido retirados. 12 Cables alargadores Compruebe que el cable alargador no presente despecfectos antes de utilizarlo.
ESPAÑOL • Compruebe si la herramienta, piezas o accesorios han sufrido algún daño durante el transporte. • Tómese el tiempo necesario para leer y comprender este manual antes de utilizar la herramienta. El martillo rotativo con percusión D25102(K)/ D25102C/D25103K/D25104K/D25203K está diseñado para aplicaciones profesionales, tales como las de perforar, perforar con percusión, atornillar, cincelado ligero, y taladrado con barrena cilíndrica hueca con punta de carburo.
ESPAÑOL • Para seleccionar el modo de operación, presione el bloqueo de seguridad (5) y gire el interruptor selector de modo (4) hasta que apunte al símbolo del modo requerido. • Suelte el bloqueo de seguridad y compruebe que el interruptor selector de modo esté bloqueado en su posición. No seleccione el modo operativo cuando la herramienta está en funcionamiento. Ajuste de la posición del cincel El cincel se puede ajustar y fijar en 51 posiciones diferentes.
ESPAÑOL • Introduzca el conjunto del mandril y el adaptador en la herramienta como si se tratase de una broca SDS-plus® estándar. • Para retirar el mandril, siga el mismo procedimiento que para retirar una broca SDS-plus® estándar. No utilice nunca portabrocas estándar en el modo de taladrado con percusión. D25104K - Sustitución del portaherramientas por el mandril (fig. G) • Gire el aro de cierre (8) a la posición de apertura y saque el portaherramientas (6).
ESPAÑOL Perforación con una barrena cilíndrica hueca • Ajuste el selector de modo (3) a la posición «perforación con percusión». • Ajuste la empuñadura lateral (9). • Monte la barrena cilíndrica hueca. • Monte la broca de centrar en la barrena cilíndrica hueca. • Coloque la broca de centrar en el punto a ser perforado y pulse el conmutador (1). Perfore hasta que la barrena haya penetrado en el hormigón hasta aprox. 1 cm. • Deje de perforar y quite la broca de centrar.
ESPAÑOL • Esta máquina no está diseñada para que la repare el usuario. Lleve la herramienta a un agente DEWALT autorizado después de unas 40 horas de operación. En caso de problemas antes del término de dicho plazo, póngase en contacto con un agente DEWALT autorizado. • La herramienta se apagará automáticamente cuando las escobillas de carbono se encuentren desgastadas.
FRANÇAIS MARTEAU ELECTROPNEUMATIQUE D25102(K)/D25102C/D25103K/D25104K/ D25203K Félicitations! Vous avez choisi un outil DEWALT. Depuis de nombreuses années, DEWALT produit des outils électriques adaptés aux exigences des utilisateurs professionnels.
FRANÇAIS D25102(K) D25102C D25103K LpA (pression acoustique) dB(A)* 90,5 90,5 90,5 LWA (puissance acoustique) dB(A) 99 99 99 D25104K D25203K LpA (pression acoustique) dB(A)* 90,5 90,5 LWA (puissance acoustique) dB(A) 99 99 * à l’oreille de l’opérateur Prendre les mesures nécessaires pour la protection de l’ouïe.
FRANÇAIS 11 Enlever les clés de réglage Avant de mettre l’outil en marche, vérifier toujours si les clés et outils de réglage ont été retirés. 12 Rallonges Vérifier la rallonge avant de l’utiliser et la remplacer si elle est endommagée. Pour utiliser cet outil à l’extérieur, n’utiliser que des rallonges prévues à cet effet et portant une inscription adéquate. 13 Utiliser l’outil adéquat Le domaine d’utilisation de l’outil est décrit dans le présent manuel.
FRANÇAIS 6 7 8 9 10 11 Porte-outil Capuchon protecteur Bague de blocage (D25104K) Butée de profondeur Poignée latérale Serre-butée de profondeur Assemblage et réglage Toujours retirer la fiche de la prise avant de procéder à l’assemblage ou au réglage. Sélection du mode de travail (fig. B1 & B2) Limiteur de couple Les marteaux électropneumatiques sont équipés d’un limiteur de couple réduisant l’à-coup en cas de blocage du foret.
FRANÇAIS Réglage de la position du burin Le burin peut être bloqué en 51 positions différentes. • Tournez le sélecteur de mode (4) vers le symbole « Rotation du foret ». • Tournez le burin dans la position requise. • Placez le commutateur de mode (4) sur la position « percussion seulement ». • Tournez le burin jusqu’à ce qu’il se bloque. Montage et démontage des accessoires SDS-plus® (fig. C) Cet outil utilise des accessoires SDS-plus® (l’encart dans la fig.
FRANÇAIS Ne jamais utiliser un mandrin standard en mode percussion. Remplacement du capuchon protecteur (fig. C) Grâce au capuchon protecteur (7), la poussière ne peut pas pénétrer dans le mécanisme. Il convient de remplacer immédiatement le capuchon lorsqu’il est usé. • Tirer vers l’arrière la bague de blocage du porteoutil (12) et retirer le capuchon protecteur (7). • Remplacer le capuchon protecteur. • Relâcher la bague de blocage du porte-outil.
FRANÇAIS • Suivez l’une des instructions indiquées ci-après en fonction de l’application : - Fixez l’arbre de montage pour mandrin/ le mandrin assemblé (D25102(K)/D25102C/ D25103K/D25203K). - Replacez le porte-outil avec le mandrin (D25104K). • Procéder comme pour le perçage avec percussion. Ne jamais utiliser un mandrin standard en mode percussion. Vissage (fig. A) • Placez le commutateur de mode (4) sur la position « perçage sans percussion ». • Sélectionnez le sens de rotation.
FRANÇAIS GARANTIE • 30 JOURS D’ENGAGEMENT SATISFACTION • Si, pour quelque raison que ce soit, votre machine DEWALT ne vous donne pas entière satisfaction, il suffit de la retourner avec tous ses accessoires dans les 30 jours suivant son achat à votre distributeur, ou à un centre de service après-vente agréé pour un remboursement intégral ou un échange. Pour la Belgique ou le Luxembourg, retournez votre machine à DEWALT. Munissez-vous d’une preuve d’achat.
ITALIANO TASSELLATORE ELETTROPNEUMATICO D25102(K)/D25102C/D25103K/D25104K/ D25203K Congratulazioni! Siete entrati in possesso di un utensile DEWALT. Anni di esperienza, continui miglioramenti ed innovazioni tecnologiche fanno dei prodotti DEWALT uno degli strumenti più affidabili per l’utilizzatore professionale. Dati tecnici Tensione Potenza assorbita Velocità a vuoto Velocità a carico Forza di percussione trapanatura a percussione scalpellatura Max.
ITALIANO D25102(K) D25102C D25103K LpA (rumorosità) dB(A)* 90,5 90,5 90,5 LWA (potenza sonora) dB(A) 99 99 99 D25104K D25203K LpA (rumorosità) dB(A)* 90,5 90,5 LWA (potenza sonora) dB(A) 99 99 * all’orecchio dell’operatore Prendere appropriate misure a protezione dell’udito.
ITALIANO 11 Non lasciare sull’utensile chiavi o strumenti di misura Prima di mettere in funzione l’utensile si abbia cura di togliere chiavi e altri strumenti. 12 Prolunghe Ispezionare la prolunga prima dell’uso e sostituirla se è danneggiata. Quando l’utensile viene impiegato all’esterno, usare unicamente le prolunghe per uso esterno. 13 Usare l’utensile adatto L’utilizzo previsto è indicato nel presente manuale.
ITALIANO 4 5 6 7 8 9 10 11 Selettore percussione-rotazione Fermo di sicurezza Portautensile Parapolvere Collare di bloccaggio (D25104K) Asta di profondità regolabile Impugnatura laterale Morsetto di arresto profondità Frizione di sicurezza I tassellatori sono dotati di un’apposita frizione che riduce l’erogazione della coppia al fine di proteggere l’operatore da contraccolpi provocati dal bloccaggio della punta nel materiale. Il dispositivo previene anche l’arresto improvviso della rotazione e del motore.
ITALIANO • Per selezionare il tipo di modalità operativa, spingere il fermo di sicurezza (5) e ruotare il selettore di modalità (4) finché non punta sul simbolo richiesto. • Sbloccare il fermo di sicurezza e controllare che il selettore di modalità sia bloccato in posizione. Non selezionare il modo di funzionamento quando l’utensile è in funzione. Impostazione della posizione scalpello Lo scalpello può essere impostato e bloccato in 51 posizioni diverse.
ITALIANO D25102(K)/D25102C/D25103K/D25203K Installazione del mandrino e del relativo adattatore • Avvitare il mandrino nell’estremità filettata dell’adattatore del mandrino. • L’adattatore e il mandrino attaccato vanno inseriti nell’attrezzo come si fa con una punta SDS-plus® normale. • Per estrarre il mandrino, procedere come si fa per rimuovere una punta SDS-plus® normale. Non impiegare mai mandrini standard nel modo operativo di foratura con percussione.
ITALIANO • Regolare l’impugnatura laterale (9). • Se necessario, impostare la profondità di trapanatura. • Fare un segno laddove si intende praticare il foro. • Collocare la punta sull’area prescelta e accendere l’attrezzo. • Spegnete sempre l’utensile al termine del lavoro e prima di disinserire la spina. Foratura con punte a corona • Porre il selettore (3) nella posizione di percussione. • Regolare l’impugnatura laterale (9). • Inserire la punta a corona del tipo richiesto.
ITALIANO Consultate il vostro rivenditore per ottenere ulteriori informazioni sugli accessori disponibili. Manutenzione Il Vostro Elettroutensile DEWALT è stato studiato per durare a lungo richiedendo solo la minima manutenzione. Per prestazioni sempre soddisfacenti occorre avere cura dell’utensile e sottoporlo a manutenzione periodica. • Le operazioni di riparazione e manutenzione di questo utensile non possono essere realizzate dall’utente.
NEDERLANDS BOORHAMER D25102(K)/D25102C/ D25103K/D25104K/D25203K Gefeliciteerd! U heeft gekozen voor een machine van DEWALT. Jarenlange ervaring, voortdurende produktontwikkeling en innovatie maken DEWALT tot een betrouwbare partner voor de professionele gebruiker.
NEDERLANDS LpA (geluidsdruk) dB(A)* LWA (geluidsvermogen) dB(A) LpA (geluidsdruk) dB(A)* LWA (geluidsvermogen) dB(A) D25102(K) D25102C D25103K 90,5 90,5 90,5 99 99 99 D25104K D25203K 90,5 90,5 99 99 * op de werkplek Neem de vereiste maatregelen voor gehoorbescherming.
NEDERLANDS 12 Verlengsnoeren Inspecteer voor gebruik het verlengsnoer. Vervang het snoer indien het beschadigd is. Maak bij gebruik buitenshuis uitsluitend gebruik van verlengsnoeren die geschikt zijn voor gebruik buitenshuis en als zodanig zijn gemerkt. 13 Gebruik de juiste machine Het gebruik volgens bestemming is beschreven in deze handleiding. Gebruik geen lichte machine of hulpstukken voor het werk van zware machines. De machine werkt beter en veiliger indien u deze gebruikt voor het beoogde doel.
NEDERLANDS 6 7 8 9 10 11 Accessoire-houder Stofkap Borgkraag (D25104K) Diepte-aanslag Zijhandgreep Diepteaanslagklem Koppelbegrenzing Deze boorhamers zijn uitgerust met een koppelbegrenzing waardoor de maximum koppelreactie naar de gebruiker in geval van vastlopen van de boor wordt beperkt. Hierdoor wordt tevens vastlopen van motor en overbrenging voorkomen. De koppelbegrenzing is in de fabriek vast ingesteld. Elektrische veiligheid De elektrische motor is ontwikkeld voor een bepaalde netspanning.
NEDERLANDS Plaatsen en verwijderen van SDS-plus®-accessoires (fig. C) Uw machine werkt met SDS-plus® accessoires (zie inzet in fig. B voor een doorsnede van een SDS-plus® boorschacht). Wij adviseren om uitsluitend professionele accessoires te gebruiken. • Reinig de boorschacht en vet deze in. • Steek de boorschacht in de houder (6). • Druk de boor naar binnen en verdraai de boor totdat de borgkraag terugspringt. • Trek aan de boor om te controleren of deze goed vastzit.
NEDERLANDS Vervangen van de stofkap (fig. C) De stofkap (7) voorkomt dat stof in het mechanisme binnendringt. Een versleten stofkap moet direct worden vervangen. • Trek de borgkraag (12) naar voren en neem de stofkap (7) van de machine. • Breng de nieuwe stofkap aan. • Laat de borgkraag los. Aanwijzingen voor gebruik • Neem altijd de veiligheidsinstructies in acht en houdt u aan de geldende voorschriften. • Let op de eventueel aanwezige gas-, water- en elektriciteitsleidingen. • Forceer de machine niet.
NEDERLANDS - Breng de boorhouderadapter/boorhouder aan (D25102(K)/D25102C/D25103K/D25203K). - Vervang de accessoirehouder door de boorhouder (D25104K). • Ga verder zoals beschreven voor hamerboren. Gebruik nooit standaard-boorkoppen voor hamerboren. In- en uitdraaien van schroeven (fig. A) • Zet de keuzeschakelaar (4) op boren. • Kies de gewenste draairichting.
NEDERLANDS GARANTIE • 30 DAGEN “NIET GOED, GELD TERUG” GARANTIE • Indien uw DEWALT elektrisch gereedschap om welke reden dan ook niet geheel aan uw verwachtingen voldoet, stuurt u het dan compleet zoals bij aankoop binnen 30 dagen terug naar DEWALT, samen met uw aankoopbewijs en uw rekeningnummer. U ontvangt dan uw geld terug.
NORSK BORHAMMER D25102(K)/D25102C/ D25103K/D25104K/D25203K Gratulerer! Du har valgt et DEWALT verktøy. Årelang erfaring, konstant produktutvikling og fornyelse gjør DEWALT til en av de mest pålitelige partnere for profesjonelle brukere. Tekniske data Spenning Motoreffekt Turtall, ubelastet Turtall, belastet Slagenergi hammerboring meisling Maksimal borekapasitet i stål/tre/betong Meiselposisjoner Boringskapasitet i bløt murstein Festesystem Diameter krage Vekt V W min-1 min-1 D25102(K) 230 650 0 - 1.
NORSK D25102(K) D25102C D25103K LpA (lydnivå) dB(A)* 90,5 90,5 90,5 LWA (akustisk effekt) dB(A) 99 99 99 D25104K D25203K LpA (lydnivå) dB(A)* 90,5 90,5 LWA (akustisk effekt) dB(A) 99 99 * ved brukerens øre Bruk egnet verneutstyr for å beskytte hørselen.
NORSK Verktøyet vil gjøre en bedre og sikrere jobb om det brukes med den hastigheten det er beregnet for. Overbelast ikke verktøyet. Advarsel! Bruk bare tilbehør og utstyr som anbefales i bruksanvisningen og i katalogene. Bruk av annet verktøy eller tilbehør kan medføre risiko for personskade. 14 Sjekk verktøyet for skader Kontroller verktøyet og strømledningen grundig for skade før bruk. Kontroller at de bevegelige delene ikke har satt seg fast, eller er feilmontert.
NORSK Elektrisk sikkerhet Den elektriske motoren er kun konstruert for én spenning. Kontroller alltid at nettspenningen er i overensstemmelse med spenningen på typeskiltet. Ditt DEWALT verktøy er dobbeltisolert i samsvar med EN 50144. Jordet ledning er derfor ikke nødvendig. Skifting av kabel eller støpsel Tenk på sikkerhetsforskriftene ved skifting av kabel eller støpsel. Et støpsel med blottede kopperledere er farlig hvis det koples til en strømførende kontakt.
NORSK • Løsne sidehåndtaket. • For høyrehendte brukere, skyv klemmen på sidehåndtaket over kragen bak verktøyholderen, med håndtaket til venstre. • For venstrehendte brukere, skyv klemmen på sidehåndtaket over kragen bak verktøyholderen, med håndtaket til høyre. • Drei sidehåndtaket i ønsket stilling og skru fast håndtaket. Stille inn boredybden (fig. E) • Sett inn ønsket drillbit som forklart ovenfor. • Trykk inn dybdestoppklemmen (11) og hold den inne.
NORSK Skru på og av (fig. A) D25102(K)/D25102C/D25103K/D25104K • Start maskinen ved å trykke på bryteren for variabelt turtall (1). Maskinens turtall avhenger av hvor hardt man trykker på bryteren. For kontinuerlig drift, trykk på strømbryteren (1), trykk på låseknappen (2) og slipp bryteren. • Maskinen stanses ved å slippe strømbryteren. • Når maskinen går i kontinuerlig drift, stanses den med et rask trykk på strømbryteren, som deretter slippes.
NORSK • Innstill sidehåndtaket (9). • Slå på verktøyet og begynn å arbeide. • Skru alltid AV maskinen når arbeidet er avsluttet og før støpselet tas ut av stikkontakten. |• Ikke bruk redskapet til å blande eller pumpe lett antennelige eller eksplosive vesker (bensin, alkohol etc.) • Bland eller rør ikke væsker som er merket som antennelige. Forskjellige typer SDS-plus® -borbits og meisler kan fås som ekstrautstyr. Din forhandler kan gi nærmere opplysninger om egnet tilleggsutstyr.
NORSK GARANTI • 30 DAGERS FORNØYD-KUNDEGARANTI • Hvis du ikke er tilfreds med ditt DEWALT verktøy, kan det returneres innen 30 dager til din DEWALT forhandler eller til et DEWALT autorisert serviceverksted og du kan bytte eller få pengene tilbake. Kvittering må fremlegges. • 1 ÅRS FRI VEDLIKEHOLDSERVICE • Skulle ditt DEWALT verktøy trenge vedlikehold eller service i de første 12 månedene etter det ble kjøpt, vil dette bli utført gratis av et autorisert DEWALT serviceverksted.
PORTUGUÊS MARTELO ELECTROPNEUMÁTICO D25102(K)/ D25102C/D25103K/D25104K/D25203K Parabéns! Escolheu uma ferramenta DEWALT. Muitos anos de experiência, um desenvolvimento contínuo de produtos e o espírito de inovação fizeram da DEWALT um dos parceiros mais fiáveis para os utilizadores profissionais.
PORTUGUÊS D25102(K) D25102C D25103K LpA (pressão sonora) dB(A)* 90,5 90,5 90,5 LWA (potência sonora) dB(A) 99 99 99 D25104K D25203K LpA (pressão sonora) dB(A)* 90,5 90,5 LWA (potência sonora) dB(A) 99 99 * junto ao ouvido do operador Use protectores auditivos.
PORTUGUÊS 12 Cabos de extensão Antes de iniciar o uso, verifique o estado do cabo de extensão e substitua-o se estiver danificado. Quando usar a ferramenta ao ar livre, utilize somente cabos de extensão apropriados para tal e correctamente rotulados. 13 Use a ferramenta apropriada. Neste manual consta as aplicações da ferramenta. Não force pequenas ferramentas ou acessórios para que efectuem o trabalho duma ferramenta forte.
PORTUGUÊS 1 Interruptor de velocidade variável 2 Botão de bloqueio do interruptor (D25102(K)/D25102C/D25103K/D25104K) 3 Selector de sentido de rotação 4 Selector de modo de percussão 5 Trinco de segurança 6 Suporte de ferramenta 7 Protecção anti-poeiras 8 Anel de bloqueio (D25104K) 9 Vareta de ajuste da profundidade 10 Punho lateral 11 Dispositivo limitador de profundidade Embraiagem limitadora de torque Os martelos electropneumáticos estão dotados de uma embraiagem limitadora de torque que evita o contrago
PORTUGUÊS Determinação da posição do cinzel O cinzelamento pode ser seleccionado e travado em 51 posições diferentes. • Rode o interruptor selector de modo (4) até apontar para a posição de “rotação da braca”. • Rode o cinzel na posição requerida. • Regule o selector de modo (4) para a posição “percussão”. • Rode o cinzel até à respectiva posição. Inserir e retirar acessórios SDS-plus® (fig. C) Esta ferramenta utiliza acessórios SDS-plus® (consulte a gravura na fig.
PORTUGUÊS • Para substituir a bucha com o suporte da ferramenta, remova em primeiro lugar a bucha da mesma forma como o suporte da ferramenta foi removido. De seguida, coloque o suporte da ferramenta tal como a bucha foi colocada. Nunca utilize buchas para a modalidade de perfuração com percussão. Para operar num modo contínuo, prima o interruptor (1), prima o botão de bloqueio (2) e liberte o interruptor. • Para desligar a máquina, liberte o interruptor.
PORTUGUÊS • Quando estiver a perfurar uma estrutura mais espessa que a profundidade da broca de caixa, retire o cilindro de betão ou de caixa dentro da broca a intervalos regulares. Para evitar partir betão a mais à volta do orifício, faça primeiro um furo com o diâmetro da broca de centrar através de toda a estrutura. Depois perfure o espaço oco até meio de cada lado. • Sempre desligue a ferramenta quando o trabalho está acabado e antes de tirar a ficha da tomada. Perfuração rotativa (fig.
PORTUGUÊS GARANTIA Os acessórios e as ligações utilizados devem ser lubrificados regularmente em redor do ajustador SDS-plus®. Limpeza Conserve livres as aberturas de ventilação e limpe regularmente o corpo da máquina utilizando um pano macio. • 30 DIAS DE SATISFAÇÃO COMPLETA • Se não estiver completamente satisfeito com a sua ferramenta DEWALT, contacte um Centro de Assistência Técnica DEWALT.
SUOMI PORAVASARA D25102(K)/D25102C/ D25103K/D25104K/D25203K Onneksi olkoon! Olet valinnut DEWALT-työkalun. Monivuotisen kokemuksen, ahkeran tuotekehittelyn ja uudistusten ansiosta DEWALT on yksi ammattikäyttäjien luotettavimmista yhteistyökumppaneista.
SUOMI D25102(K) D25102C D25103K LpA (äänenpaine) dB(A)* 90,5 90,5 90,5 LWA (ääniteho) dB(A) 99 99 99 D25104K D25203K LpA (äänenpaine) dB(A)* 90,5 90,5 LWA (ääniteho) dB(A) 99 99 * käyttäjän korvassa Suojaa kuulosi asianmukaisesti.
SUOMI 13 Käytä oikeaa konetta Oikea käyttötarkoitus on kuvattu tässä käyttöohjeessa. Älä tee pienillä työkaluilla tai varusteilla työtä, johon tarvitaan suurtehoista työkalua. Työkalu toimii paremmin ja turvallisemmin, kun sitä käytetään oikeaan tarkoitukseen. Älä ylikuormita konetta. Varoitus! Käytä konetta ainoastaan sellaiseen työhön, johon se on tarkoitettu, ja käytä vain käyttöohjeessa suositeltuja tarvikkeita ja lisälaitteita. Ohjeesta poikkeava käyttö voi aiheuttaa onnettomuuden.
SUOMI Tämä ominaisuus estää myös vaihteiston ja sähkömoottorin jumittumisen. Vääntömomentin rajoitinkytkin on säädetty tehtaalla, eikä käyttäjä voi sitä muuttaa. Vain isku: kevyttä talttausta, piikkausta, hajoitustöitä varten. Tässä toimintatilassa työkalua voidaan käyttää myös vipuna, jonka avulla irrotetaan juuttunut poranterä. Sähköturvallisuus Sähkömoottori on suunniteltu käytettäväksi vain yhdellä jännitteellä. Tarkista aina, että virtalähde vastaa arvokilvessä ilmoitettua jännitettä.
SUOMI Tarkista että sivukahva on asianmukaisesti koottu ja asennettu ennen kuin käytät konetta. • Irrota sivukahva. • Oikeakätiset: siirrä sivukahvan kiinnitysrengas kauluksen ympäri istukan taakse, kahva vasemmalla. • Vasenkätiset: siirrä sivukahvan kiinnitysrengas kauluksen ympäri istukan taakse, kahva oikealla. • Kierrä sivukahva haluttuun asemaan ja kiristä kahva. Poraussyvyyden asettaminen (kuva E) • Asenna tarvittava terä paikalleen edellä annettujen ohjeiden mukaisesti.
SUOMI Virran kytkeminen päälle/pois päältä (kuva A) D25102(K)/D25102C/D25103K/D25104K • Käynnistä kone painamalla virtakytkintä (1). Virtaytkimeen kohdistuvan paineen määrä säätää koneen kierrosnopeuden. Jatkuvaa käyttöä varten, paina kytkintä (1), paina lukitusnäppäintä (2) ja vapauta kytkin. • Pysäytä kone vapauttamalla kytkin. • Halutessasi pysäyttää koneen jatkuvasta käynnistä paina kytkintä lyhyesti ja vapauta se.
SUOMI • Asenna sopiva taltta ja kierrä sitä kädellä, kunnes se lukkiutuu yhteen 51:sta asennosta. • Säädä sivukahva (9). • Kytke työkalu päälle ja aloita työskentely. • Katkaise virta aina työn jälkeen ja ennen kuin irrotat pistokkeen pistorasiasta. • Älä käytä tätä työkalua tulenarkojen tai räjähdysalttiitten nesteiden (bensiini, alkoholi, jne.) sekoittamiseen. • Älä sekoita tai vatkaa tulenarkoja nesteitä.
SUOMI TAKUU • 30 PÄIVÄN TYYTYVÄISYYSTAKUU • Jos et ole täysin tyytyväinen DEWALT-työkaluusi, palauta se myyjälle tai valtuutettuun DEWALThuoltopisteeseen 30 päivän sisällä ostopäivästä, niin saat rahasi takaisin tai vaihtokoneen. Tuote on palautettava täydellisenä ja ostokuitti on esitettävä. • YHDEN VUODEN ILMAINEN YLLÄPITOHUOLTO • DEWALT-työkalusi kunnossapito ja huolto suoritetaan ilmaiseksi 12 kuukauden sisällä ostopäivästä huoltopisteessämme.
SVENSKA BORRHAMMARE D25102(K)/D25102C/ D25103K/D25104K/D25203K Vi gratulerar! Du har valt ett DEWALT verktyg. Mångårig erfarenhet, ihärdig produktutveckling och förnyelse gör DEWALT till ett av de mest pålitliga namnen för professionella användare.
SVENSKA D25102(K) D25102C D25103K LpA (ljudtryck) dB(A)* 90,5 90,5 90,5 LWA (ljudeffekt) dB(A) 99 99 99 D25104K D25203K LpA (ljudtryck) dB(A)* 90,5 90,5 LWA (ljudeffekt) dB(A) 99 99 * vid användarens öra Vidtag lämpliga åtgärder för hörselskydd.
SVENSKA 13 Använd rätt verktyg Använd inte verktyg för ändamål de inte är avsedda för. Tvinga inte verktyget att göra arbeten som är avsedda för kraftigare verktyg. Använd endast tillbehör och tillsatser som är rekommenderade i bruksanvisningen och katalogerna. Överbelasta inte verktyget. Varning! Använd endast tillbehör och tillsatser som är rekommenderade i bruksanvisningen och katalogerna. Användning av annat verktyg eller tillbehör kan innebära risk för personskada.
SVENSKA Säkerhetskoppling Borrhammaren är utrustad med en säkerhetskoppling som reducerar den maximala vridningen för användaren om ett borr skulle fastna. Denna funktion förhindrar även att kuggdreven och elmotorn stannar. Säkerhetskopplingen är fabriksinställd och kan inte justeras. Elektrisk säkerhet Den elektriska motorn är endast avsedd för en spänning. Kontrollera alltid att spänningen på nätet motsvarar den spänning som finns angiven på märkplåten.
SVENSKA • Drag i verktyget för att se om det är ordentligt spärrat. Hammarfunktionen kräver att verktyget kan svänga flera centimeter i längdriktningen medan det sitter i verktygshållaren. • För att avlägsna verktyget, drag tillbaka spärrhylsan (12) och drag ut verktyget ur hållaren. Montering av sidohandtaget (fig. D) Sidohandtaget (10) kan monteras för att passa både höger- och vänsterhänta användare. Använd alltid borrmaskinen med sidohandtaget ordentligt monterat. • Lossa sidohandtaget.
SVENSKA • Borra eller skruva inte för djupt för att förhindra att dammskyddet skadas. • Håll alltid fast maskinen med båda händerna och se till att du står stadigt (fig. H). Ha alltid sidohandtaget korrekt monterat under arbete. Strömbrytare (fig. A) D25102(K)/D25102C/D25103K/D25104K • För att starta verktyget, tryck på strömbrytaren (1). Hastigheten är beroende på hur hårt brytaren trycks in. För kontinuerlig drift, tryck på strömbrytaren (1), tryck på låsknappen (2) och släpp strömbrytaren.
SVENSKA Vid rotation bakåt (motsols) reduceras apparatens hastighet automatiskt för enkel utdragning av skruven. • Släpp hastighetsbrytaren när skruvens huvud är jäms med arbetsstyckets yta, så att den inte tränger in i arbetsstycket. D25103K/D25104K/D25203K - Mejsling och skärning (fig. A) • Ställ funktionsväljaren (4) i läge för ”hammarfunktion, enbart”. • Montera en lämplig mejsel och vrid den för hand tills den spärras i en av 51 positioner. • Ställ in sidohandtaget (9).
SVENSKA GARANTI • 30 DAGARS NÖJD-KUND-GARANTI • Om du inte är fullständigt nöjd med din DEWALTprodukts prestanda behöver du endast returnera den inom 30 dagar, komplett som vid köpet, till ditt inköpsställe eller en DEWALT auktoriserad serviceverkstad för fullständig återbetalning eller utbyte. Inköpsdatum måste påvisas. • ETT ÅRS FRI FÖREBYGGANDE SERVICE • Om din DEWALT-produkt inom 12 månader efter inköpsdatum kräver underhåll eller service, utförs detta kostnadsfritt av en auktoriserad serviceverkstad.
TÜRKÇE DARBELİ MATKAP D25102(K)/ D25102C/D25103K/D25104K/D25203K Tebrikler! Bir D E WALT aletini seçmiş bulunuyorsunuz. Ürün geliştirme ve yenilemede y llar n deneyimi D E WALT’ profesyonel kullan c lar işin en güvenilir partnerlerden biri haline getirmektedir.
TÜRKÇE D25102(K) 25102C D25103K L pA (ses şiddeti) dB(A)* 90,5 L WA (akustik gücü) dB(A) 99 D25104K L pA (ses şiddeti) dB(A)* 90,5 L WA (akustik gücü) dB(A) 99 90,5 90,5 99 99 D25203K 90,5 3 99 * kullan c n n kulağ nda Kulaklar korumak için gerekli önlemleri al n.
TÜRKÇE 11 Ayar anahtarlar-n- ve aparatlar-nç-kart-n Aleti çal şt rmadan önce, üzerinde hiçbir ayar anahtar ve aparat n n bulunmamas na dikkat edin. 12 Uzatma kablolari Kullanmadan önce uzatma kablolarini gözden geçirin ve eger zarar görmüsse degistirin. Alet aç k havada kullan ld ğ nda, daima aç k havada kullan m için özel yap lm ş ve böyle olduğunu gösteren bir damga taş yan uzatma kablolar kullan n. 13 İşe uygun alet kullan-n Bu ürünün kullan m tasar m bu kullan m k lavuzunda anlat lm şt r.
TÜRKÇE Sahip olduğunuz D25102(K)/D25102C/ D25103K/D25104K/D25203K döner darbeli matkap, profesyonel dairesel ve darbeli delme işlemlerinde, vidalama ve hafif budama, yontma, y k m uygulamalar nda ve karpit uçlu merkez delme işlemlerinde kullan lmak üzere tasarlanm şt r.
TÜRKÇE Keski konumunu belirleme Keski ucu, 51 farkl konuma ayarlanabilir ve kilitlenebilir. • Çal şma modu seçme düğmesini (4) “döner uç” konumuna çevirin. • Keskiyi istediğiniz konuma döndürerek getirin. • Mod seçme düğmesini (4) “sadece darbe” konumuna getirin. • Yerine oturana kadar keskiyi döndürün. SDS-plus ® donat lar n n tak lmas ve ç kart lmas (şekil C) Bu alet SDS-plus ® aksesuarlar n kullanmaktad r (şekil B’e gösterilen SDS-plus ® matkap ucu gövde kesiti çizimine bak n z).
TÜRKÇE Standart kavramay asla “darbeli delme” modunda olmak kullanmay n. D25104K - Alet tutucunun kavramayla değiştirilmesi (şekil G) • Kilit bileziğini (8) aç k kilit konumuna getirin ve alet tutucuyu (6) geriye çekin. • Kavramay (13) milin üzerine yerleştirin ve kilit bileziğini kilitli konuma çevirin. • Kavramay alet tutucuyla değiştirmek için öncelikle alet tutucuyu sökmüş olduğunuz şekilde kavramay sökün. Daha sonra kavramay yerleştirdiğiniz şekilde alet tutucuyu yerleştirin.
TÜRKÇE • Yan kolu (9) istenildiği gibi ayarlay n. • Merkez delgiyi delgeç ucuna getirin. • Merkez delgiyi noktan n üzerine getirin ve değişken h z ayar anahtar na (1) bas n. Matkap ucu betona yaklaş k 1 cm girene kadar delin. • Delme işlemini durdurun ve merkez delgiyi ç kart n. Matkap ucunu yeniden deliğe yerleştirin ve delmeye devam edin. • Delgi ucu derinliğinden daha kal n yap lar delerken betonun silindirini k r n veya ucu düzgün aral klarla içeri itin.
TÜRKÇE • Makinenin bak m kullan c taraf ndan yap labilecek şekilde değildir. Yaklaş k 40 saatlik kullan mdan sonra aletinizi yetkili bir D E WALT tamir servisine götürünüz. Bu süreden önce problem ç karsa yine bir yetkili D E WALT tamir servisine başvurun. • Karbon f rçalar y prand ğ nda alet otomatik olarak kendini kapatacakt r.
∂§§∏¡π∫∞ ¶Eƒπ™∆ƒ√ºπ∫√ ∫ƒ√À™∆π∫√ ¢ƒ∞¶∞¡√ D25102(K)/D25102C/D25103K/D25104K/ D25203K £ÂÚÌ¿ Û˘Á¯·ÚËÙ‹ÚÈ·! ¢È·Ï¤Í·Ù ¤Ó· ·fi Ù· Ì˯·Ó‹Ì·Ù· Ù˘ DEWALT. ∏ Ôχ¯ÚÔÓË ÂÌÂÈÚ›· Ù˘ DEWALT, Ë Û˘Ó¯‹˜ ÂͤÏÈÍË ÙˆÓ ÚÔ˚fiÓÙˆÓ Ù˘ Î·È Ë ÂÊ·ÚÌÔÁ‹ ηÈÓÔÙÔÌÈÒÓ ÙËÓ Î·ıÈÛÙÔ‡Ó ¤Ó·Ó ·fi ÙÔ˘˜ Èfi ·ÍÈfiÈÛÙÔ˘˜ Û˘ÓÂÚÁ¿Ù˜ ÙˆÓ Â·ÁÁÂÏÌ·ÙÈÒÓ.
∂§§∏¡π∫∞ LpA (˯ËÙÈ΋ ›ÂÛË) D25102(K) dB(A)* 90,5 LWA (·ÎÔ˘ÛÙÈ΋ ‰‡Ó·ÌË) dB(A) LpA (˯ËÙÈ΋ ›ÂÛË) 99 D25104K dB(A)* 90,5 LWA (·ÎÔ˘ÛÙÈ΋ ‰‡Ó·ÌË) dB(A) 99 D25102C D25103K 90,5 90,5 99 99 D25203K 90,5 3 99 * ÛÙÔ ·˘Ù› ÙÔ˘ ¯ÂÈÚÈÛÙ‹ §¿‚ÂÙ ηٿÏÏËÏ· ̤ÙÚ· ÁÈ· ÙËÓ ÚÔÛÙ·Û›· Ù˘ ·ÎÔ‹˜ Û·˜.
∂§§∏¡π∫∞ 10 ™˘Ó‰¤ÛÙ ÙË Û˘Û΢‹ ·Ê·›ÚÂÛ˘ ÛÎfiÓ˘ E¿Ó ·Ú¤¯ÔÓÙ·È Û˘Û΢¤˜ ÁÈ· ÙË Û‡Ó‰ÂÛË Û˘Û΢ÒÓ ·Ê·›ÚÂÛ˘ Î·È Û˘ÏÏÔÁ‹˜ ÛÎfiÓ˘, ‚‚·Èˆı›Ù fiÙÈ Ë Û‡Ó‰ÂÛË Î·È Ë ¯Ú‹ÛË ÙÔ˘˜ Á›ÓÂÙ·È Ì ÙÔÓ ÂӉ‰ÂÈÁ̤ÓÔ ÙÚfiÔ. 11 ∞ÔÌ·ÎÚ‡ÓÂÙ ·fi ÙÔ Ì˯¿ÓËÌ· Ù· ÎÏÂȉȿ Ô˘ ¯ÚËÛÈÌÔÔț٠ÁÈ· ÙË Ú‡ıÌÈÛ‹ ÙÔ˘ ¶ÚÈÓ ‚¿ÏÂÙ Û ÏÂÈÙÔ˘ÚÁ›· ÙÔ ÂÚÁ·Ï›Ô, ‚‚·Èˆı›Ù ¿ÓÙ· fiÙÈ ¤¯ÂÙ ‚Á¿ÏÂÈ ·fi ·˘Ùfi Ù· ÎÏÂȉȿ ÁÈ· ÙË Ú‡ıÌÈÛ‹ ÙÔ˘. 12 ∫·Ï҉ȷ ÂÈÌ‹Î˘ÓÛ˘ ¶ÚÈÓ ÙË ¯Ú‹ÛË, ÂÈıˆڋÛÙ ÙÔ Î·ÏÒ‰ÈÔ ÂÈÌ‹Î˘ÓÛ˘ Î·È ·ÓÙÈηٷÛÙ‹ÛÙ ÙÔ, ·Ó ¤¯ÂÈ Êı·Ú›.
∂§§∏¡π∫∞ 1 ∫È‚ÒÙÈÔ (Ù‡· K ÌfiÓ·) 1 ™ÊÈÁÎÙ‹Ú·˜ ¯ˆÚ›˜ ÙÛÔÎ (D25104K) 1 ™ÊÈÁÎÙ‹Ú·˜ Ì ÙÛÔÎ + ÚÔÛ·ÚÌÔÁ¤·˜ ÙÛÔÎ (D25103C) 1 º˘ÏÏ¿‰ÈÔ Ô‰ËÁÈÒÓ 1 ∞Ó·Ï˘ÙÈÎfi Û¯¤‰ÈÔ • EϤÁÍÙ ÙÔ ÂÚÁ·Ï›Ô, Ù· ·ÓÙ·ÏÏ·ÎÙÈο Î·È Ù· ÂÍ·ÚÙ‹Ì·Ù· ÁÈ· ‚Ï¿‚˜ Ô˘ ›Ûˆ˜ ¤¯Ô˘Ó ÚÔÎÏËı› ηٿ ÙË ÌÂÙ·ÊÔÚ¿. • ∞ÊÈÂÚÒÛÙ ϛÁÔ ¯ÚfiÓÔ ÁÈ· Ó· ‰È·‚¿ÛÂÙÂ Î·È Ó· ηٷÓÔ‹ÛÂÙ fiÏÔ ÙÔ Ê˘ÏÏ¿‰ÈÔ Ô‰ËÁÈÒÓ ÚÈÓ Ó· ¯ÚËÛÈÌÔÔÈ‹ÛÂÙ ÙÔ ÂÚÁ·Ï›Ô.
∂§§∏¡π∫∞ ¶ÂÚÈÛÙÚÔÊÈ΋ ‰È¿ÙÚËÛË: ÁÈ· ‚›‰ˆÌ· Î·È ÁÈ· ‰È¿ÙÚËÛË ·ÙÛ·ÏÈÔ‡, ͇ÏÔ˘ Î·È Ï·ÛÙÈÎˆÓ ∫ÚÔ˘ÛÙÈ΋ ‰È¿ÙÚËÛË: ÁÈ· fiϘ ÙȘ ÂÊ·ÚÌÔÁ¤˜ ‰È¿ÙÚËÛ˘ Û Û΢Úfi‰ÂÌ· Î·È ÏÈıÔ‰ÔÌ‹ ∞Ï‹ ÎÚÔ‡ÛË: ÁÈ· ÂÏ·ÊÚÈ¿ ÛÊ˘ÚËÏ¿ÙËÛË, Ư̂ϢÛË Î·È ÂÚÁ·Û›Â˜ ηÙ‰¿ÊÈÛ˘. ™Â ·˘Ù‹ ÙË ı¤ÛË ÏÂÈÙÔ˘ÚÁ›·˜ ÙÔ ÂÚÁ·ÏÂ›Ô ÌÔÚ› ›Û˘ Ó· ¯ÚËÛÈÌÔÔÈËı› Û·Ó ÌÔ¯Ïfi˜ ÁÈ· Ó· ·ÂÏ¢ıÂÚÒÛÂÈ ¤Ó· ÙÚ˘¿ÓÈ Ô˘ ¤¯ÂÈ ÌÏÔοÚÂÈ. ¶ÂÚÈÛÙÚÔÊ‹ ·Î›‰·˜: ı¤ÛË ÌË ÏÂÈÙÔ˘ÚÁ›·˜ Ô˘ ¯ÚËÛÈÌÔÔÈÂ›Ù·È ÌfiÓÔ ÁÈ· ÙËÓ ÂÚÈÛÙÚÔÊ‹ ›‰˘ ÛÌ›Ï˘ ÛÙËÓ ÂÈı˘ÌËÙ‹ ı¤ÛË.
∂§§∏¡π∫∞ • ¶È¤ÛÙ ÙÔÓ ÛÊÈÎÙ‹Ú· ÛÙÔ ‚¿ıÔ˘˜ (11) Î·È ÎÚ·Ù‹ÛÙ ÙÔÓ ·ÙË̤ÓÔ. • ∆ÔÔıÂÙ‹ÛÙ ÙË Ú¿‚‰Ô Ú‡ıÌÈÛ˘ ‚¿ıÔ˘˜ (9) ̤۷ ·fi ÙËÓ Ô‹ ÛÙÔ ÛÊÈÎÙ‹Ú· ÛÙÔ ‚¿ıÔ˘˜. • ƒ˘ıÌ›ÛÙ ÙÔ ‚¿ıÔ˜ ÙÚ˘·ÓÈÔ‡ fiˆ˜ Ê·›ÓÂÙ·È. • ∞Ê‹ÛÙ ÙÔÓ ÛÊÈÎÙ‹Ú· ÛÙÔ ‚¿ıÔ˘˜. ¢È·ÎfiÙ˘ ηÓÔÓÈ΋˜/·ÓÙ›ÛÙÚÔÊ˘ ÂÚÈÛÙÚÔÊ‹˜ (ÂÈÎ. F1 & F2) D25102(K)/D25102C/D25103K/D25104K (ÂÈÎ. F1) • ∆Ú·‚‹ÍÙ ÙÔ Û˘ÚfiÌÂÓÔ ‰È·ÎfiÙË Î·ÓÔÓÈ΋˜/ ·ÓÙ›ÛÙÚÔÊ˘ ÂÚÈÛÙÚÔÊ‹˜ (3) ‰ÂÍÈ¿ ÁÈ· ηÓÔÓÈ΋ (‰ÂÍÈfiÛÙÚÔÊË) ÂÚÈÛÙÚÔÊ‹. µÏ¤Â Ù· ‚¤ÏË ¿Óˆ ÛÙÔ ÂÚÁ·Ï›Ô.
∂§§∏¡π∫∞ £· Ú¤ÂÈ ¿ÓÙÔÙ ӷ ¯ÂÈÚ›˙ÂÛÙ ÙÔ ÂÚÁ·ÏÂ›Ô Ì ÙËÓ Ï¢ÚÈ΋ Ï·‚‹ ηٿÏÏËÏ· ÙÔÔıÂÙË̤ÓË. • ∏ ÏÂÈÙÔ˘ÚÁ›· ÙÔ˘ ÂÚÁ·Ï›Ԣ Ú¤ÂÈ ¿ÓÙÔÙ ӷ ‰È·ÎfiÙÂÙ·È ÌÂÙ¿ ÙËÓ ÔÏÔÎÏ‹ÚˆÛË Ù˘ ÂÚÁ·Û›·˜ Î·È ÚÈÓ ÙÚ·‚‹ÍÂÙ ÙÔ Î·ÏÒ‰ÈÔ ·fi ÙËÓ Ú›˙·. •ÂΛÓËÌ·/™Ù·Ì¿ÙËÌ· (ÂÈÎ. A) D25102(K)/D25102C/D25103K/D25104K • °È· Ó· ·ÓÔ›ÁˆÛÙ ÙÔ ÂÚÁ·ÏÂ›Ô È¤ÛÙ ÙÔ ‰È·ÎfiÙË ÌÂÙ·‚ÏËÙ‹˜ Ù·¯‡ÙËÙ·˜ (1) Ô›˙ÂÈ Ë Ù·¯‡ÙËÙ·. °È· ÙË Û˘Ó¯‹ ÏÂÈÙÔ˘ÚÁ›·, ȤÛÙ ÙÔ ‰È·ÎfiÙË (1), ȤÛÙ ÙÔ ‰È·ÎfiÙË (2) Î·È ·ÂÏ¢ıÂÚÒÛÙ ÙÔ ‰È·ÎfiÙË.
∂§§∏¡π∫∞ • ¶ÚÔ¯ˆÚ‹ÛÙ fiˆ˜ ÂÚÈÁÚ¿ÊÂÙ·È ÛÙËÓ ∫ÚÔ˘ÛÙÈ΋ ‰È¿ÙÚËÛË. ¶ÔÙ¤ ÌË ¯ÚËÛÈÌÔÔÈ›ÙÂ Û˘Ó‹ıË ÙÛÔΠηٿ ÙË ÏÂÈÙÔ˘ÚÁ›· ÎÚÔ˘ÛÙÈ΋˜ ‰È¿ÙÚËÛ˘. ÃÚ‹ÛË ˆ˜ ηÙÛ·‚›‰È (ÂÈÎ. A) • £¤ÛÙ ÙÔ ‰È·ÎfiÙË ÂÈÏÔÁ‹˜ ÏÂÈÙÔ˘ÚÁ›·˜ (4) ÛÙË ı¤ÛË “rotary drilling” (ÂÚÈÛÙÚÔÊÈ΋ ‰È¿ÙÚËÛË). • EÈϤÍÙ ÙË ÊÔÚ¿ ÂÚÈÛÙÚÔÊ‹˜.
E°°À∏™∏ ∫·ı¿ÚÈÛÌ· ¢È·ÙËÚ›Ù ÙȘ Ô¤˜ ÂÍ·ÂÚÈÛÌÔ‡ ηı·Ú¤˜ Î·È ÛÎÔ˘›˙ÂÙ ٷÎÙÈο ÙÔ ÂÚÁ·ÏÂ›Ô Ì ̷ϷÎfi ‡Ê·ÛÌ·. ¢È¿ıÂÛË ÂÚÁ·Ï›ˆÓ Î·È ÂÚÈ‚¿ÏÏÔÓ ¶·Ú·‰ÒÛÙ ÙÔ ÂÚÁ·ÏÂ›Ô Û·˜ Û ¤Ó· ÂÍÔ˘ÛÈÔ‰ÔÙË̤ÓÔ ÛÙ·ıÌfi Û˘ÓÙ‹ÚËÛ˘. √È Ù¯ÓÈÎÔ› ÙÔ˘ ı· ÌÂÚÈÌÓ‹ÛÔ˘Ó ÁÈ· ÙËÓ ‰È¿ıÂÛ‹ ÙÔ˘ ηٿ ÙÚfiÔ Ô˘ ‰ÂÓ ‚Ï¿ÙÂÈ ÙÔ ÂÚÈ‚¿ÏÏÔÓ.
Belgique et Luxembourg België en Luxemburg DEWALT Mechelen Campus, Schaliënhoevedreef 20E B-2800 Mechelen Tel: +32 (0)015 - 15 47 9211 Fax: +32 (0)015 - 15 47 9210 www.dewaltbenelux.com Danmark DEWALT Hejrevang 26 B 3450 Allerød Tlf: 70 20 15 30 Fax: 48 14 13 99 www.dewalt-nordic.com Deutschland DEWALT Richard-Klinger-Straße 65510 Idstein Tel: 06126-21-1 Fax: 06126-21-2770 www.dewalt.de EÏÏ¿˜ Black & Decker (Hellas) S.A.