
Use and Care Manual


ENGLISH
6
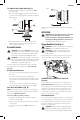
Operation Modes (Fig. A)
WARNING: Do not select the operating mode when
the tool isrunning.
CAUTION: Never use in Rotary Drilling or Rotary
Hammering mode with a chisel bit in the bit holder.
Personal injury and damage to the the tool may result.
Your tool is equipped with a mode selector dial
3
to
selectthe mode appropriate to desired operation.
Symbol Mode Application
Rotary Drilling
Screwdriving
Drilling into steel, wood
andplastics
Rotary
Hammering
Drilling into concrete
and masonry
Hammering
only
Lightchipping
To select an operating mode
1. Depress the mode selector release button
4
.
2. Rotate the mode selector dial so that the arrow points to
the symbol corresponding for the desired mode.
NOTE: The arrow on the mode selector dial
3
must be
pointing at a mode symbol at all times. There are no
operable positions inbetween. It may be necessary to briefly
run the motor after having changed from 'hammering only'
to 'rotary' modes in order to align thegears.
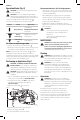
Performing an Application (Fig. F)
WARNING: TO REDUCE THE RISK OF PERSONAL
INJURY, ALWAYS ensure workpiece is anchored or
clamped firmly. If drilling thin material, use a wood
“back-up” block to prevent damage to thematerial.
WARNING: Always wait until the motor has come to
a complete standstill before changing the direction
ofrotation.
1. Choose and install the appropriate chuck, adapter, and/
or bit onto to the tool. Refer to Bit and Bit Holder.
2. Using the mode selector dial
3
, selectthe mode
appropriate to desired application. Refer to
OperationModes.
3. Adjust the side handle
5
asnecessary.
Fig. F
3 1
5
4. Place the bit/chisel on the desired location.
5. Depress the trigger switch
1
.
6. To stop the hammer, release the switch.
Recommendations for Tool Operation
• Large (5/16" to 1/2" [7.9 mm to 12.7 mm]) holes in steel
can be made easier if a pilot hole (5/32" to 3/16" [4 mm
to 4.8 mm]) is drilledfirst.
• When drilling, always apply pressure in a straight line
with the bit, but do not push hard enough to stall the
motor or deflect thebit. A smooth even flow of material
indicates the proper drilling rate.
• If drilling thin material or material that is prone to
splinter, use a wood “back-up” block to prevent damage
to thework piece.
WARNING:
• Do not use this tool to mix or pump easily
combustible or explosive fluids (benzine,
alcohol,etc.).
• Do not mix or stir inflammable liquids
labelledaccordingly.
MAINTENANCE
WARNING: To reduce the risk of serious personal
injury, turn unit off and disconnect it from
power source before making any adjustments or
removing/installing attachments or accessories.
An accidental start-up can causeinjury.
Cleaning
WARNING: Blow dirt and dust out of all air vents with
clean, dry air at least once a week. To minimize the risk
of eye injury, always wear ANSI Z87.1 approved eye
protection when performingthis.
WARNING: Never use solvents or other harsh
chemicals for cleaning the non-metallic parts of
the tool. These chemicals may weaken the plastic
materials used in these parts. Use a cloth dampened
only with water and mild soap. Never let any liquid
get inside the tool; never immerse any part of the tool
into aliquid.
Accessories
WARNING: Since accessories, other than those
offered by
DeWALT
, have not been tested with this
product, use of such accessories with this tool could be
hazardous. To reduce the risk of injury, only
DeWALT
recommended accessories should be used with
thisproduct.
Recommended accessories for use with your tool
are available at extra cost from your local dealer or
authorized service center. If you need assistance in
locating any accessory, please contact
DeWALT
Industrial
Tool Co., 701East Joppa Road, Towson, MD 21286, call
1-800-4-
DeWALT
(1-800-433-9258) or visit our website:
www.dewalt.com.