Operation Manual
Manuals
Brands
DEWALT Manuals
Tools & Hardware
15-Amp 40 lbs. Demolition Hammer
1
2
3
4
5
6
7
8
9
10
2
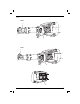
Figure 3
Figure 2A
Figure 2B
b
b
f
1
...
2
3
4
5
6
...
...
124