
Instruction manual


7
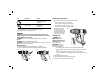
Icon Description Purpose
20
φ
Cone nozzle Welding, shrink sleeving
(heat concentrated over
small area)
50 mm Fish tail Drying, thawing
surface nozzle (heat spread
over wide area)
1. Make sure the on/off switch (A) is in position "O" and the tool is disconnected
from the power source. Ensure the nozzle has cooled down.
2. Place the desired accessory onto the nozzle.
OPERATION
WARNING: To reduce the risk of serious personal injury, turn tool off and
disconnect tool from power source before making any adjustments or removing/
installing attachments or accessories.
WARNING: Make sure the nozzle ALWAYS points away from you and any
bystanders.
WARNING: DO NOT drop anything into the nozzle.
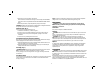
WARNING: Use only one hand to hold the tool as shown in Figure 2. Do not place
your other hand over the air vents (Fig. 3).
PRIOR TO OPERATION
1. Attach the correct accessory recommended for the application.
2. Turn the air temperature adjustment knob (D) to desired air temperature.
FIG. 2 FIG. 3
Switching On and Off (Fig. 4)
1. Push the on/off switch (A) to the desired air flow settings:
1.24 liter/min [50˚ C-400˚ C 122–752º F)]
A low air flow to heat up the workpiece slowly.
11.45 liter/min [50˚ C-600˚ C (122–1112º F)]
A high air flow to heat up the workpiece quickly.
2. To turn the tool off, push
A
FIG. 4
the on/off switch (A) to
position O. Disconnect the
tool from the power source
and let the tool cool down
before moving or storing it.
Stripping Paint
WARNING: Refer to
Important Notice under
Additional Safety Instructions
for Heat Guns before using the
tool to remove paint.
WARNING: Do not strip
metal window frames as the
heat may crack the glass.
• When striping other window frames, use the glass protection nozzle.
• To prevent igniting the surface, do not keep the tool directed at one spot too
long.
• Avoid collecting paint on the scraper accessory, as it may ignite. If
necessary, carefully remove paint debris from the scraper accessory using
a knife.
1. Attach the appropriate accessory.
2. Turn the air temperature adjustment knob (D) to high.
3. Turn the tool on by selecting the desired air flow.