INSTRUCTION MANUAL DC300-XE 36V CORDLESS CIRCULAR SAW
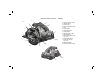
DC300 36 Volt Cordless Circular Saw 4000 RPM M FIG. 1 A. B. C. D. E. F. A L B J N G. H. I. J. I C H M. N. E G K. L.
c. Keep children and bystanders away while operating a power tool. Distractions can cause you to lose control. 2. ELECTRICAL SAFETY a. Power tool plugs must match the outlet. Never modify the plug in any way. Do not use any adapter plugs with earthed (grounded) power tools. Unmodified plugs and matching outlets will reduce risk of electric shock. b. Avoid body contact with earthed or grounded surfaces such as pipes, radiators, ranges and refrigerators.
b. Recharge only with the charger specified by the manufacturer. A charger that is suitable for one type of battery pack may create a risk of fire when used with another battery pack. c. Use power tools only with specifically designated battery packs. Use of any other battery packs may create a risk of injury and fire. d.
CAUSES AND OPERATOR PREVENTION OF KICKBACK • Kickback is a sudden reaction to a pinched, bound or misaligned saw blade, causing an uncontrolled saw to lift up and out of the workpiece toward the operator. • When the blade is pinched or bound tightly by the kerf closing down, the blade stalls and the motor reaction drives the unit rapidly back toward the operator.
• ANSI S12.6 (S3.19) hearing protection, • NIOSH/OSHA/MSHA respiratory protection. WARNING: Some dust created by power sanding, sawing, grinding, drilling, and other construction activities contains chemicals known to cause cancer, birth defects or other reproductive harm. Some examples of these chemicals are: • lead from lead-based paints, • crystalline silica from bricks and cement and other masonry products, and • arsenic and chromium from chemically-treated lumber (CCA).
SAVE THESE INSTRUCTIONS • An extension cord must have adequate wire size (AWG or American Wire Gauge) for safety. The smaller the gauge number of the wire, the greater the capacity of the cable, that is 16 gauge has more capacity than 18 gauge. When using more than one extension to make up the total length, be sure each individual extension contains at least the minimum wire size. MINIMUM GAGE FOR CORD SETS For Cable length (m): 7.5 15 25 30 45 60 Use Cable with minimum rating (Amperes) Tool Amperes 0 - 3.
Storage Recommendations • Charge the battery packs only in DEWALT chargers. • DO NOT splash or immerse in water or other liquids. • Do not store or use the tool and battery pack in locations where the temperature may reach or exceed 40˚C (105°F) (such as outside sheds or metal buildings in summer). WARNING: Never attempt to open the battery pack for any reason. If battery pack case is cracked or damaged, do not insert into charger. Do not crush, drop or damage battery pack.
d. If charging problems persist, take the tool, battery pack and charger to your local service center. 4. The battery pack should be recharged when it fails to produce sufficient power on jobs which were easily done previously. DO NOT CONTINUE to use under these conditions. Follow the charging procedure. You may also charge a partially used pack whenever you desire with no adverse affect on the battery pack. 5.
To install the battery pack into the tool handle, align the base of the tool with the rails inside the tool’s handle and slide the battery pack firmly into the handle until you hear the lock snap into place. To remove the battery pack from the tool, press the release button (N) and firmly pull the battery pack out of the tool handle. Insert it into the charger as described in the charger section of this manual. 4.
Blades NOTE: Never engage the blade lock while saw is running, or engage in an effort to stop the tool. Never turn the saw on while the blade lock is engaged. Serious damage to your saw will result. TO REPLACE THE BLADE (FIG. 4) 1. Depress the blade lock button (L) and turn the saw spindle until the blade lock engages and the blade stops rotating. With the blade lock engaged, extend the lever on the keyless blade clamp and turn clockwise (clamp has left-hand threads and must be turned clockwise to loosen).
removes sawdust from the cut, results in cooler, faster sawing and reduces the chance of kickback. A method for checking for correct cutting depth is shown in Figure 8. Lay a piece of the material you plan to cut along the side of the blade, as shown, and observe how much tooth projects beyond the material. NOTE: When using carbide-tipped blades, make an exception to the above rule and allow only one-half of a tooth to project below the material to be cut. Bevel Angle Adjustment (Fig.
Figure 11 shows proper sawing position. Note that hands are kept away from cutting area. To avoid kickback, DO support board or panel NEAR the cut (Fig. 12). DON’T support board or panel away from the cut (Fig. 13). Place the work with its “good” side – the one on which appearance is most important – down. The saw cuts upward, so any splintering will be on the work face that is up when you cut it. FIG. 12 IF SAW STALLS, RELEASE THE TRIGGER AND BACK THE SAW UNTIL IT IS LOOSE.
ACCESSORIES 5. Make sure blade is not in contact with cutting surface before starting saw. 6. Start the motor and gradually lower the saw until its shoe rests flat on the material to be cut. Advance saw along the cutting line until cut is completed. 7. Release trigger and allow blade to stop completely before withdrawing the blade from the material. 8. When starting each new cut, repeat as above. Recommended accessories for use with your tool are available at extra cost from your local service center.
Patent Notification In addition to the warranty, DEWALT tools are covered by our: FREE ONE YEAR SERVICE CONTRACT DEWALT will also maintain the tool for free at any time during the first year of purchase. This includes labour, parts and lubrication required to restore the product to sound mechanical and/or electrical condition. Normal wear parts are not covered in this service. Carbon brushes worn more then 50% will be replaced. NOTE: Three Year Warranty is not applicable to items deemed as consumables.
DEWALT Battery and Charger Systems Battery Output Nominal Chargers/Charge Time 240 Volts 12 Volts Cat. Number Voltage Amp Hour 97014 98014 DW9106 DW9107 DW9108 DW9115 DW9116 DW9117 DW9118 DE9116 DE9118 DW911 DC011 DW0245 DE2046 DE9000 DW9109 DW0242 DE0240-XJ DW0240 DW9096 DE9095-XJ DE9091-XJ DW9091 DC9071 DE9074-XJ DW9072 DE9071-XJ DW9071 DW9050 DW9063 DW9062 DW9061 DW9048 DW9057 DW9046 DC9096 DC9091 DC9036 24 24 24 18 18 14.4 14.4 12 12 12 12 12 12 9.6 9.6 9.6 9.6 7.2 7.2 18 14.