DC390, DCS392 Cordless Circular Saws Scies circulaires sans fil Sierras circulares inalámbricas INSTRUCTION MANUAL GUIDE D'UTILISATION MANUAL DE INSTRUCCIONES INSTRUCTIVO DE OPERACIÓN, CENTROS DE SERVICIO Y PÓLIZA DE GARANTÍA. ADVERTENCIA: LÉASE ESTE INSTRUCTIVO ANTES DE USAR EL PRODUCTO. 1-800-4-DEWALT • www.dewalt.com If you have questions or comments, contact us. Pour toute question ou tout commentaire, nous contacter. Si tiene dudas o comentarios, contáctenos.
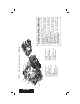
English H I J K L G F E A B C 3700 RPM 2 H. BLADE CLAMPING SCREW I. KERF INDICATOR J. BEVEL ADJUSTMENT KNOB (not shown) K. BLADE LOCK BUTTON (not shown) L. AUXILARY HANDLE 18.0 Volt Cordless Circular Saw A. SWITCH LOCK-OFF BUTTON B. TRIGGER SWITCH C. BATTERY PACK D. DEPTH ADJUSTMENT KNOB E. SHOE F. LOWER GUARD RETRACTING LEVER G. LOWER GUARD DC390 The definitions below describe the level of severity for each signal word. Please read the manual and pay attention to these symbols.
2) ELECTRICAL SAFETY a) Power tool plugs must match the outlet. Never modify the plug in any way. Do not use any adapter plugs with earthed (grounded) power tools. Unmodified plugs and matching outlets will reduce risk of electric shock. 1) WORK AREA SAFETY a) Keep work area clean and well lit. Cluttered or dark areas invite accidents. b) Do not operate power tools in explosive atmospheres, such as in the presence of flammable liquids, gases or dust.
English 4) POWER TOOL USE AND CARE a) Do not force the power tool. Use the correct power tool for your application. The correct power tool will do the job better and safer at the rate for which it was designed. b) Do not use the power tool if the switch does not turn it on and off. Any power tool that cannot be controlled with the switch is dangerous and must be repaired.
DANGER: a) Keep hands away from cutting area and blade. Keep your second hand on auxiliary handle or motor housing. If both hands are holding the saw, they cannot be cut by the blade. b) Do not reach underneath the workpiece. The guard cannot protect you from the blade below the workpiece. c) Adjust the cutting depth to the thickness of the workpiece. Less than a full tooth of the blade teeth should be visible below the workpiece. d) Never hold piece being cut in your hands or across your leg.
English LOWER GUARD SAFETY INSTRUCTIONS a) Check lower guard for proper closing before each use. Do not operate the saw if lower guard does not move freely and close instantly. Never clamp or tie the lower guard into the open position. If saw is accidentally dropped, lower guard may be bent. Raise the lower guard with the retracting handle and make sure it moves freely and does not touch the blade or any other part, in all angles and depths of cut. b) Check the operation of the lower guard spring.
• crystalline silica from bricks and cement and other masonry products, and • arsenic and chromium from chemically-treated lumber (CCA). Your risk from these exposures varies, depending on how often you do this type of work. To reduce your exposure to these chemicals: work in a well ventilated area, and work with approved safety equipment, such as those dust masks that are specially designed to filter out microscopic particles.
English Consult the chart at the end of this manual for compatibility of batteries and chargers. • Charge the battery packs only in DEWALT chargers. • DO NOT splash or immerse in water or other liquids. • Do not store or use the tool and battery pack in locations where the temperature may reach or exceed 105°F (40˚C) (such as outside sheds or metal buildings in summer). DANGER: Electrocution hazard. Never attempt to open the battery pack for any reason.
SAVE THESE INSTRUCTIONS: This manual contains important safety and operating instructions for battery chargers. • Before using charger, read all instructions and cautionary markings on charger, battery pack, and product using battery pack. DANGER: Electrocution hazard. 120 volts are present at charging terminals. Do not probe with conductive objects. Electric shock or electrocution may result.
English • An extension cord must have adequate wire size (AWG or American Wire Gauge) for safety. The smaller the gauge number of the wire, the greater the capacity of the cable, that is 16 gauge has more capacity than 18 gauge. An undersized cord will cause a drop in line voltage resulting in loss of power and overheating. When using more than one extension to make up the total length, be sure each individual extension contains at least the minimum wire size.
15 MINUTE CHARGER 1 HOUR CHARGER Indicator Light Operation DANGER: Electrocution hazard. 120 volts present at charging terminals. Do not probe with conductive objects. Danger of electric shock or electrocution. 1. Plug the charger into an appropriate outlet before inserting battery pack. 2. Insert the battery pack into the charger. The red (charging) light will blink continuously indicating that the charging process has started. 3.
English 1. Longest life and best performance can be obtained if the battery pack is charged when the air temperature is between 65°F and 75°F (18°- 24°C). DO NOT charge the battery pack in an air temperature below +40°F (+4.5°C), or above +105°F (+40.5°C). This is important and will prevent serious damage to the battery pack. 2. The charger and battery pack may become warm to touch while charging. This is a normal condition, and does not indicate a problem.
M A FIG. 3 B Release switch lock-off button (A) by pressing button as shown (Fig. 3). Pull the trigger switch (B) to turn the motor ON. Releasing the trigger switch turns the motor OFF. Releasing the trigger switch also automatically actuates lock-off button. Switch (Fig. 3) NOTE: Make sure your battery pack is fully charged. WARNING: Make certain the switch lock-off button (A) is engaged to prevent switch actuation before removing or installing battery.
English FIG. 4b H H O O BLADE N N SPINDLE 12 TIGHTEN (counterclockwise) K 2. Remove the blade clamping screw (H) and outer clamp washer (O) only. Remove old blade. LOOSEN (clockwise) FIG. 5 TO REPLACE THE BLADE (FIG. 5) 1. To loosen the blade clamping screw (H), depress the blade lock (K) and turn the saw spindle with the blade wrench until the blade lock engages and the blade stops rotating.
WARNING: To minimize the risk of eye injury, always use eye protection. Carbide is a hard but brittle material. Foreign objects in the work piece such as wire or nails can cause tips to crack or break. Only operate saw when proper saw blade guard is in place. Mount blade securely in proper rotation before using, and always use a clean, sharp blade. Blades LOWER BLADE GUARD WARNING: The lower blade guard is a safety feature which reduces the risk of serious personal injury.
English C. Cutting off a cantilevered or overhanging piece of material from the bottom up in a vertical direction can cause kickback. The falling cut off piece can pinch the blade. D. Cutting off long narrow strips (as in ripping) can cause kickback. The cut off strip can sag or twist closing the kerf and pinching the blade. E. Snagging the lower guard on a surface below the material being cut momentarily reduces operator control.
IF ADDITIONAL ADJUSTMENT IS NEEDED: 1. Adjust the saw to 0˚ bevel. Shoe Adjustment for 90˚ Cuts TO SET THE SAW FOR A BEVEL CUT 1. Loosen (counterclockwise) the bevel adjustment knob (J) and tilt shoe to the desired angle by aligning the pointer with the desired angle mark. 2. Retighten knob firmly (clockwise). The full range of the bevel adjustment is from 0˚ to 50˚. The quadrant is graduated in increments of 1˚. On the front of the saw is a bevel angle adjustment mechanism (Fig.
English DON’T support board or panel AWAY from the cut. SUPPORT DO support board or panel NEAR the cut. Place the wider portion of the saw shoe on that part of the work piece which is solidly supported, not on the section that will fall off when Cutting FIG. 10 FIG. 9 panel NEAR the cut (Fig. 9). DON’T support board or panel away from the cut (Fig. 10). Place the work with its “good” side – the one on which appearance is most important – down.
INSTALL RIP FENCE IN THIS DIRECTION POCKET CUTTING (FIG. 12) FIG. 12 CAUTION: Never tie the blade guard in a raised position. Never move the saw backwards when pocket cutting. This may cause the unit to raise up off the work surface which could cause injury. A pocket cut is one that is made in a floor, wall, or other flat surface. 1. Adjust the saw shoe so the blade cuts at desired depth. 2. Tilt the saw forward and rest front of the shoe on material to be cut. 3.
English DEWALT will repair, without charge, any defects due to faulty materials or workmanship for three years from the date of purchase. This warranty does not cover part failure due to normal wear or tool abuse. For further detail of warranty coverage and warranty repair information, visit www.dewalt.com or call 1-800-4-DEWALT (1-800433-9258). This warranty does not apply to accessories or damage Three Year Limited Warranty The charger is not serviceable.