INSTRUCTION MANUAL DC545-XE, DC546-XE, DC547-XE HEAVY-DUTY 18V CORDLESS ADHESIVE GUN
1. WORK AREA a. Keep work area clean and well lit. Cluttered and dark areas invite accidents. b. Do not operate power tools in explosive atmospheres, such as in the presence of flammable liquids, gases or dust. Power tools create sparks which may ignite the dust or fumes. c. Keep children and bystanders away while operating a power tool. Distractions can cause you to lose control. 2. ELECTRICAL SAFETY a. Power tool plugs must match the outlet. Never modify the plug in any way.
5. BATTERY TOOL USE AND CARE a. Ensure the switch is in the off position before inserting battery pack. Inserting the battery pack into power tools that have the switch on invites accidents. b. Recharge only with the charger specified by the manufacturer. A charger that is suitable for one type of battery pack may create a risk of fire when used with another battery pack. c. Use power tools only with specifically designated battery packs. Use of any other battery packs may create a risk of injury and fire.
Extension Cords • ANSI S12.6 (S3.19) hearing protection, • NIOSH/OSHA/MSHA respiratory protection. WARNING: Some dust created by power sanding, sawing, grinding, drilling, and other construction activities contains chemicals known to cause cancer, birth defects or other reproductive harm. Some examples of these chemicals are: • lead from lead-based paints, • crystalline silica from bricks and cement and other masonry products, and • arsenic and chromium from chemically-treated lumber (CCA).
.............. Class I Construction ................... (grounded) ............... Class II Construction ................... (double insulated) DANGER: Electrocution Hazard. Never attempt to open the battery pack for any reason. If battery pack case is cracked or damaged, do not insert into charger. Electric shock or electrocution may result. Damaged battery packs should be returned to service center for recycling.
Important Safety Instructions for Battery Chargers SAVE THESE INSTRUCTIONS: This manual contains important safety instructions for battery chargers. • Before using charger, read all instructions and cautionary markings on charger, battery pack, and product using battery pack. DANGER: Electrocution Hazard. 230 volts are present at charging terminals. Do not probe with conductive objects. Electric shock or electrocution may result. WARNING: Shock Hazard. Do not allow any liquid to get inside charger.
Indicator Light Operation up weekly or after 10 charge/discharge cycles or whenever the pack no longer delivers the same amount of work. To use the Automatic Tune-Up™, place the battery pack in the charger and leave it for at least 8 hours. The charger will cycle through the following modes. 1. The red light will blink continuously indicating that the 1-hour charge cycle has started. 2. When the 1-hour charge cycle is complete, the light will stay on continuously and will no longer blink.
WEAK BATTERY PACKS: Chargers can also detect a weak battery. Such batteries are still usable but should not be expected to perform as much work. In such cases, about 10 seconds after battery insertion, the charger will beep rapidly 8 times to indicate a weak battery condition. The charger will then go on to charge the battery to the highest capacity possible. WARNING: Shock hazard. Don’t allow any liquid to get inside charger. Electric shock may result.
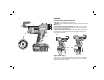
OPERATION FIG. 1 Installing and Removing the Battery Pack H NOTE: Make sure your battery pack is fully charged. CAUTION: To prevent inadvertant operation, lock trigger switch before removing or installing battery. To install the battery pack into the tool handle, align the base of the tool with the notch inside the tool’s handle and slide the battery pack firmly into the handle until you hear the lock snap into place (Fig. 2).
Trigger Switch Lock-off (Fig. 1) To Insert Material WARNING: Turn unit off and disconnect battery pack before installing and removing accessories, before adjusting or when making repairs. To prevent inadvertant operation, lock the trigger switch when the tool is not in use and when storing the tool. 1. To lock the trigger switch, push trigger switch lock-off (C) up. The tool will not operate with the switch in the locked position. 2. To unlock the trigger switch, push the trigger switch lock-off down.
FIG. 4 M L FIG. 5 N FIG. 6 P 310 ML CARTRIDGE HOLDER R Q O G S J FIG.
SAUSAGE HOLDER (FIG. 4) 1. Unscrew nozzle cap (M) and remove nozzle (N). 2. Press and hold plunger rod release trigger (A). Using the plunger rod handle (F), pull plunge rod (G) back to allow the caulk/adhesive casing to fit inside the sausage holder (L). 3. Insert sausage pack into sausage holder and cut casing according to manufacturer’s instructions. 4. With nozzle tip facing away from tool, screw nozzle cap back onto sausage holder. 5. Trim tip of nozzle cap for appropriate application (Fig. 5). 3.
CHARGER CLEANING INSTRUCTIONS WARNING: Shock hazard. Disconnect the charger from the AC outlet before cleaning. Dirt and grease may be removed from the exterior of the charger using a cloth or soft non-metallic brush. Do not use water or any cleaning solutions. This warranty does not apply to • Accessories • Damage caused where repairs have been made or attempted by others. • Damage due to misuse, neglect, wear and tear, alteration or modification.
13
DEWALT Battery and Charger Systems Battery Output Nominal Chargers/Charge Time 240 Volts 12 Volts Cat. Number Voltage Amp Hour 97014 98014 DW9106 DW9107 DW9108 DW9115 DW9116 DW9117 DW9118 DE9116 DE9118 DW911 DC011 DW0245 DE2046 DE9000 DW9109 DW0242 DE0240-XJ DW0240 DW9096 DE9095-XJ DE9091-XJ DW9091 DC9071 DE9074-XJ DW9072 DE9071-XJ DW9071 DW9050 DW9063 DW9062 DW9061 DW9048 DW9057 DW9046 DC9096 DC9091 DC9036 24 24 24 18 18 14.4 14.4 12 12 12 12 12 12 9.6 9.6 9.6 9.6 7.2 7.2 18 14.