
Extra Information


12
ENGLISH
● If the pack is left in the charger after the initial
charge, the charger will automatically initiate
the refresh mode. This mode will continue up to
8 hours, but the battery pack can be removed at
any time during the refresh mode.
Hot/Cold Pack Delay
When the charger detects a battery that is too hot
or too cold, it automatically starts a Hot/Cold Pack
Delay, suspending charging until the battery has
reached an appropriate temperature. The charger
then automatically switches to the pack charging
mode. This feature ensures maximum battery life.
The red indicator (13) blinks long, then short while
in the Hot/Cold Pack Delay mode.
Inserting and removing bits (fi g. A & C)
● Open the chuck by turning the sleeve (15)
counterclockwise and insert the bit shank.
● Place the bit in the chuck as far as it will go and
lift slightly before tightening.
● Tighten fi rmly by turning the sleeve clockwise.
● To remove the bit, proceed in reverse order.
Selecting the operating mode or adjusting the
torque (fi g. D)
The collar of this tool has a wide range of positions
for the adjustment of the torque to suit the size of
the screw and the workpiece material. For torque
adjustment, refer to the section "Screwdriving".
● Select the drilling mode or torque by aligning
the symbol or number on the collar (4) with the
indicator (16) on the housing.
DC945/DC935/DC925
These tools can be used in the following operating
modes:
Rotary drilling: for steel, wood and
plastics
Percussion drilling: for masonry
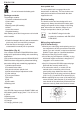
Forward/reverse slider (fi g. E)
● To select forward or reverse rotation, use the
forward/reverse slider (2) as shown (see arrows
on tool).
Always wait until the motor has come to
a complete standstill before changing
the direction of rotation.
Three-gear selector (fi g. F)
Your tool is fi tted with a three-gear selector (6) to
vary the speed/torque ratio.
1 low speed/high torque
2 medium speed/medium torque
3 high speed/low torque
For speed rates, refer to the technical data.
Do not change gears at full speed or
during use.
Instructions for use
● Always observe the safety instructions
and applicable regulations.
● Be aware of the location of pipework
and wiring.
● Apply only a gentle pressure to the tool.
Excessive force does not speed up
drilling but decreases tool performance
and may shorten tool life.
Prior to operation:
● Make sure your battery pack is (fully) charged.
● Make sure the battery pack is properly seated.
● Insert the appropriate bit.
● Mark the spot where the hole is to be drilled.
Switching on and off (fi g. A & E)
● To run the tool, press the variable speed switch
(1). The pressure exerted on the variable speed
switch determines the tool speed.
● To stop the tool, release the switch.
● To lock the tool in the off position, move the
forward/reverse slider (2) to the central position.
Screwdriving (fi g. A)
● Select forward or reverse rotation using the
slider (2).
● Set the collar (4) to position 1 and begin
screwdriving (low torque).
● If the clutch ratchets too soon, adjust the collar
to increase the torque as required.