
Use and Care Manual


ENGLISH
8
NOTE: The light will not time out until the entire unit
timesout.
ASSEMBLY AND ADJUSTMENTS
WARNING: To reduce the risk of serious personal
injury, turn unit off, remove the battery pack
and disconnect it from the power source before
making any adjustments or removing/installing
attachments or accessories. An accidental start-up
can causeinjury.
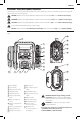
Hose and Accessory Storage (Fig. A)
12V DC Vehicle Connector and Cord
• The 12V DC vehicle connector
19
can be stored inside
the storage compartment on the side of theinflator.
High-Pressure Hose
• The high-pressure hose
10
is located on a storage
channel on the side of the unit. Wrap the high-pressure
hose inside the channel and secure in the providedclips.
High-Volume Hose
• The high-volume hose
5
is located on a storage
channel on the side of the unit. Wrap the high-volume
hose inside the channel and secure in the two clips.
Accessories
• The accessories
15
,
16
and
17
are stored in snap
clips located on the side of theinflator.
Fitting the Accessories (Fig. A)
The high-volume hose
5
comes fitted with a standard
tapered nozzle
13
.
The high-pressure hose
10
can be fitted with the following
attachments which can be found on the side storage panel:
• an inflation needle
16
,
• a high-pressure tapered nozzle
15
, and
• a Presta valve adapter
17
.
NOTE: Make sure each of these adapters is firmly locked in
place before turning on theinflator.
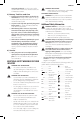
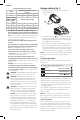
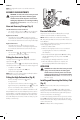
Fitting the High-Volume Hose (Fig. D)
• Remove the high-volume hose
5
from its
storagelocation.
• Line up the notches
of the hose with the nubs
21
of the
high volume pump outlet/inflation port
18
. Then, slide
the hose on and twist counter-clockwise tosecure.
• To remove, twist the hose clockwise and slide hoseoff.
Many inflatables have an internal flap that prevents air loss
during inflation, especially air mattresses. Unless this flap is
displaced by the nozzle the inflatable will not inflate. Push
the nozzle firmly into the valve to make sure that you push
this flap out of theway.
Fig. D
5
21
18
Pressure Calibration
The pressure sensor can be re-calibrated for use in high
elevations (recommended over 5000 ft [1524m]).
NOTE: Calibration will not be stored when the inflator is
OFF. Every time the inflator is turned on, it will be reset to sea
levelcalibration.
To re-calibrate, the inflator must have a battery installed or it
must be plugged into a powersource.
1. Make sure inflator isOFF.
2. Make sure the high-pressure hose is not connected
to anything. Pressure in the hose will disable
thecalibration.
3. Press and hold the LED light switch
3
. While holding
the LED light switch, press the power switch
2
andrelease.
4. Keep holding the LED light switch for 5seconds.
5. When the calibration sequence is complete, the
pressure display will flash and then display "0.0".
OPERATION
WARNING: To reduce the risk of serious personal
injury, turn unit off, remove the battery pack
and disconnect it from the power source before
making any adjustments or removing/installing
attachments or accessories. An accidental start-up
can causeinjury.
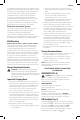
Installing and Removing the Battery Pack
(Fig. E)
NOTE: For best results, make sure your battery pack is
fullycharged.
To install the battery pack
12
into the inflator, align the
battery pack with the rails inside inflator's battery port and
slide it into the port until the battery pack is firmly seated
and ensure that it does notdisengage.
To remove the battery pack from the tool, press the release
button
11
and firmly pull the battery pack out of the tool
handle. Insert it into the charger as described in the charger
section of thismanual.
NOTE: The inflator will not chargebatteries.