
Extra Information


9
OPERATION
WARNING: To reduce the risk of serious personal injury, turn the tool off and
disconnect the battery pack before making any adjustments or removing/installing
attachments or accessories. An accidental start-up can cause injury.
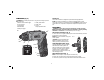
Installing and Removing the Battery Pack (Fig. 4)
NOTE: For best results, make sure your battery pack is
fully charged.
To install the battery pack (G) into the tool handle,
align the battery pack with the recess in the tool’s
handle and slide it into the handle until the battery
pack is firmly seated in the tool and ensure that it does
not disengage.
To remove the battery pack from the tool, press the
release button (F) and firmly pull the battery pack
out of the tool handle. Insert it into the charger as
described in the charger section of this manual.
BATTERY FUEL GAUGE (FIG. 5)
The D
EWALT cordless screwdriver has a fuel gauge
which consists of three green LED lights that
indicate the level of charge remaining in the
battery pack.
To actuate the fuel gauge, press and hold
the motion control activation trigger (A). A
combination of the three green LED lights
will illuminate designating the level of charge
left. When the level of charge in the battery
is below the usable limit, the fuel gauge will
not illuminate and the battery will need to be
recharged.
NOTE: The fuel gauge is only an indication of the charge left on the battery pack.
It does not indicate tool functionality and is subject to variation based on product
components, temperature and end-user application.
FIG. 4
F
G
FIG. 5
A
For more information regarding fuel gauge battery packs, please contact Stanley Black
& Decker, 82 Taryn Drive, Epping, VIC 3076 Australia or call 1800 338 002 or (NZ)
0800 339 258.
To Operate
Your screwdriver uses gyroscopic technology to sense your hand motion. To operate,
press in the motion control activation trigger and turn your hand in the direction that
you want the screwdriver to operate.
SETTING INITIAL STARTING POINT
1. Grasp the screwdriver as shown in Figure 6.
2. Press and hold in the motion control activation trigger.
3. When the LED illuminates the tool is ready for use.
4. To reset initial starting point first release the motion control activation trigger.
Move tool to new position, then press and hold in the motion control activation
trigger.
OPERATING IN FORWARD DIRECTION
1. Grasp the screwdriver as shown in Figure 6.
2. Engage head of fastener with screwdriver accessory on work piece. Follow
instructions for setting initial starting point.
3. Rotate your hand to the right and the screwdriver will activate in the forward
direction.
OPERATING IN REVERSE DIRECTION
1. Grasp the screwdriver as shown in Figure 6.
2. Engage head of fastener with screwdriver accessory on work piece. Follow
instructions for setting initial starting point.
3. Rotate your hand to the left and the screwdriver will activate in the reverse
direction.
To turn the tool off, release the motion control activation trigger.
NOTE: When the tool is not in use or during transit please be sure to remove any
accessory from the tool.